Fought At Cameliard: Guard Post
653 days 17 hours 53 minutes ago
Operation Patient Sparrow
View Linked Report - CLICK HERE 300 POINTSYu Jing activity has been noted on the outskirts of the Cameliard Guard Post. Our objective is to secure the area, pushing out any hostile forces encountered. The coordination of the human forces appears to be quite sophisticated – it is likely that they have employed the use of an advanced clone to lead them in the push toward control of the facility. With this in mind, the strategic importance of the Guard Post is likely to be crucial in the human efforts on Concilium Prima.
We will insert a pair of operatives within the human’s ranks and attempt to remove any significant threats before advancing on the Guard Post proper.
Mission: The Armory
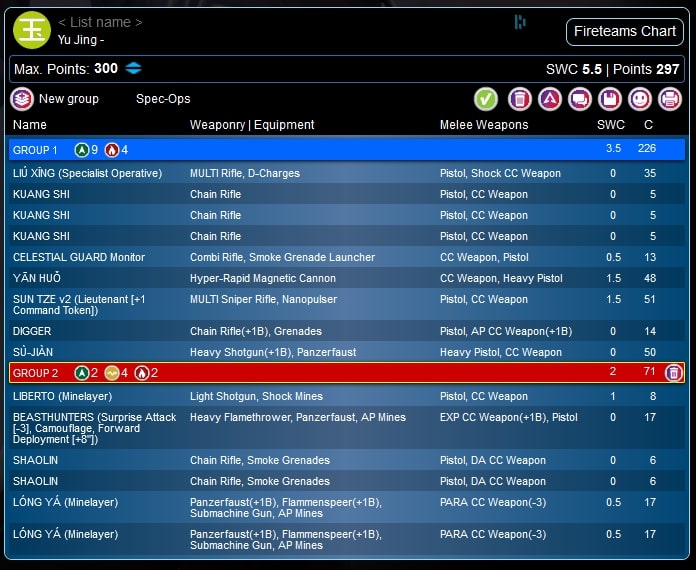
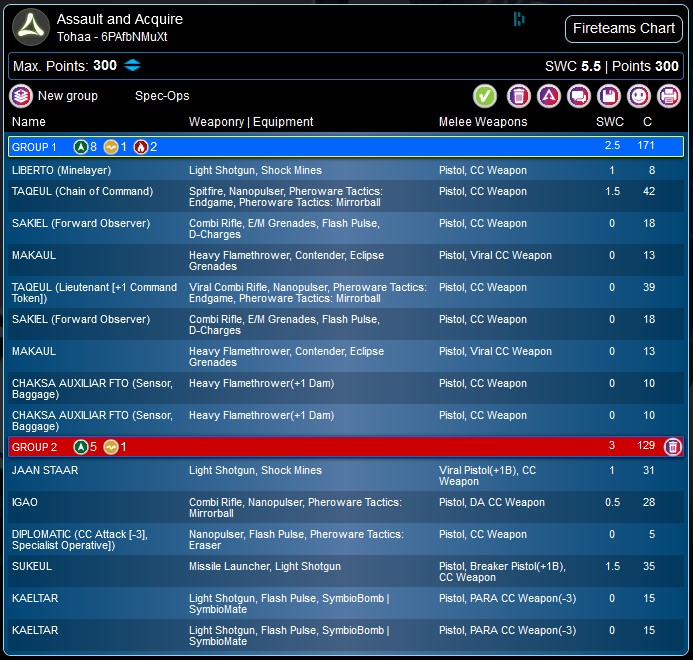
Forces: Vanilla Yu Jing (Khepri) versus Tohaa (Hey It’s Bren) – 300 points
Deploy First: Yu Jing
First Turn: Yu Jing
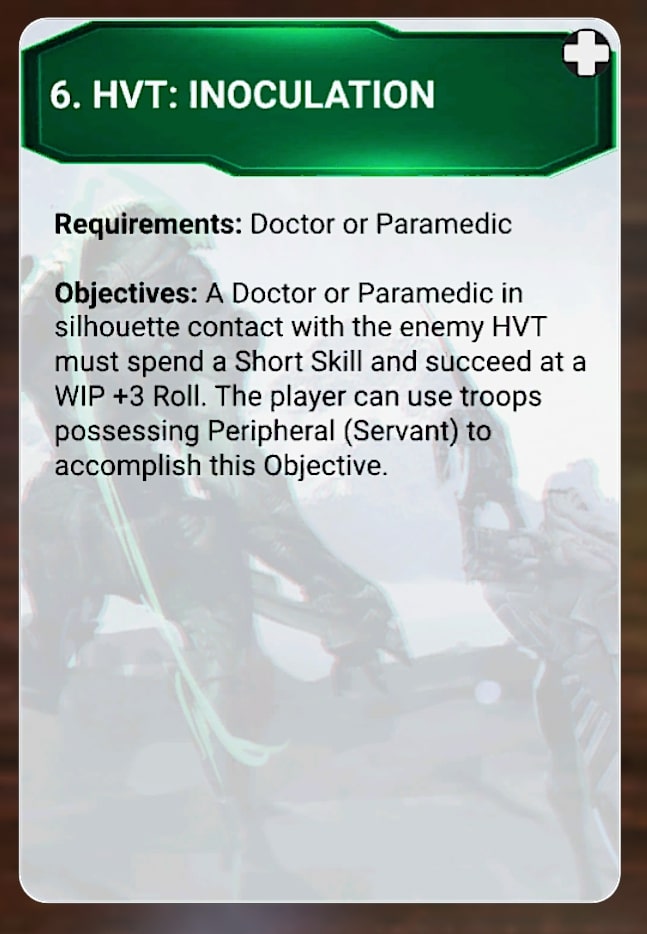
We both pulled HVT-related objectives, with Yu Jing’s pair being impossible to complete. Yu Jing chose HVT: Inoculation.
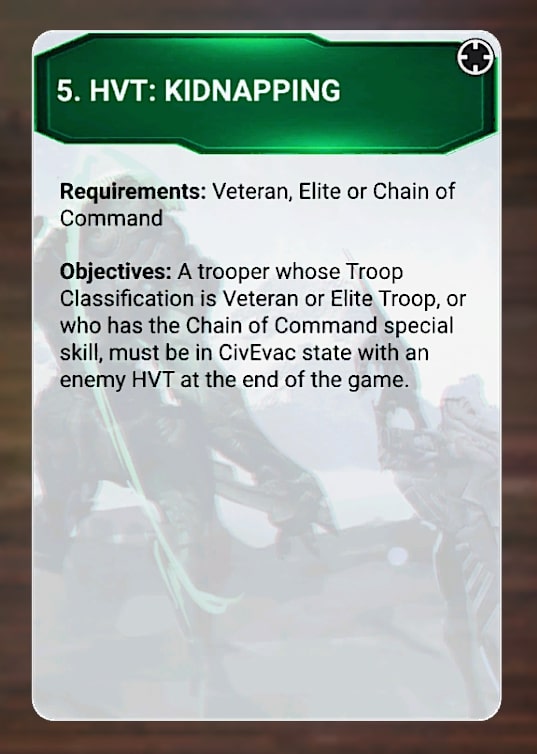
While difficult, my objective choices were possible. In the end, I went with HVT: Kidnapping, knowing full well that there was a very slim chance that I’d be able to make it happen.
Yu Jing
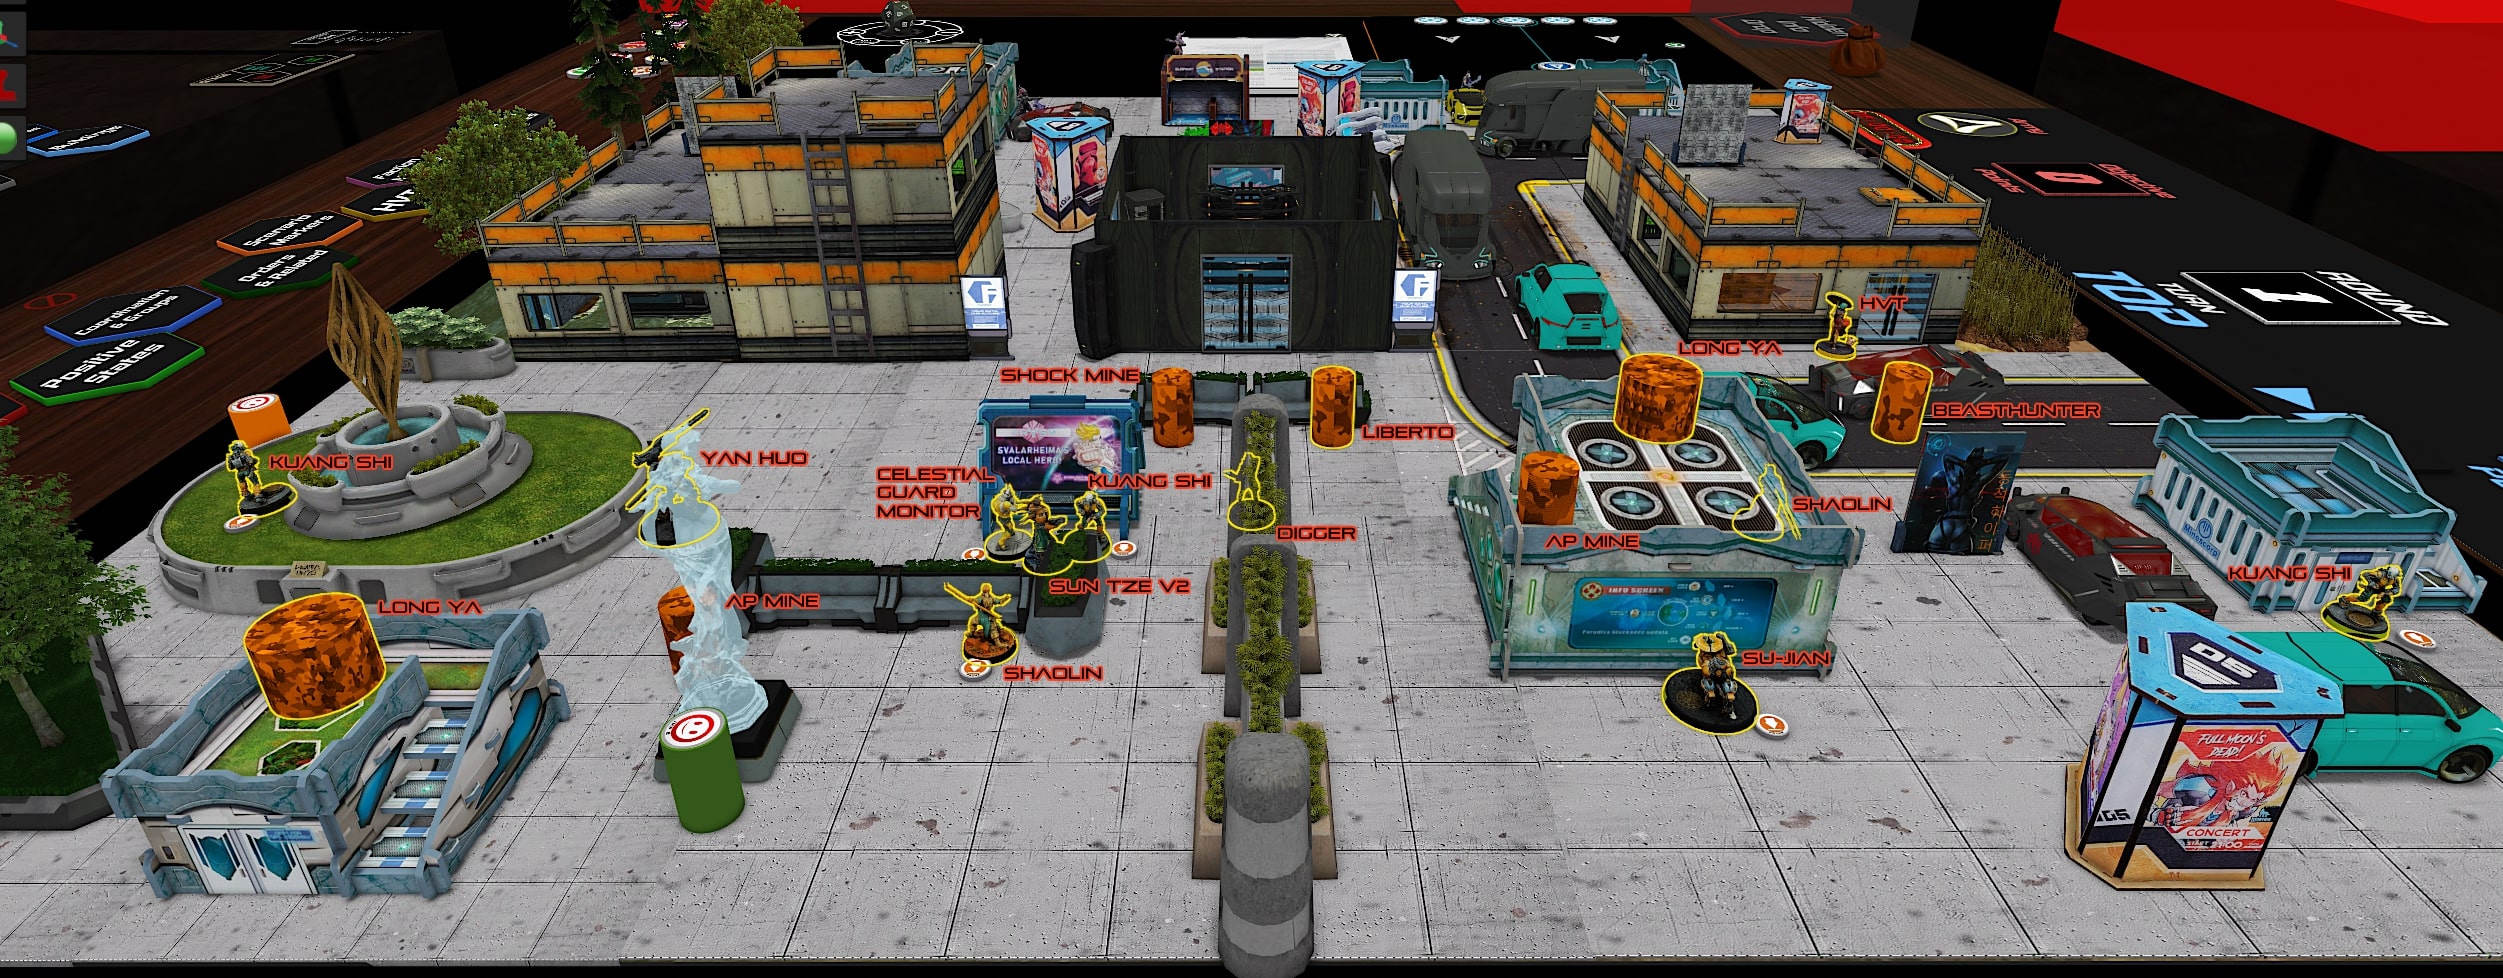
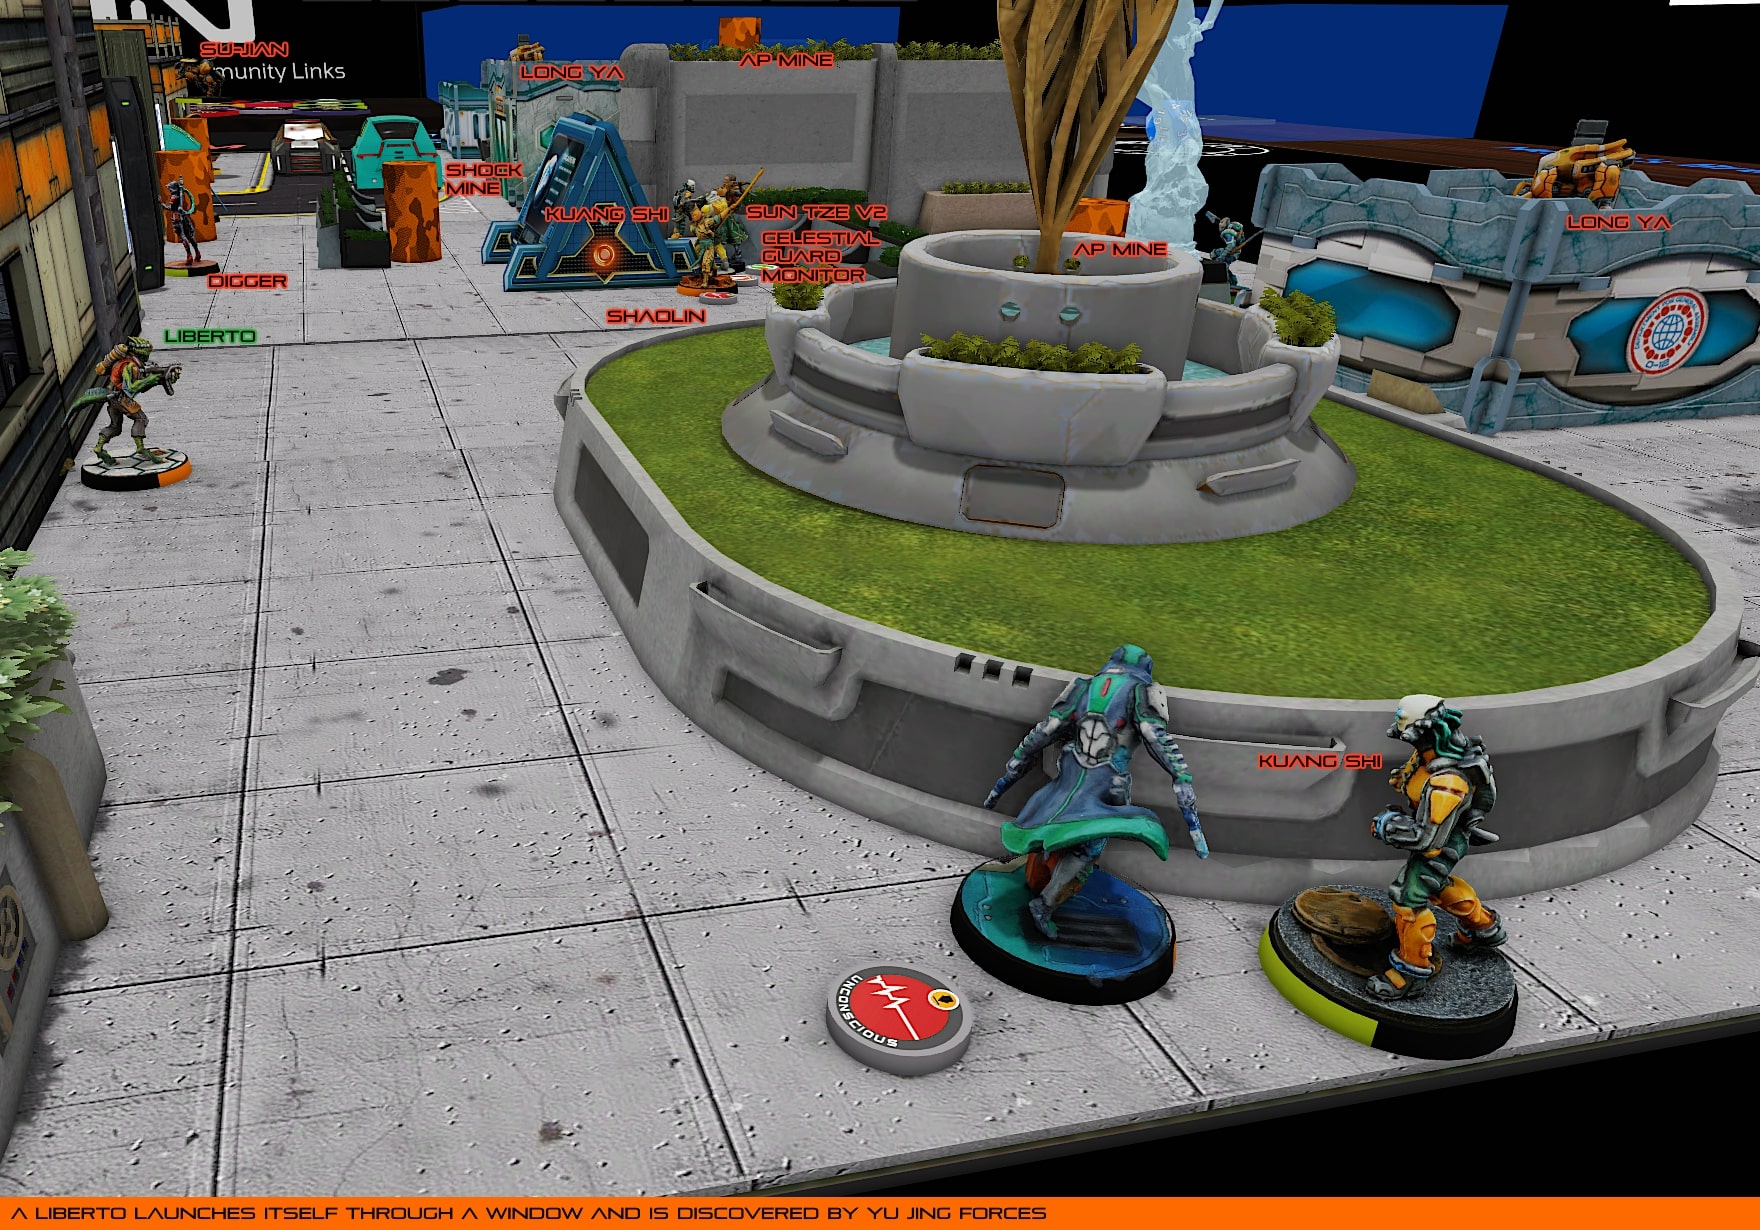
Faced with a relatively open deployment zone, with a few places to hide and an exclusion zone to hamper mobility, several Kuang Shi were placed up front. A pair of Long Ya found spots high up to get the most out of their unlimited Panzerfausts (Cameliard features the Arsenal special rule, which allows troopers to ignore the Expendable trait of any weapon or piece of equipment). A Liberto was put down watching the Armory doors, and a Beasthunter took a flank position, ready to move up under cover of camouflage.
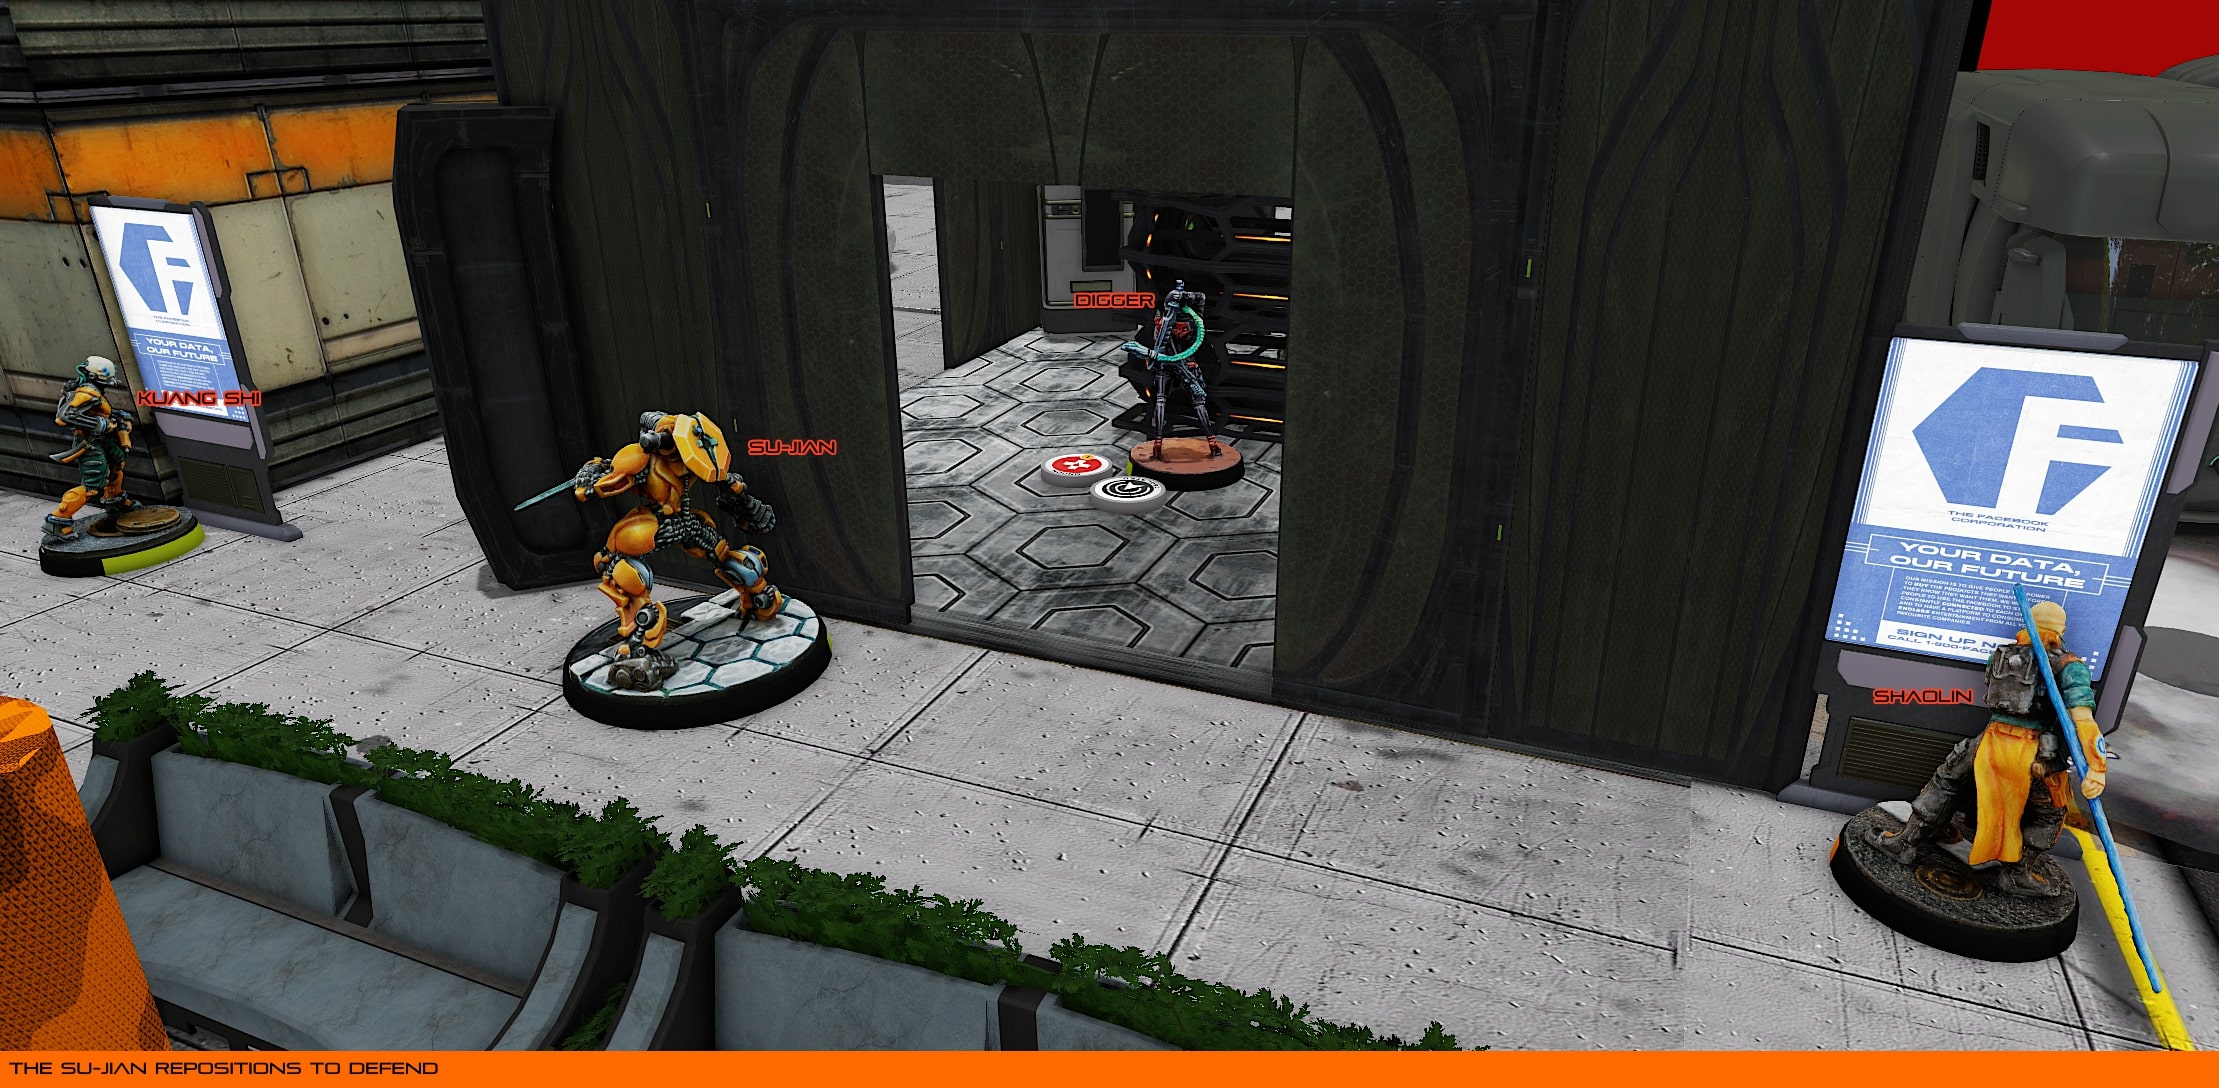
The Su-Jian was placed well back, intending to move forward in turns two or three, rather than being exposed too early. Both Shaolin Monks were placed centrally to obscure the two fire lanes alongside the Armory with smoke, and the Celestial Guard Monitor was placed near the middle of the table for a similar support role. To assist the Liberto, a Digger went down directly across from the Armory, ready to charge in and lay down templates once the doors opened.
Due to Strategos L2, both the Yan Huo and Sun Tze were held back. The Yan Huo found itself placed aggressively on the deployment line, trading safety for mobility, and relying on its prodigious armor to keep it safe. Sun Tze went alongside the Celestial Guard Monitor and Kuang Shi, hoping to make good use of his Multispectral Visor and MULTI Sniper.
Tohaa
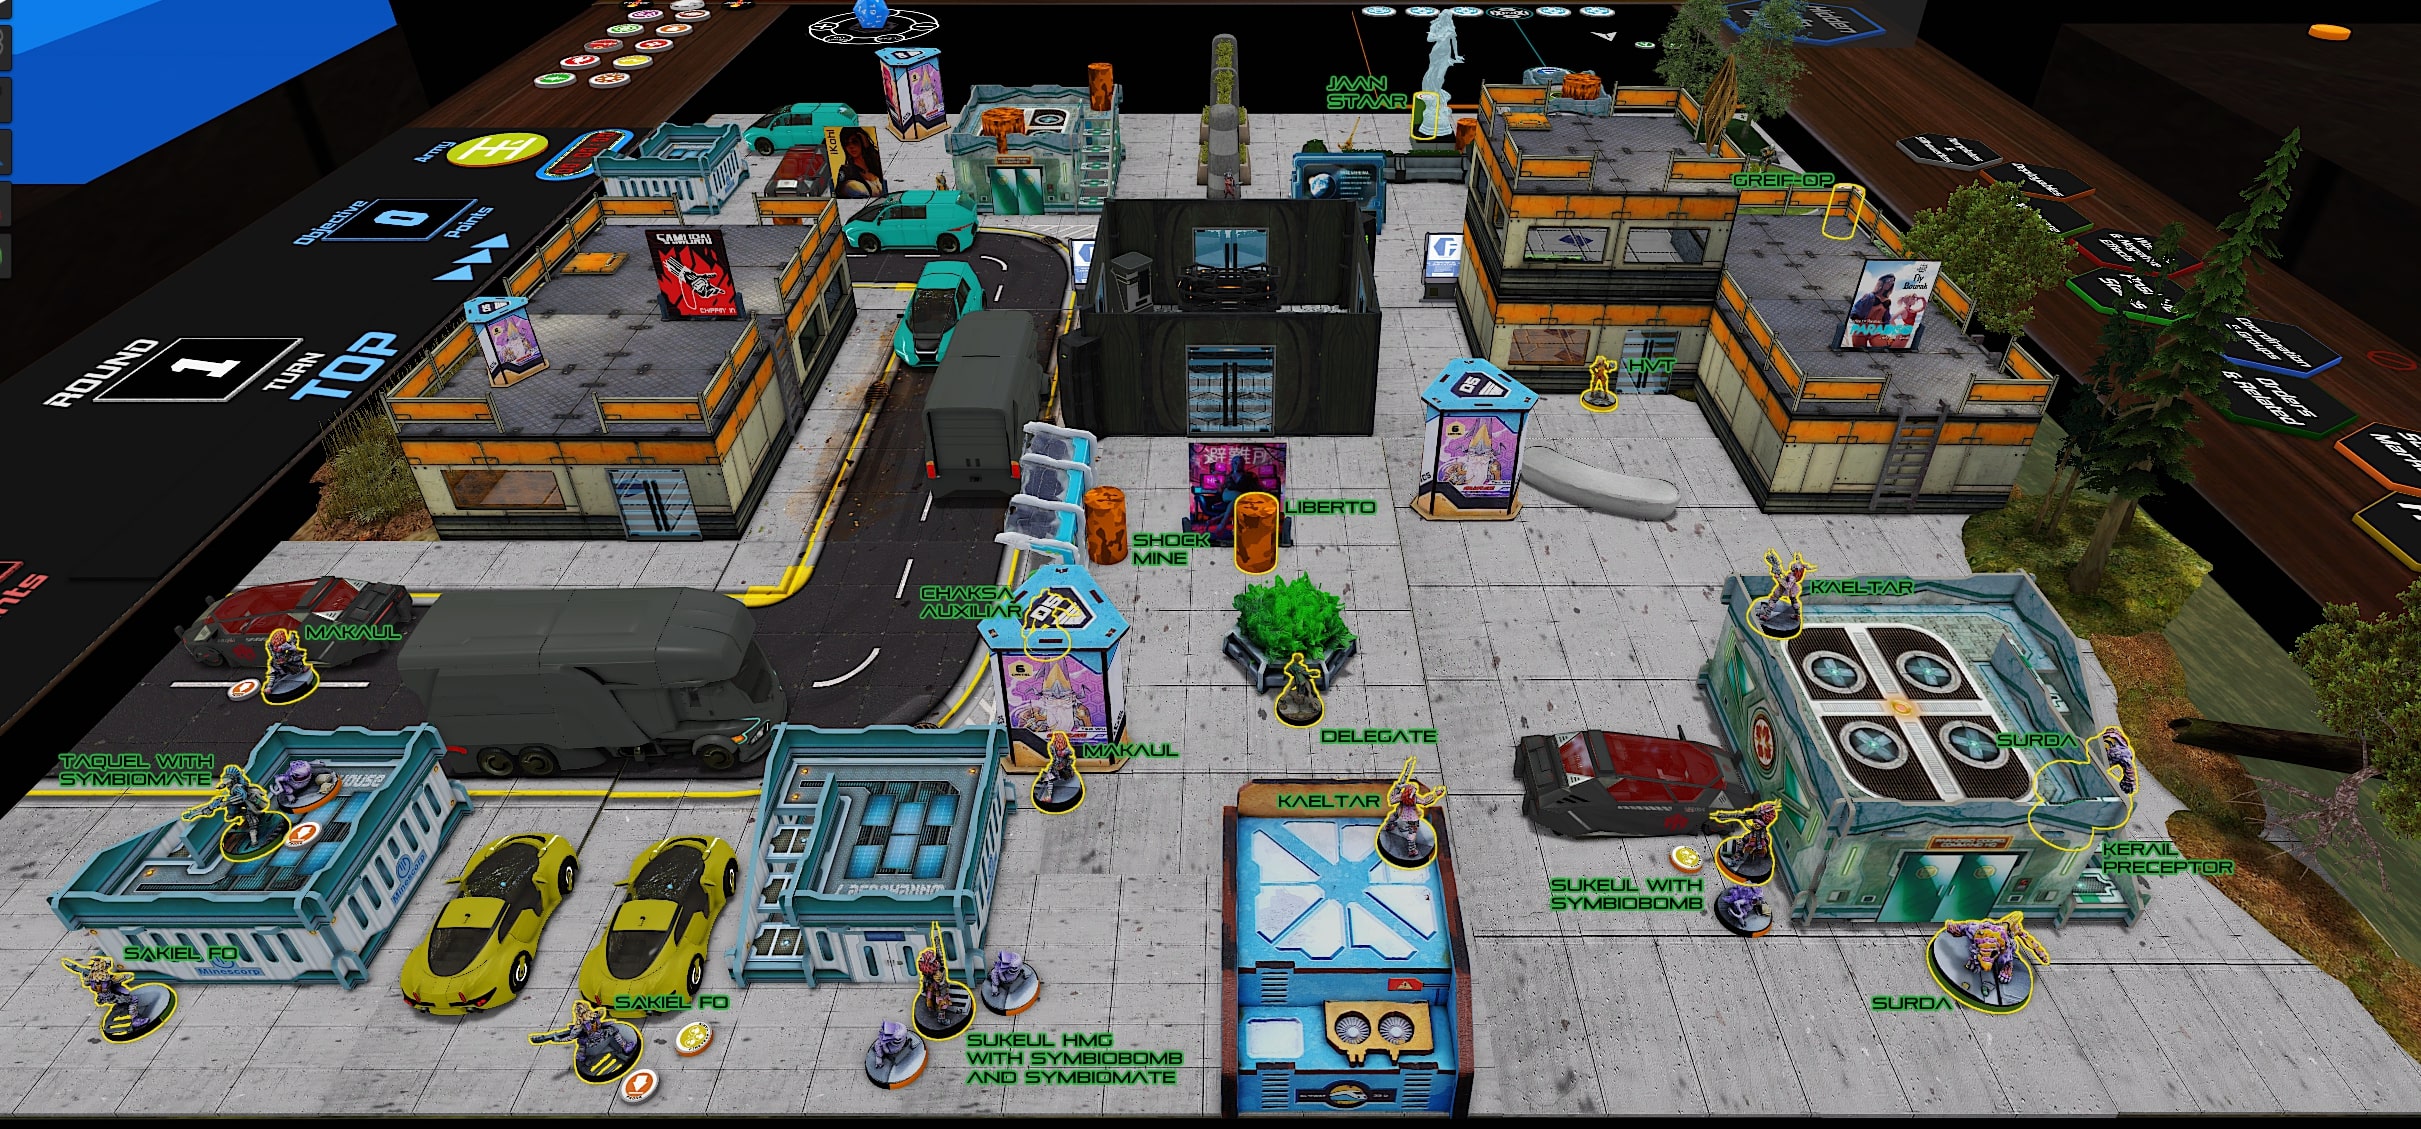
Being behind already by losing the Lieutenant roll to Sun Tze and having to go second, my deployment was relatively conservative. Without many decent places to hide, I deployed my Greif in an awkward spot along the flank, hoping to pressure the side by placing the impersonator prone. Unfortunately, the exclusion zone did me about as many favors as Yu Jing, so there wasn’t much space to maneuver.
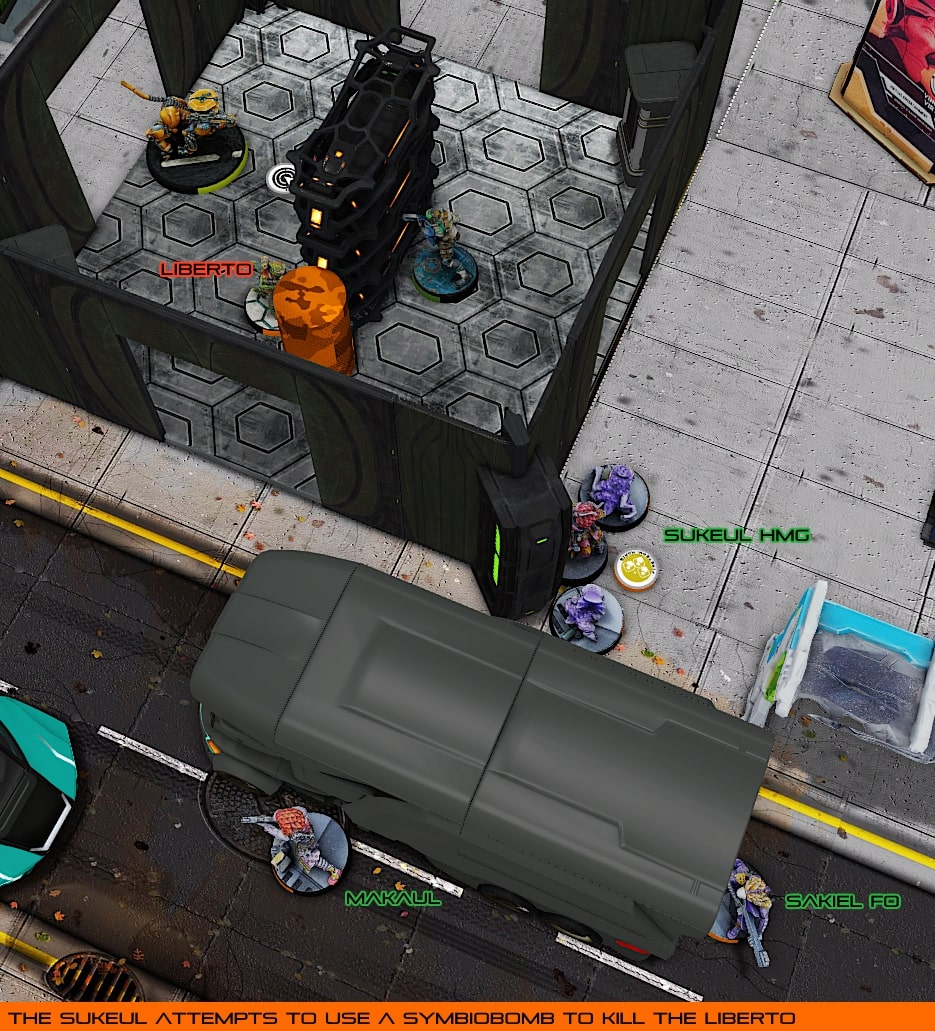
I placed my Taqeul triad carefully, knowing that I was running a list without Chain of Command in favor of a pair of HMG and Missile Launcher Sukeul’s. I let the HMG poke out just slightly, trying to cover the line from the back of my DZ to the right of the Armory, in case one of the many Impetuous models decided to run down the lane. Similar to my opponent, my Liberto went up front, opposite an Armory door, with a Delegate watching its back.
I popped both Kaeltar up high – having dispensed their Symbiobombs and Mates, I thought I would be able to catch reckless troopers with a few WIP 14 Flash Pulses, and the linked Sukeul Missile Launcher was placed with an eye on the Armory door, and yet more firepower looking down the long right lane.
Knowing that I was leaving the left lane a little exposed, I hedged by bets by placing a Chaska Auxiliar watching the side. It had a linked Makaul just behind, with another opposite the pair on my far left, which I hoped would be enough of a deterrent.
I held Jaan back, and once Sun Tze went down, knowing that I didn’t have a great place for the Impersonator elsewhere, I risked the roll and was lucky enough to land him right behind enemy lines, looking directly at the back of the obvious Lieutenant’s head. Chaos and opportunity, indeed.
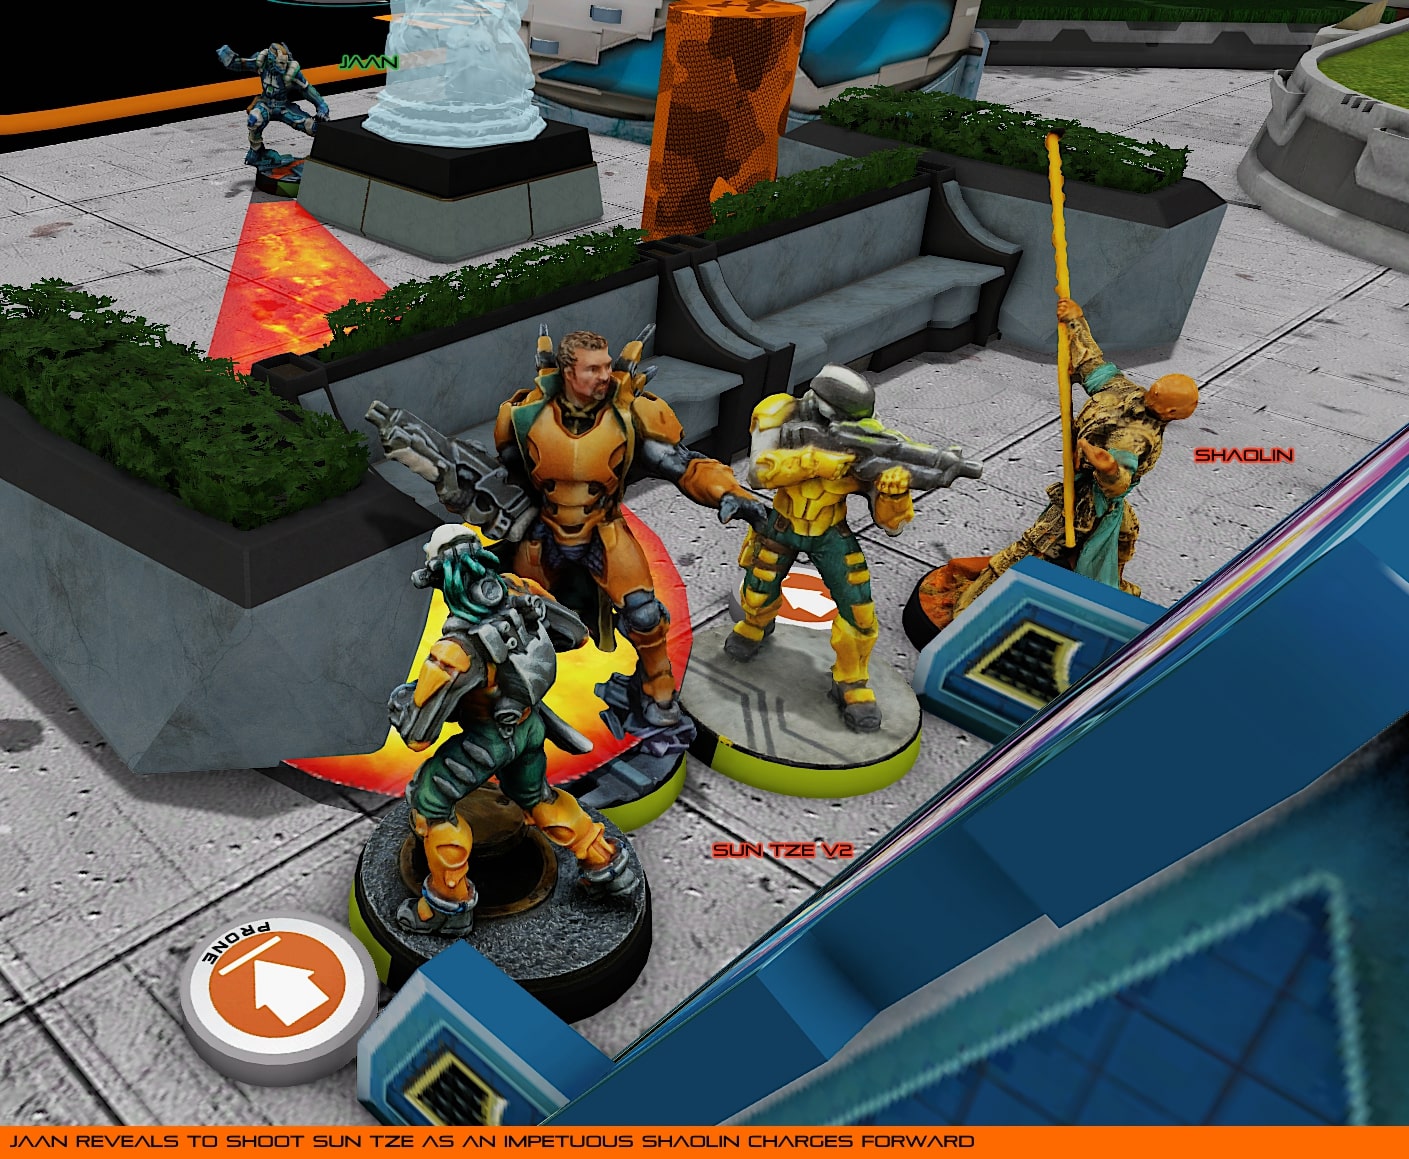
Yu Jing began the game by moving their Impetuous troops forward. Unfortunately, Jaan Staar took the opportunity to come out of Impersonation state and lay down a template, catching an unfortunate Shaolin Monk, along with Sun Tze, both of whom failed Dodges and armor rolls. Sun Tze failed guts to fall prone, but due to how bunched the Yu Jing units were, wasn’t able to gain cover facing the Tohaa side of the table. Before dying, the Shaolin was able to catch Jaan in a Chain Rifle, causing a wound to the Impersonator.
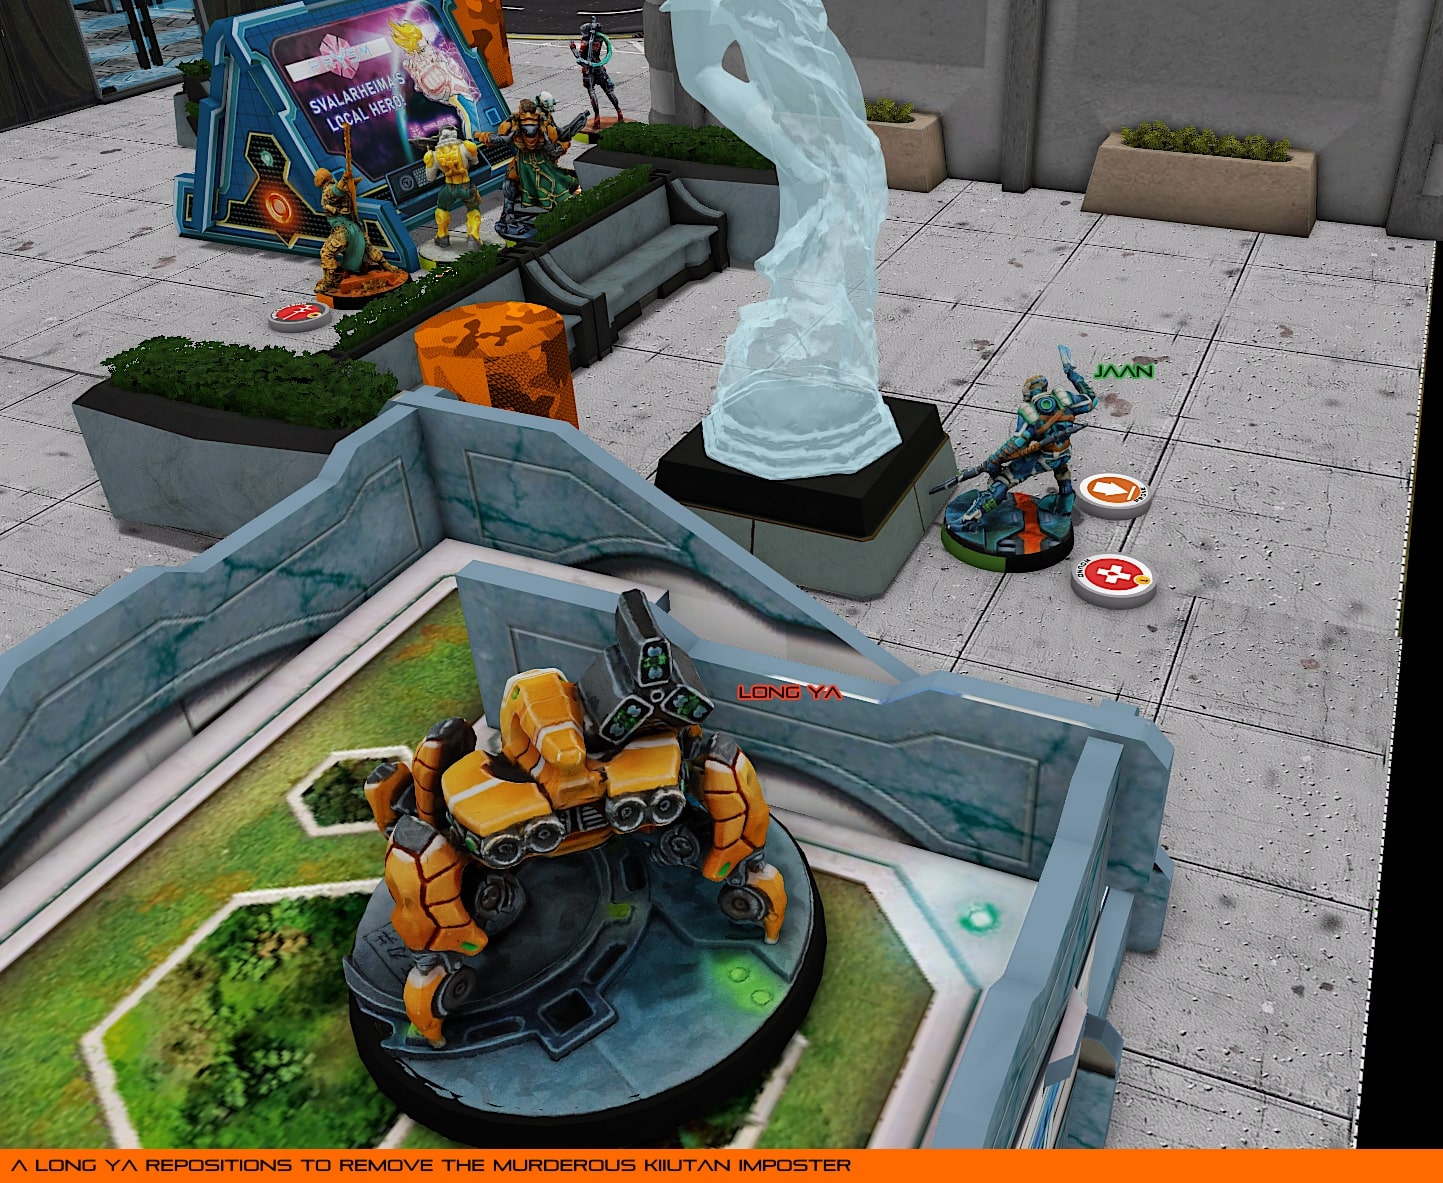
A Yu Jing Long Ya revealed to remove the threat to the back line, templating Jaan who failed a Dodge and second armor roll, falling unconscious.
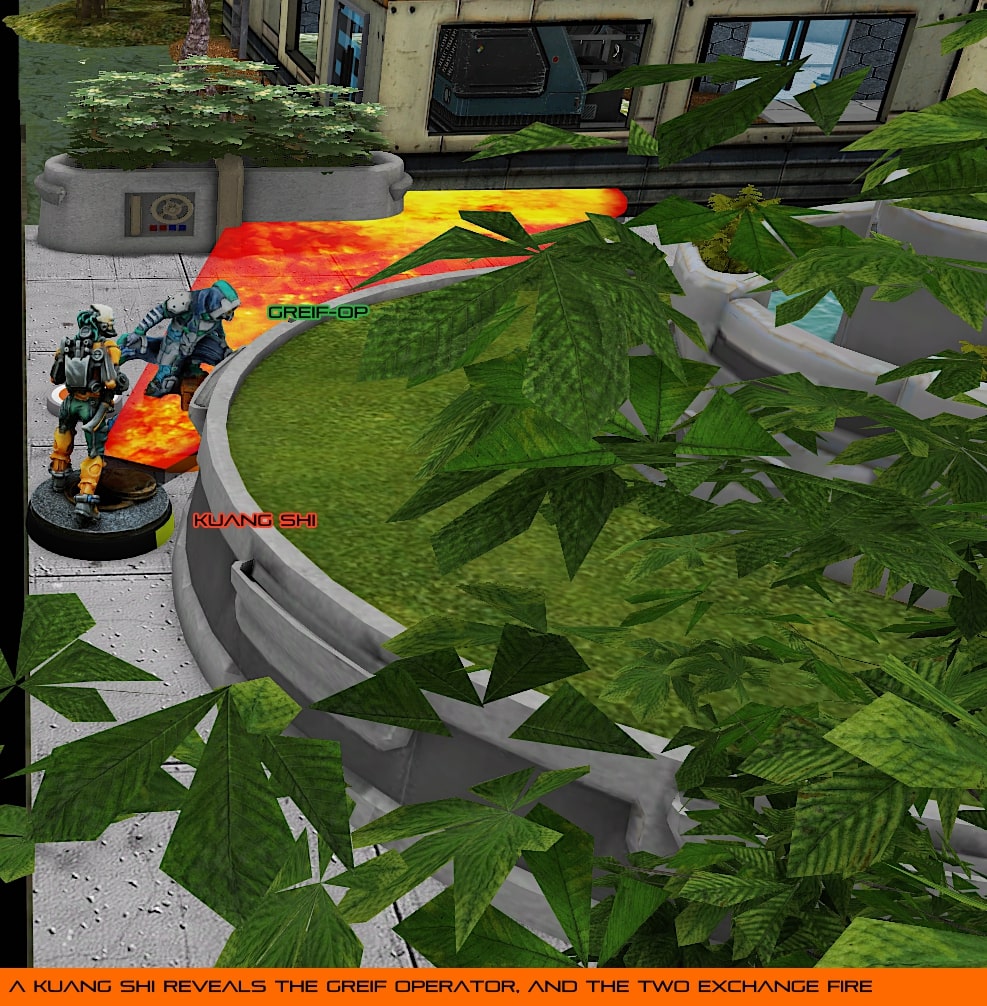
With one Impersonator dealt with, a Kuang Shi forced a Grief Operator to reveal – both units shot at close range, but no wounds were taken by either during the exchange.
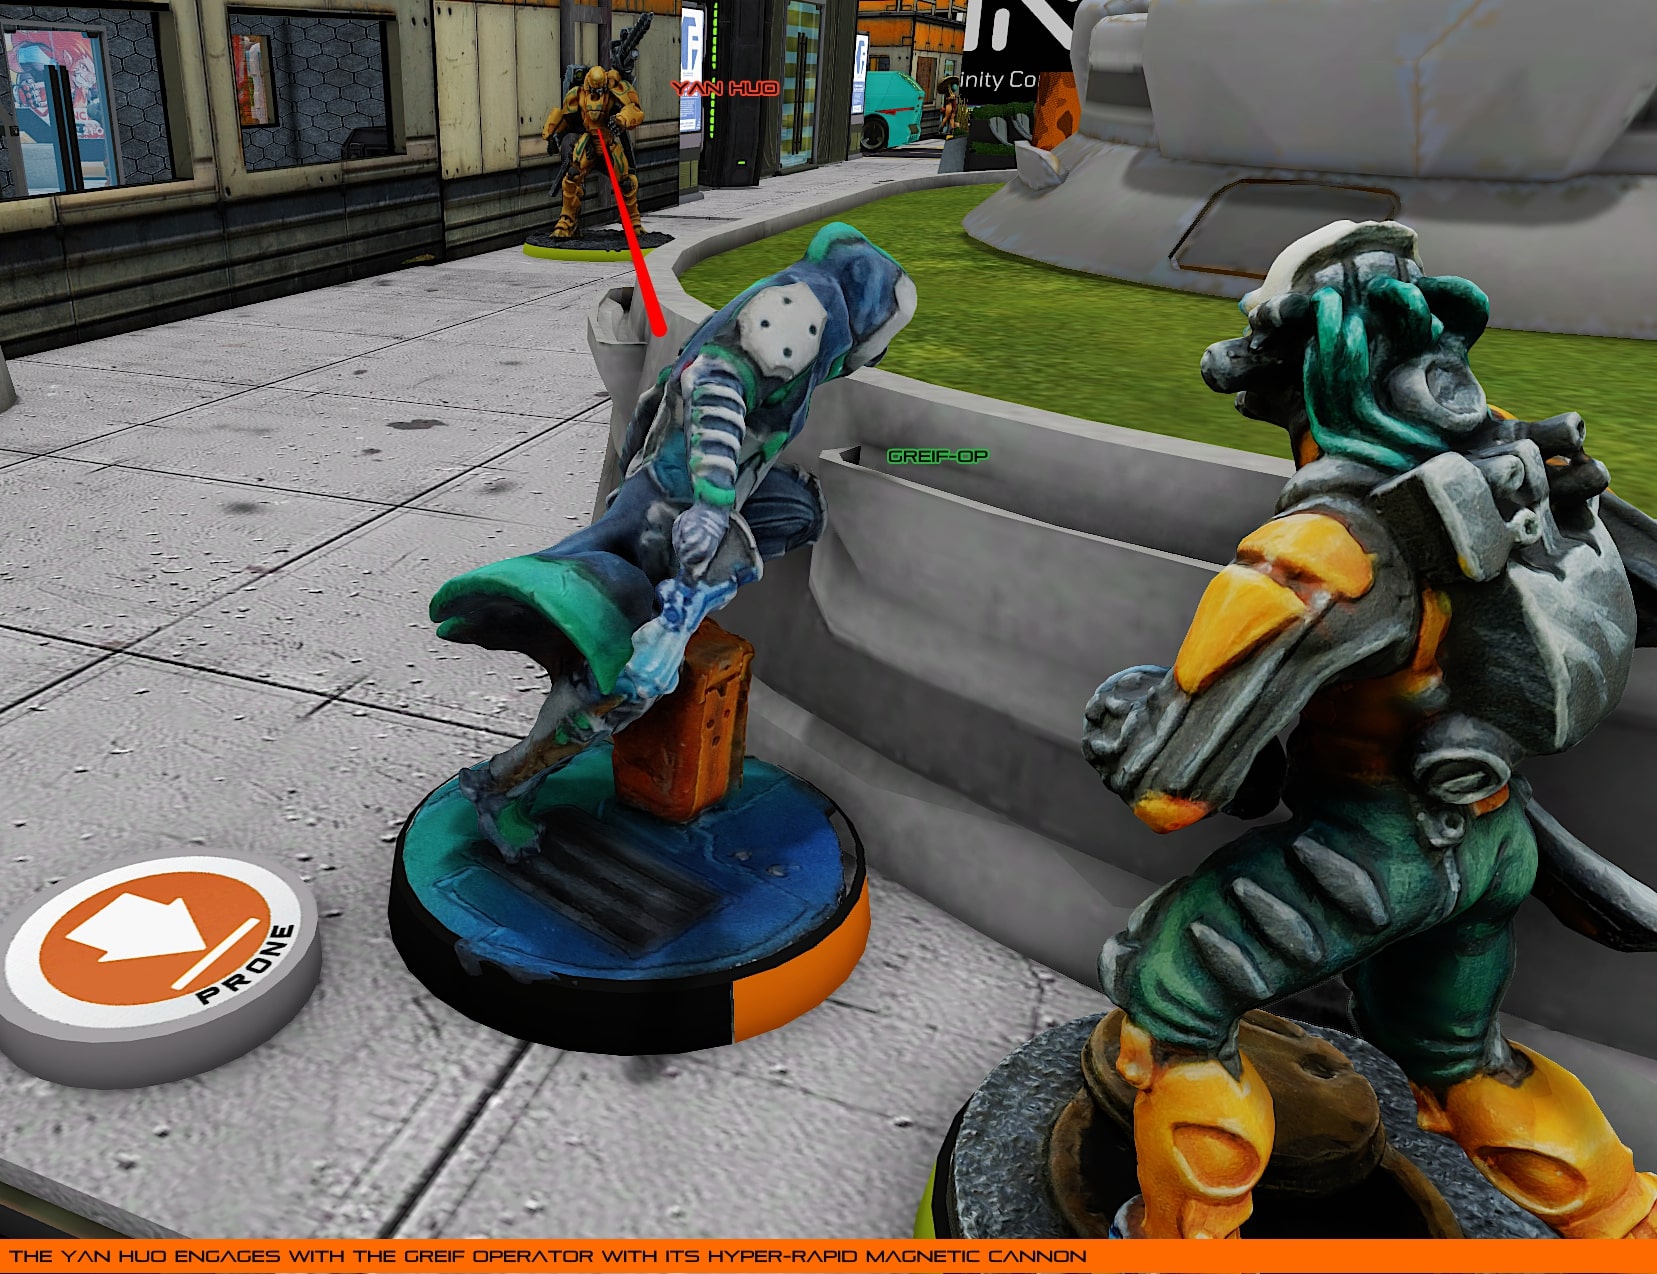
Pressing forward to gain ground, a Yan Huo armed with a Hyper-Rapid Magnetic Cannon was finally able to kill the second Impersonator, removing the pressure from the Yu Jing deployment zone.
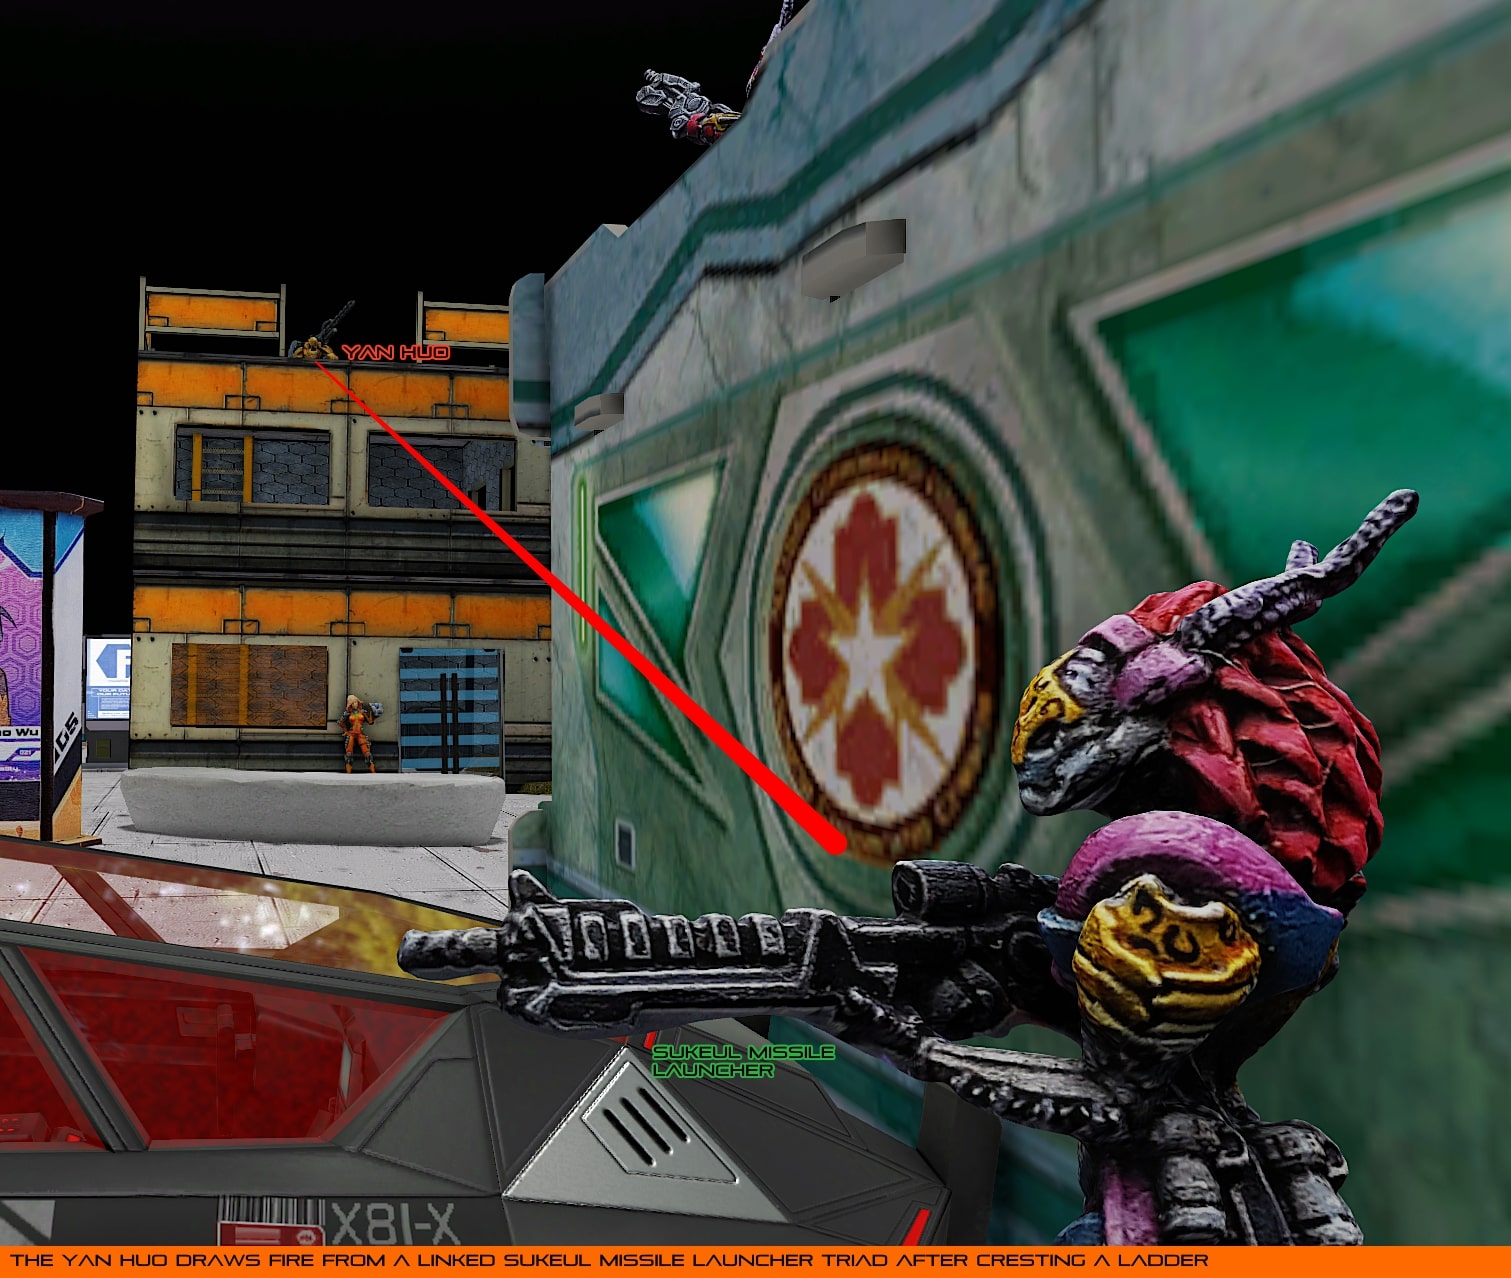
Seeking to gain better angles on the battlefield, the Yan Huo spent the final order in group one to climb the central building, but was seen by a watchful Sukeul Triad as it crested the ledge, and was subsequently blasted into meaty bits.
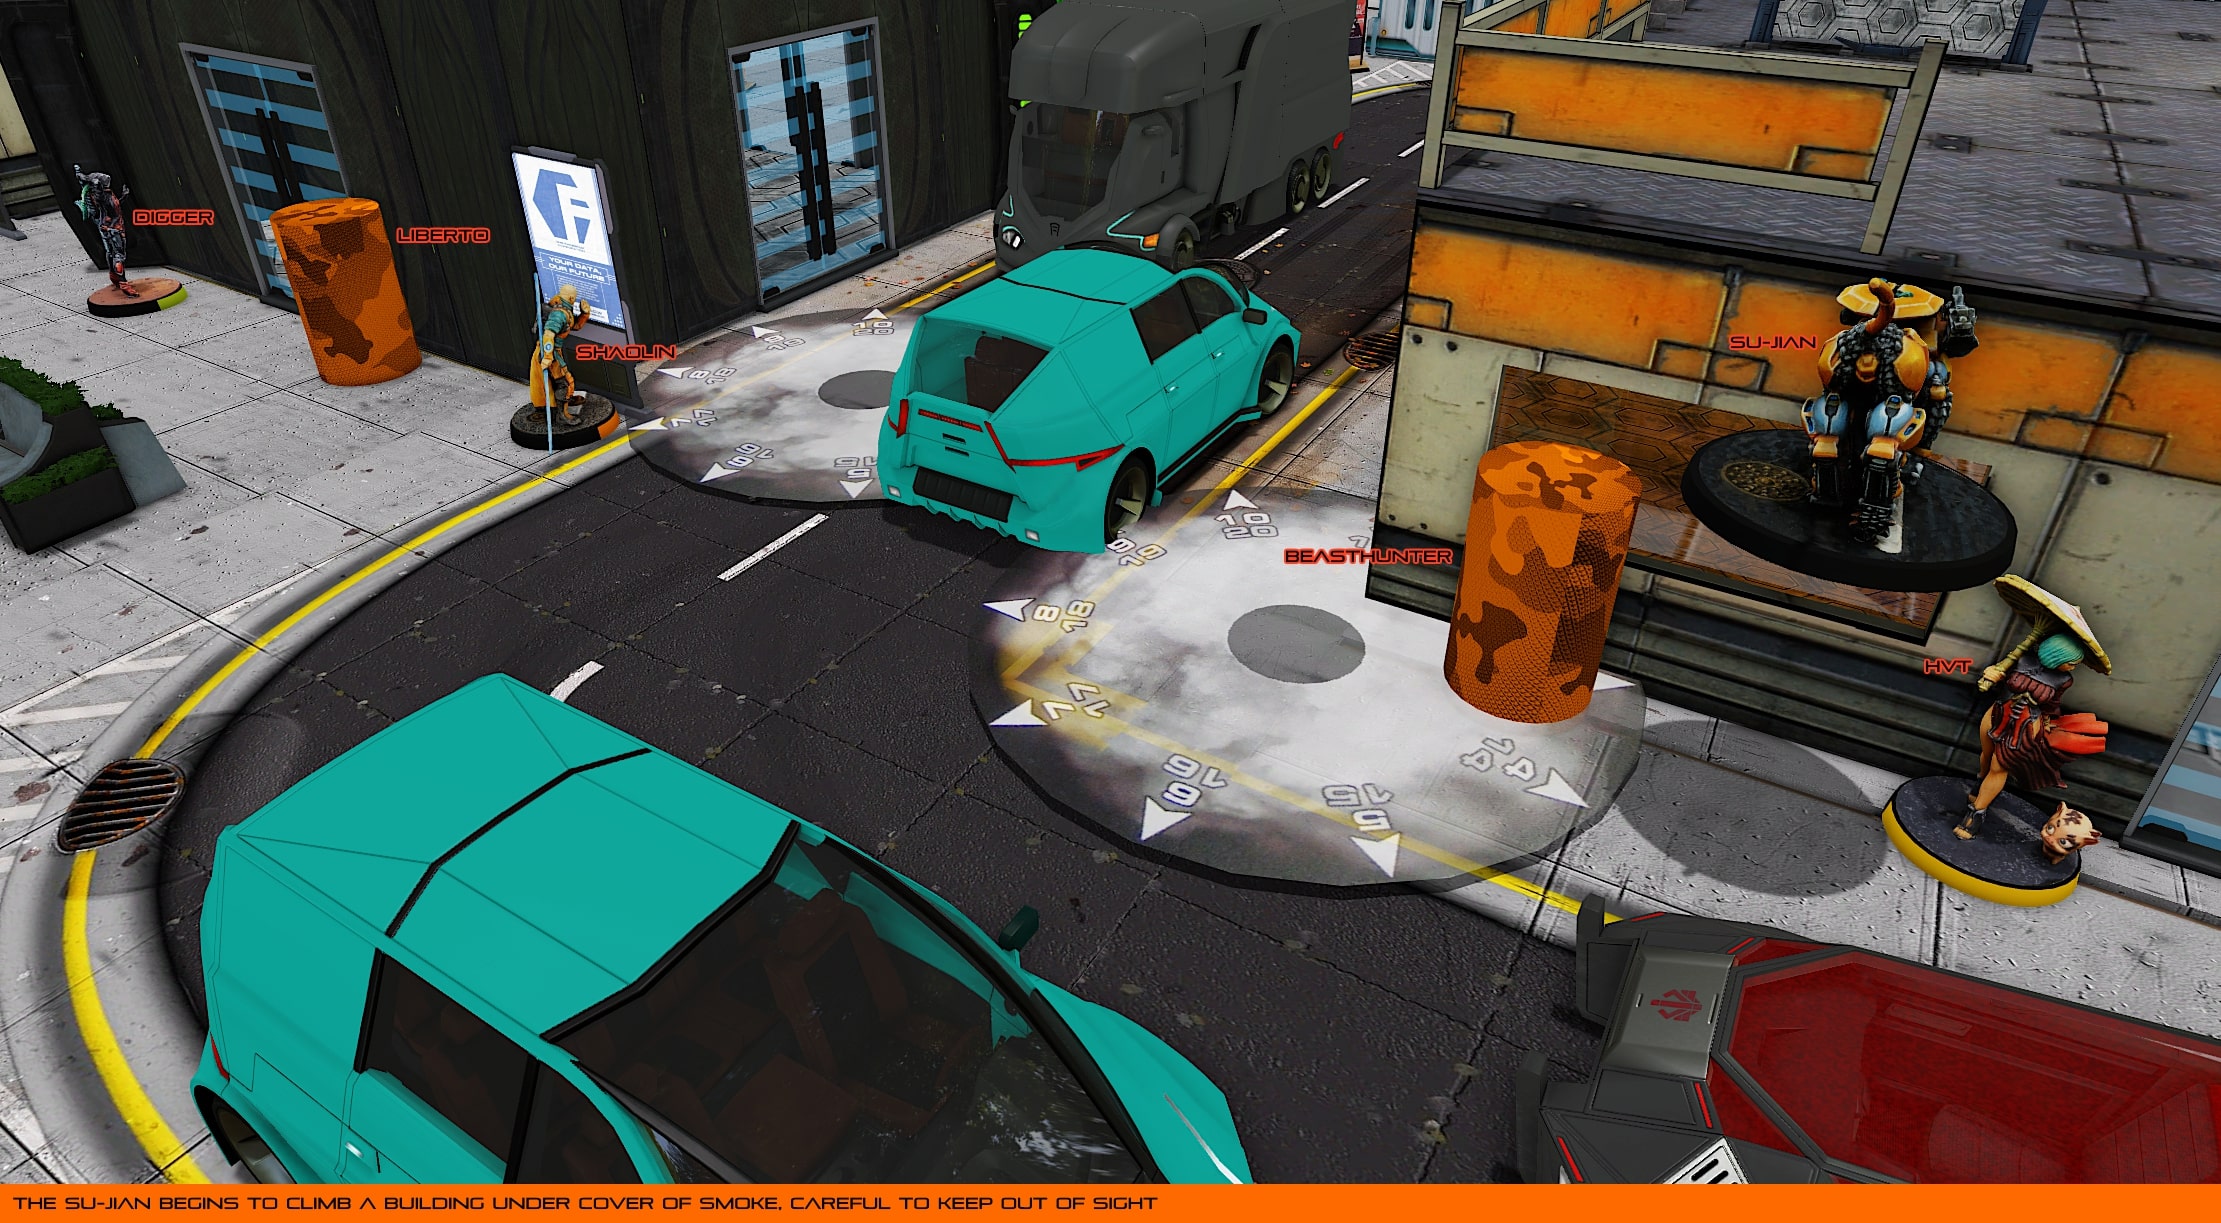
The final orders for Yu Jing saw the Su-Jian move forward under cover of smoke thrown earlier by the second Shaolin Monk. The armored robot was careful to stay low and avoid taking unnecessary fire in the upcoming turn.
The Armory remained locked, and the initiative was now passed to Tohaa.
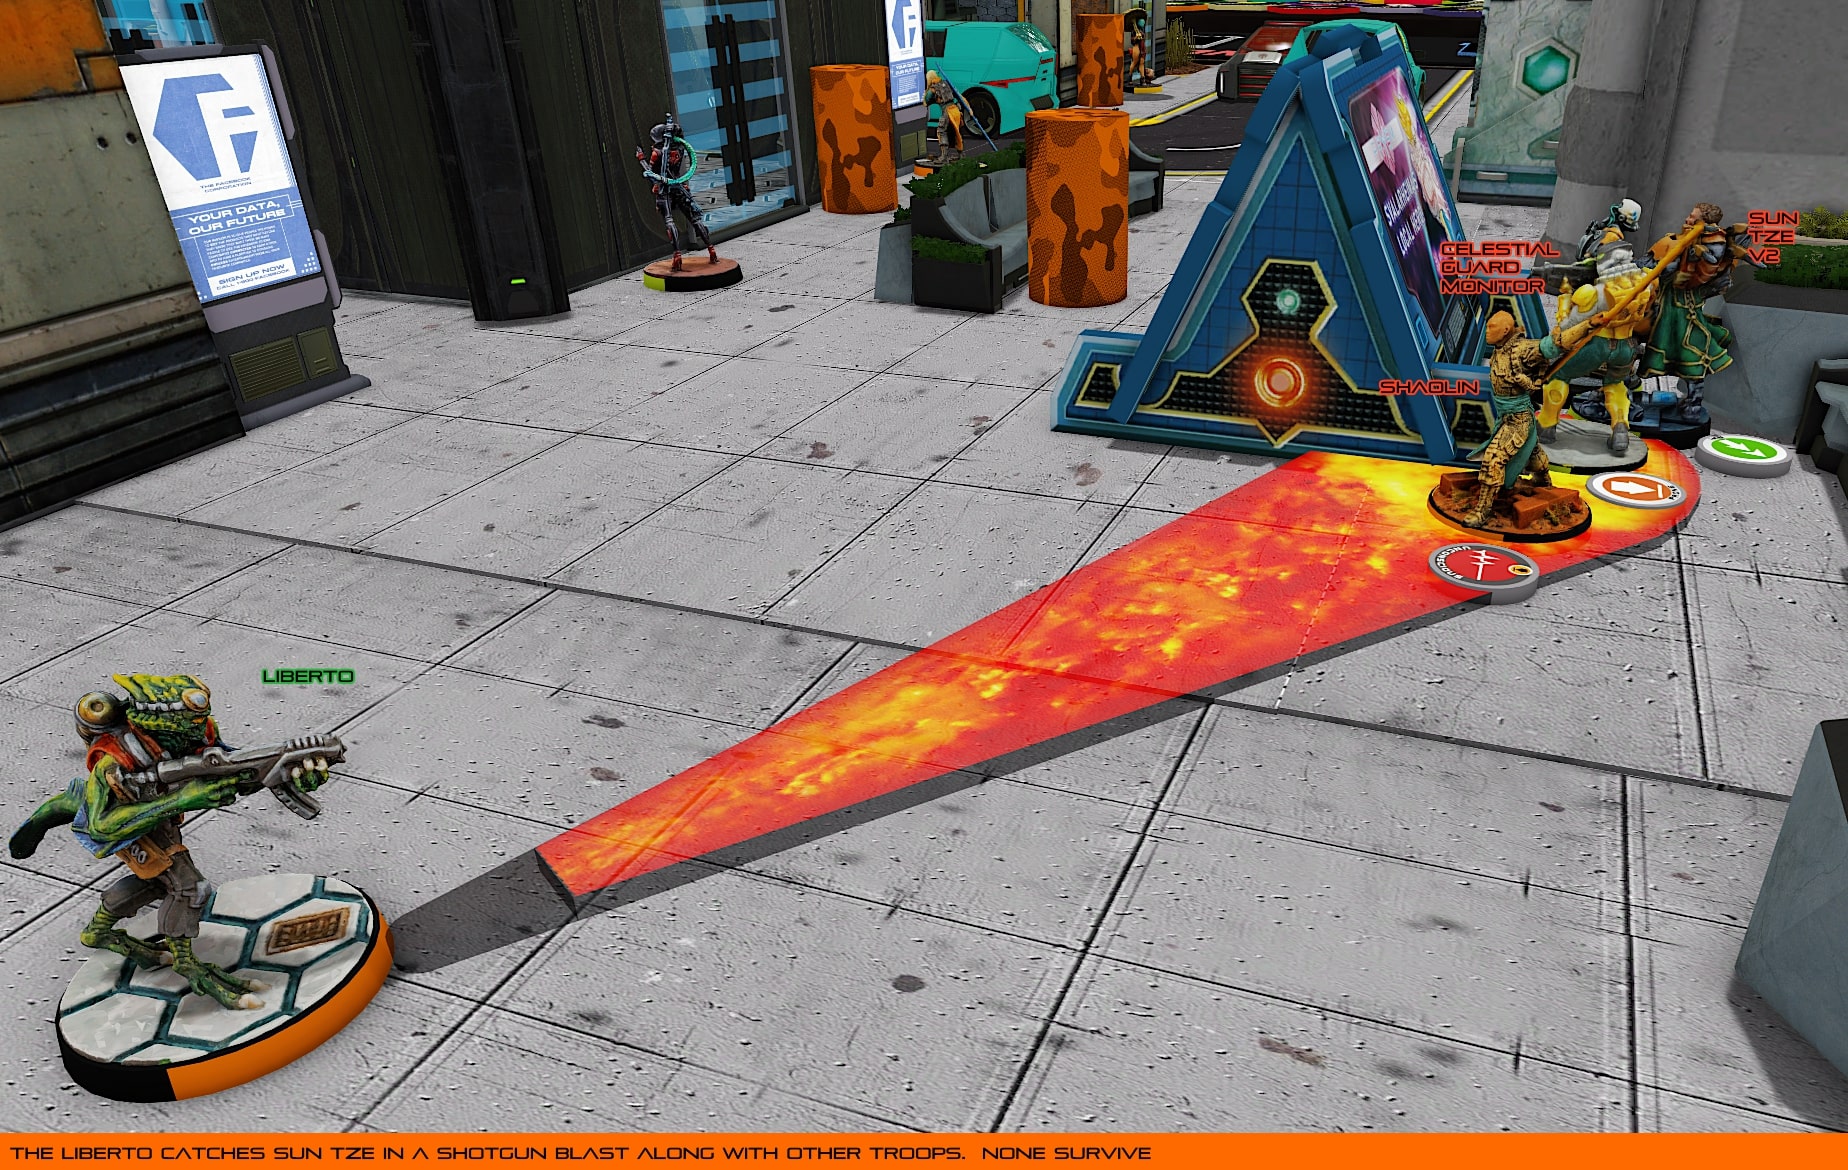
With both of my Impersonators removed, but having put a wound on Sun Tze, and knowing that the Lieutenant was woefully exposed, I threw nearly all of my group one orders into moving a Liberto up the table, with the intention of putting Yu Jing into Loss of Lieutenant for their second turn. After crashing through a window, the Liberto was discovered a little short of its objective.
Spending another order on the suicide run, the shotgun-toting alien ran forward, and was just close enough to catch the unconscious Shaolin Monk, a Celestial Guard Monitor, and Sun Tze in its blast template. Several high-value Dodge rolls later, all three Yu Jing targets were killed or unconscious, and the Liberto was blown up in an impressive pyrotechnic display, completely bypassing the Dogged state and going straight to dead.
Having revealed itself to ensure that the Liberto didn’t survive its attack run on Sun Tze, my Sukeul HMG triad repositioned to engage a second Long Ya, shredding the Yu Jing remote with five successful shots from the machine gun.

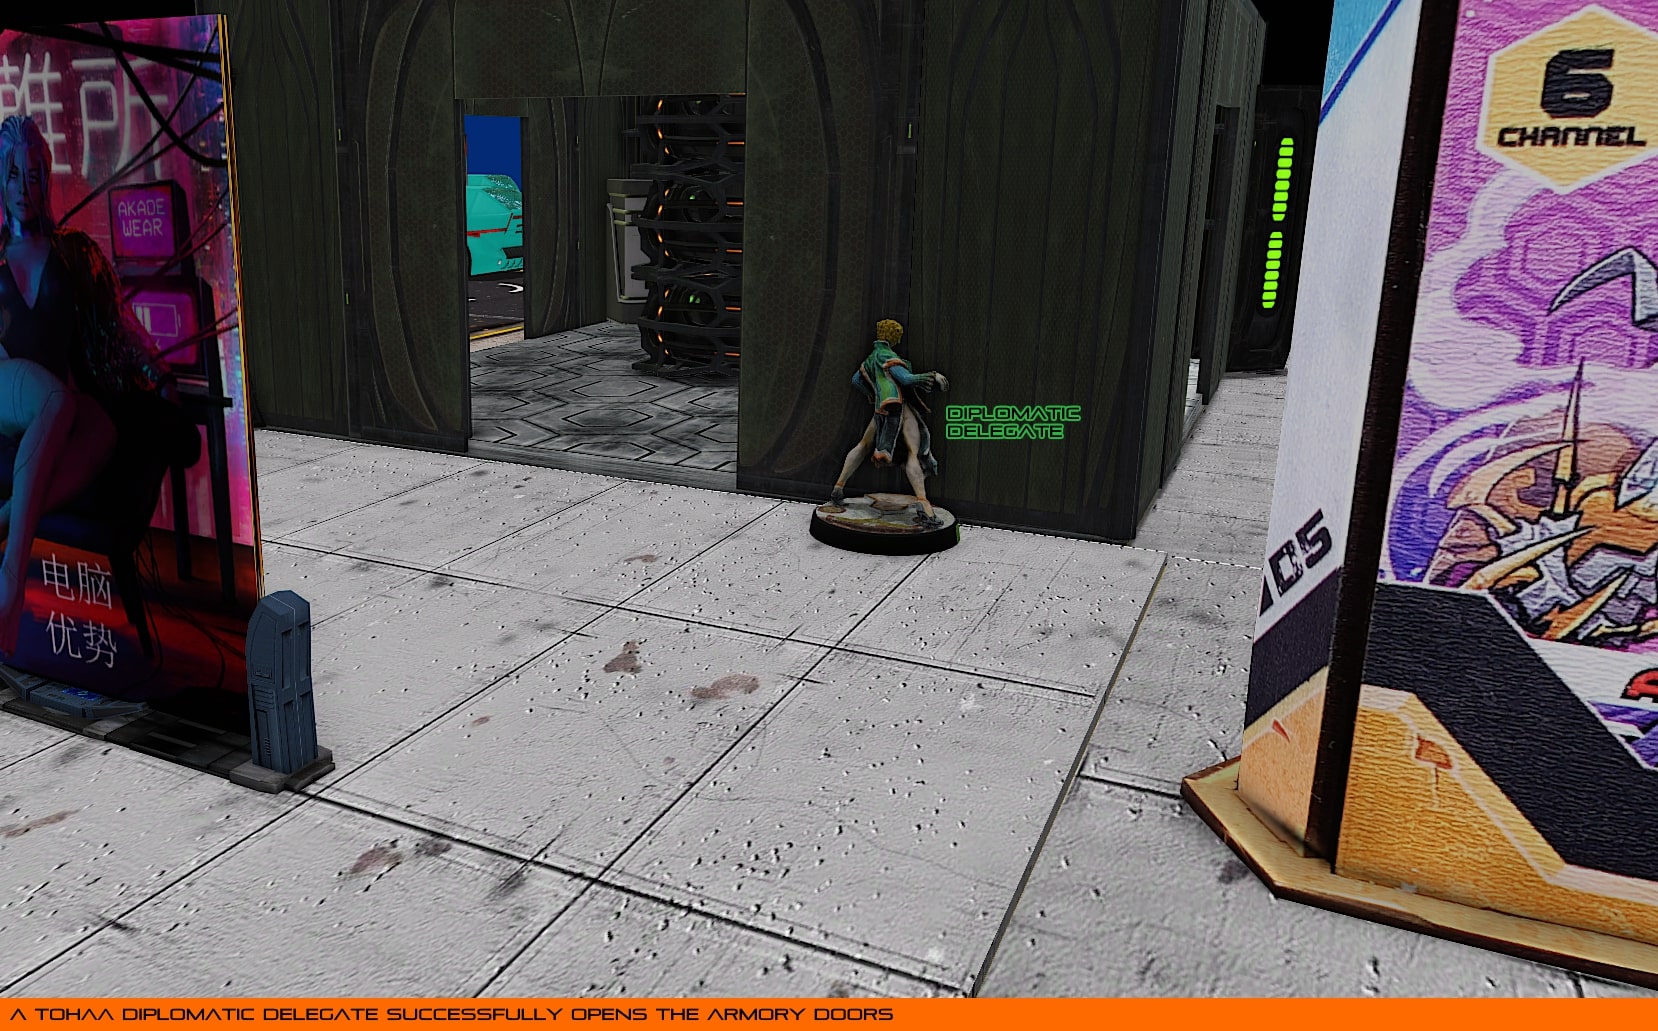
With group one’s order pool depleted, the Delegate in group two ran forward to unlock the Armory and allow access to more dangerous units.
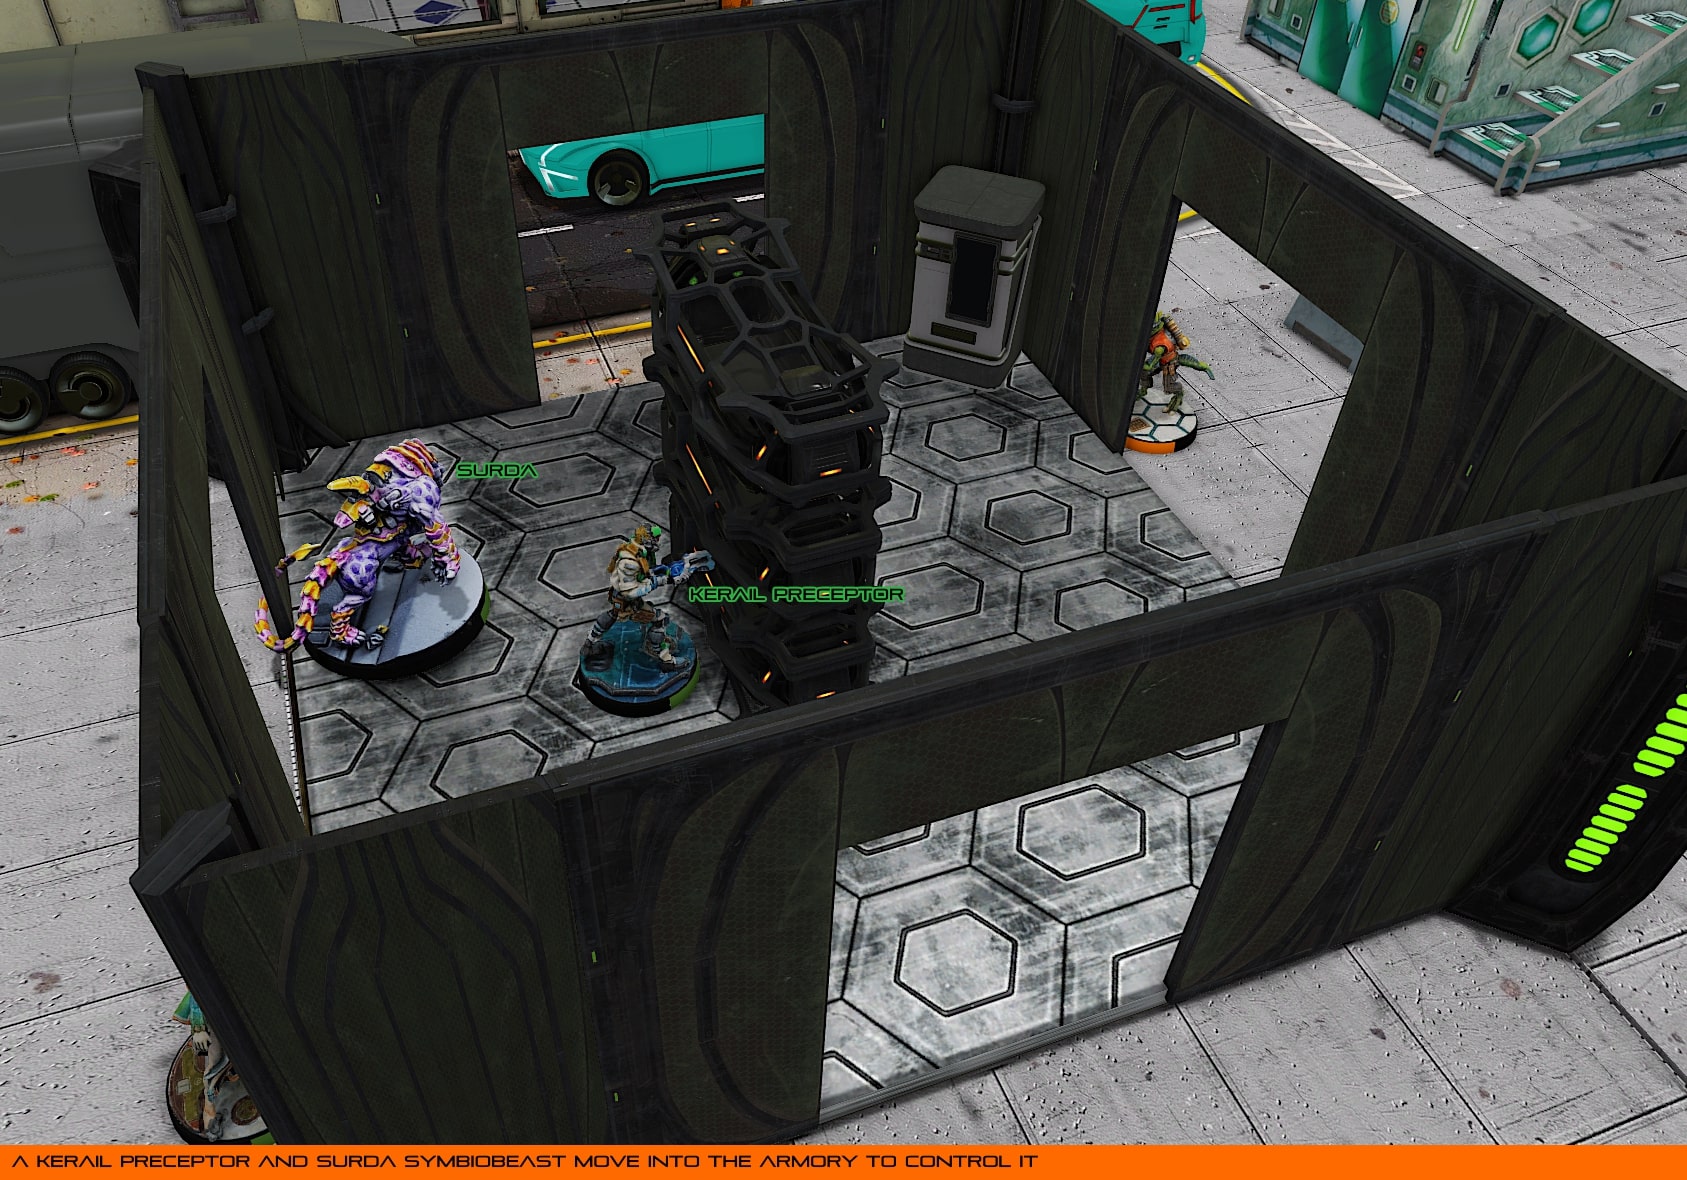
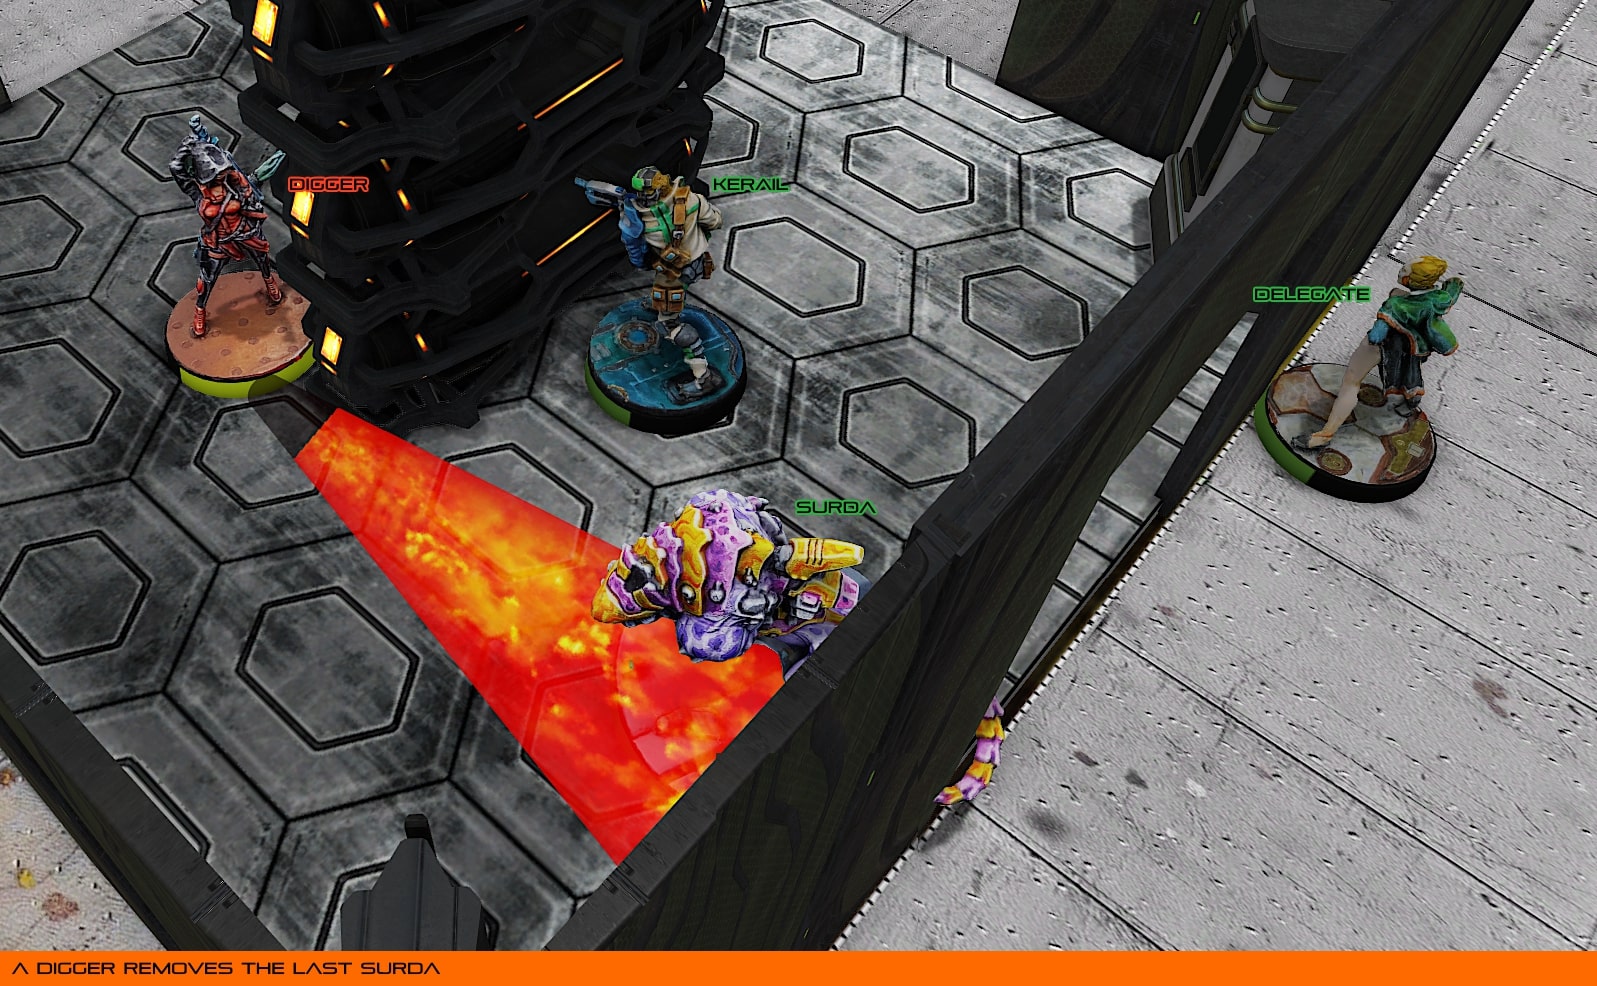
The Kerail Preceptor moved up from its flanking position with two Surda Symbiobeasts bounding along in tow. One of the Symbiobeasts took up a position in the Armory, attempted to remove an enemy Liberto after it revealed itself with a Pulzar, but wasn’t able to kill the traitorous alien. Tragically, the Surda died in the attempt.

With the final group two orders, the remaining Surda and the Kerail moved into the Armory to score it at the end of the round, pushing Tohaa into a 2:0 lead!
With the Armory now unlocked, but occupied, Yu Jing needed to gain a foothold or be completely overrun. Faced with Loss of Lieutenant on their second turn, the Digger used its Impetuous movement to gain access to the Armory and kill the final Surda, taking a wound in response, and finding itself Isolated from the Delegate’s Eraser Pheroware ARO.
With another bout of smoke on the field, obscuring the view for a Tohaa retaliation, the Su-Jian climbed down from the building it was clinging to and made its way toward the Armory.
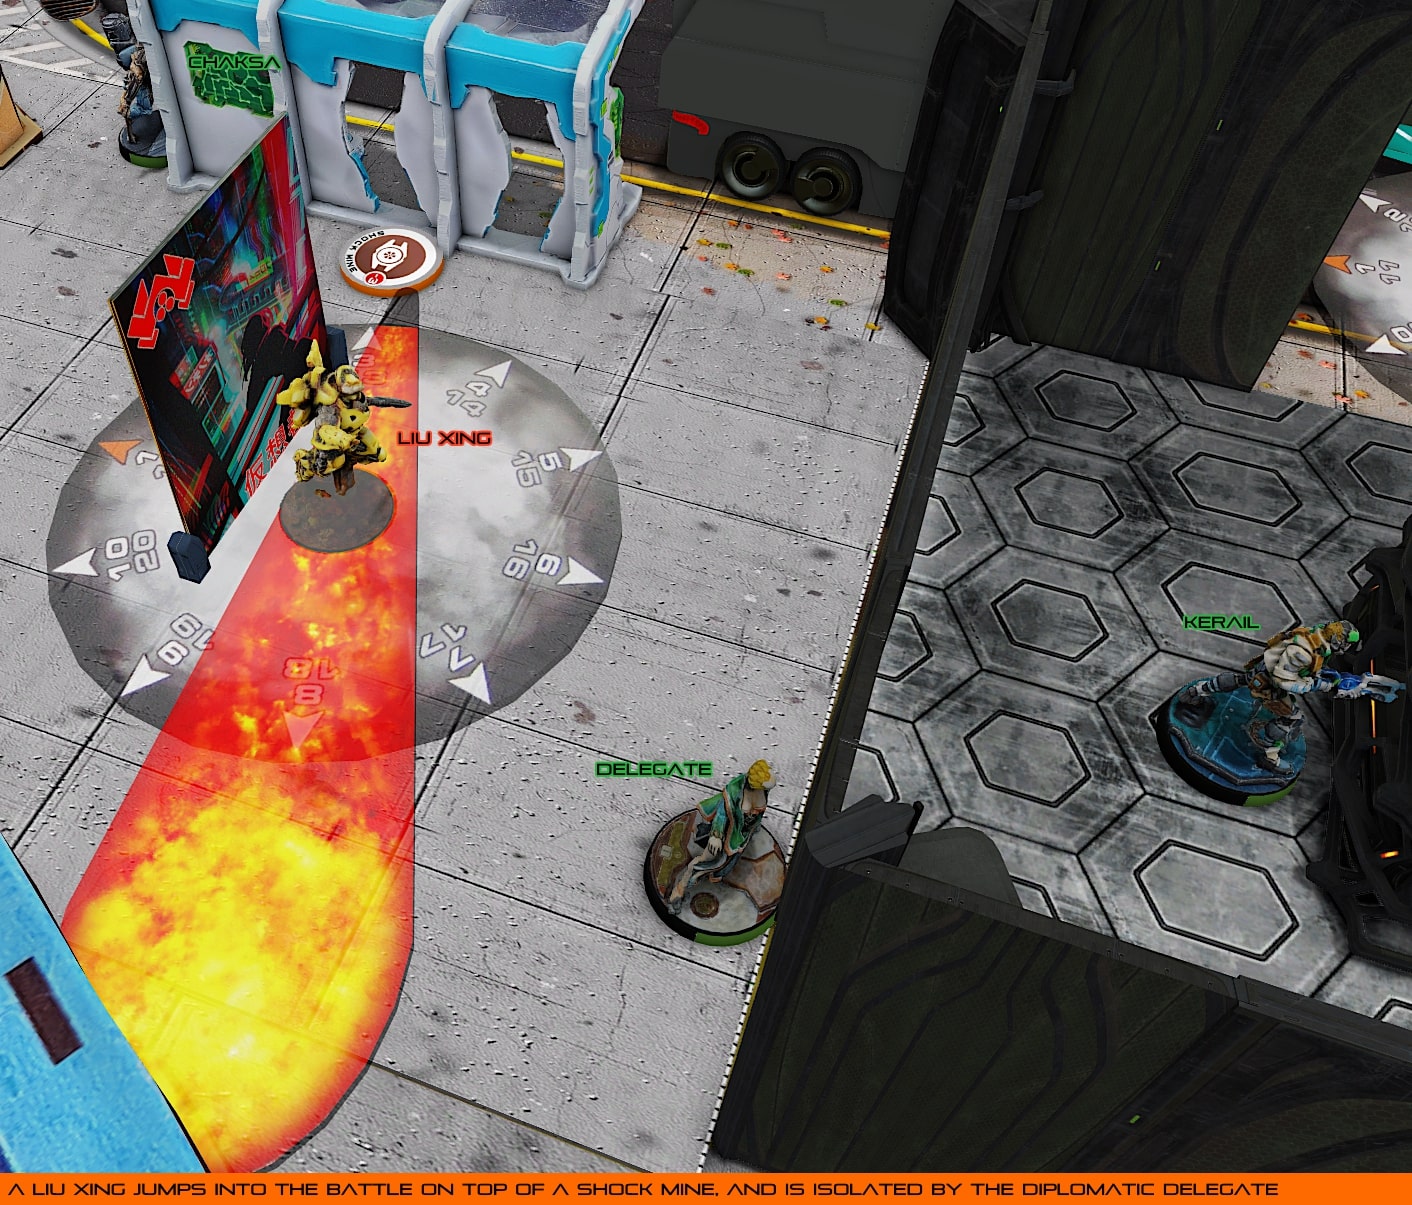
Coming it on its own order, a Liu Xing attempted to land on an unknown camo marker with its exploding jump. Unfortunately, this was a mine, left over from the Liberto! The jump troop took a wound, going into No Wound Incapacitation, and was Isolated by the Delegate.
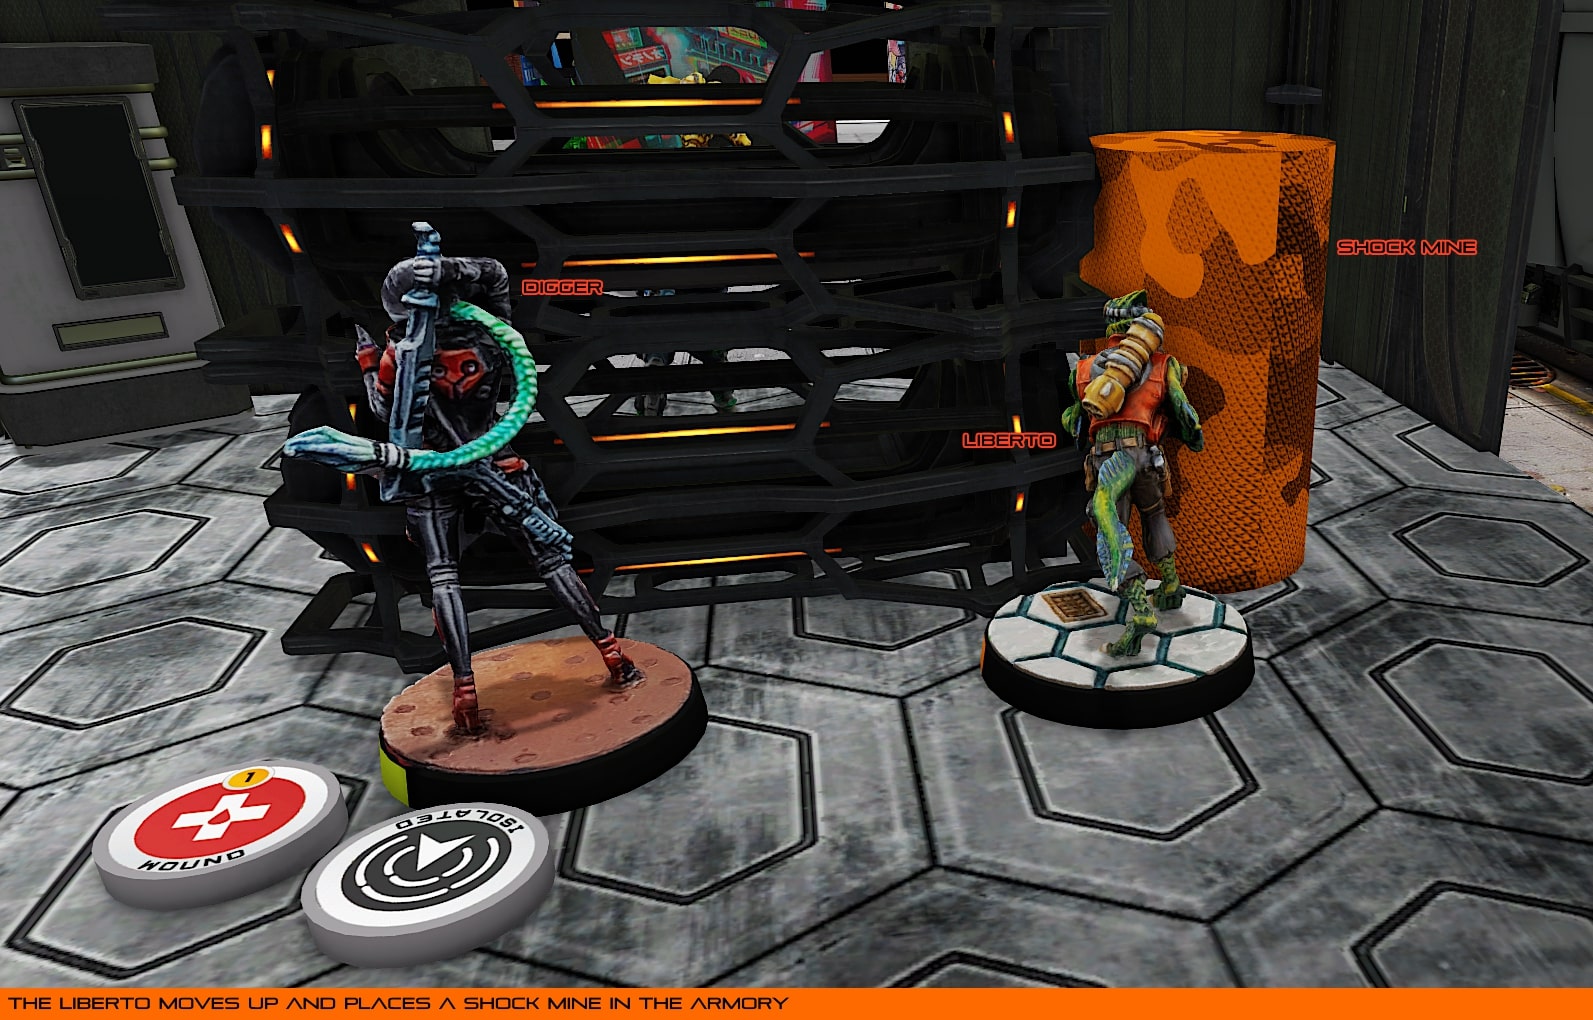
Having survived the encounter with the Surda in the previous turn, the Yu Jing Liberto entered the Armory to provide support to the wounded Digger, placing a mine that would no doubt cause the Tohaa units quite a bit of trouble.
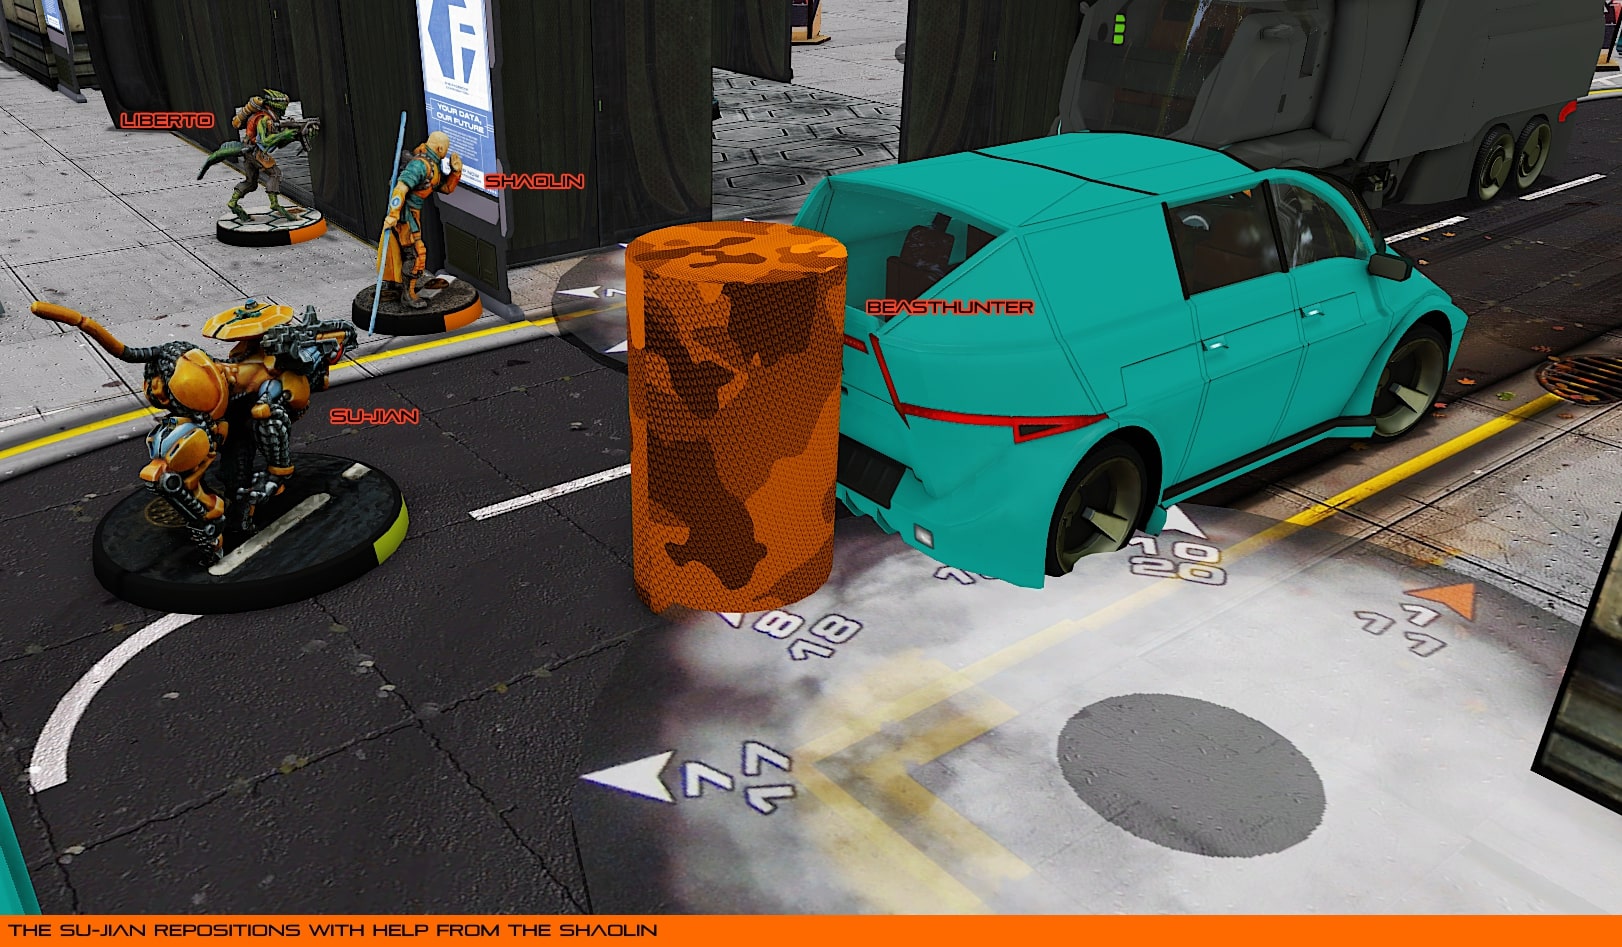
Spending a command token to push farther, the Su-Jian repositioned itself just outside of the Armory, ready to defend against a possible attack into Yu Jing territory.
With a few troublesome units located in the Armory, but standing in a nice, juicy line, I wanted to push up with the Heavy Flamethrower-wielding Chaksa Auxiliar. The only thing standing in its way was the Isolated Liu Xing that had rudely dropped into my half of the board. I tried to remove it in an order, but despite failing its Dodge roll, it managed to tank the Armor save.

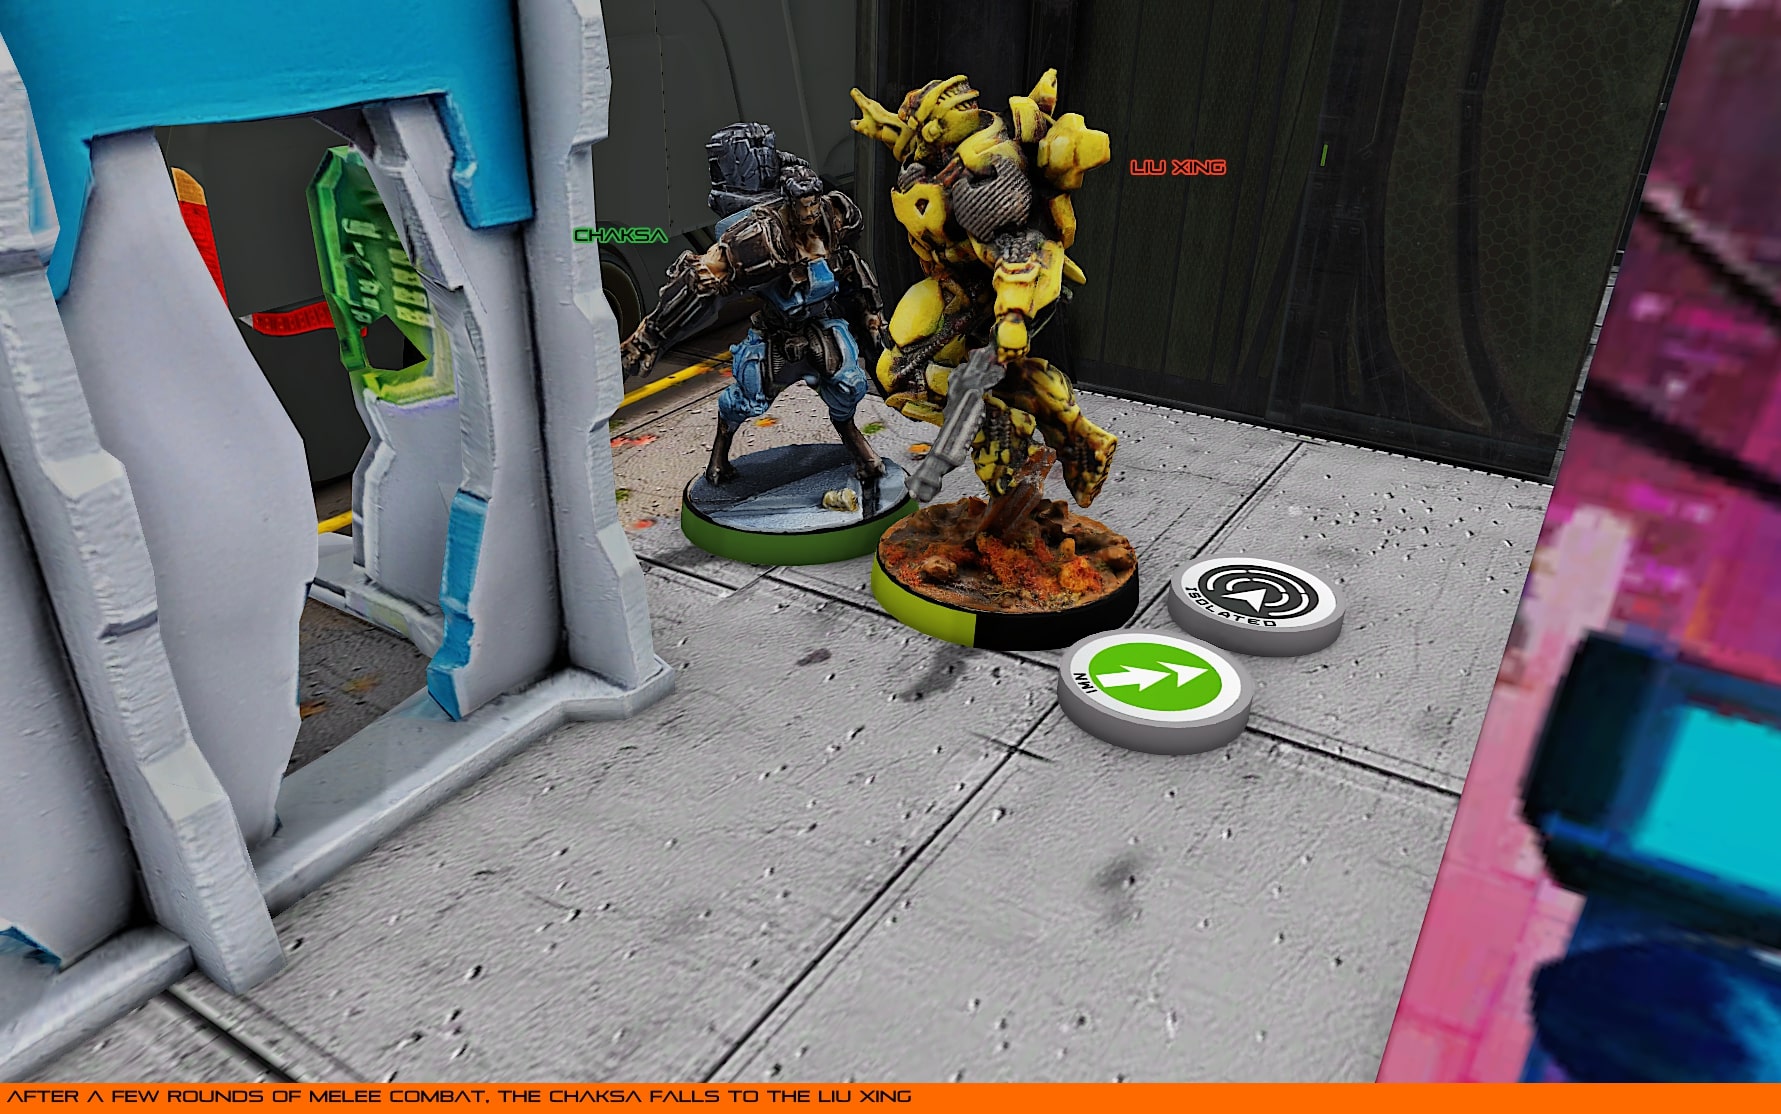
I still wanted to move forward with the Chaksa to remove the shock mine, and put down a flame template on the Liberto and wounded Digger. I spent an order advancing the Chaksa, trying to skirt the Liu Xing, but the jump troop managed to dodge into melee combat, avoiding a pair of pistol shots on the way!
Looking at the CC stats for both units, I thought they were comparable enough that I could still come out on top of the coin flip – the Chaksa has CC 19 with a +1 Damage bonus, and the Liu Xing is slightly better, with CC 21 and a shock CC weapon. I spent two orders engaged with the Liu Xing, but the jump troop’s luck held, and it mercilessly eviscerated my brave Chaksa!
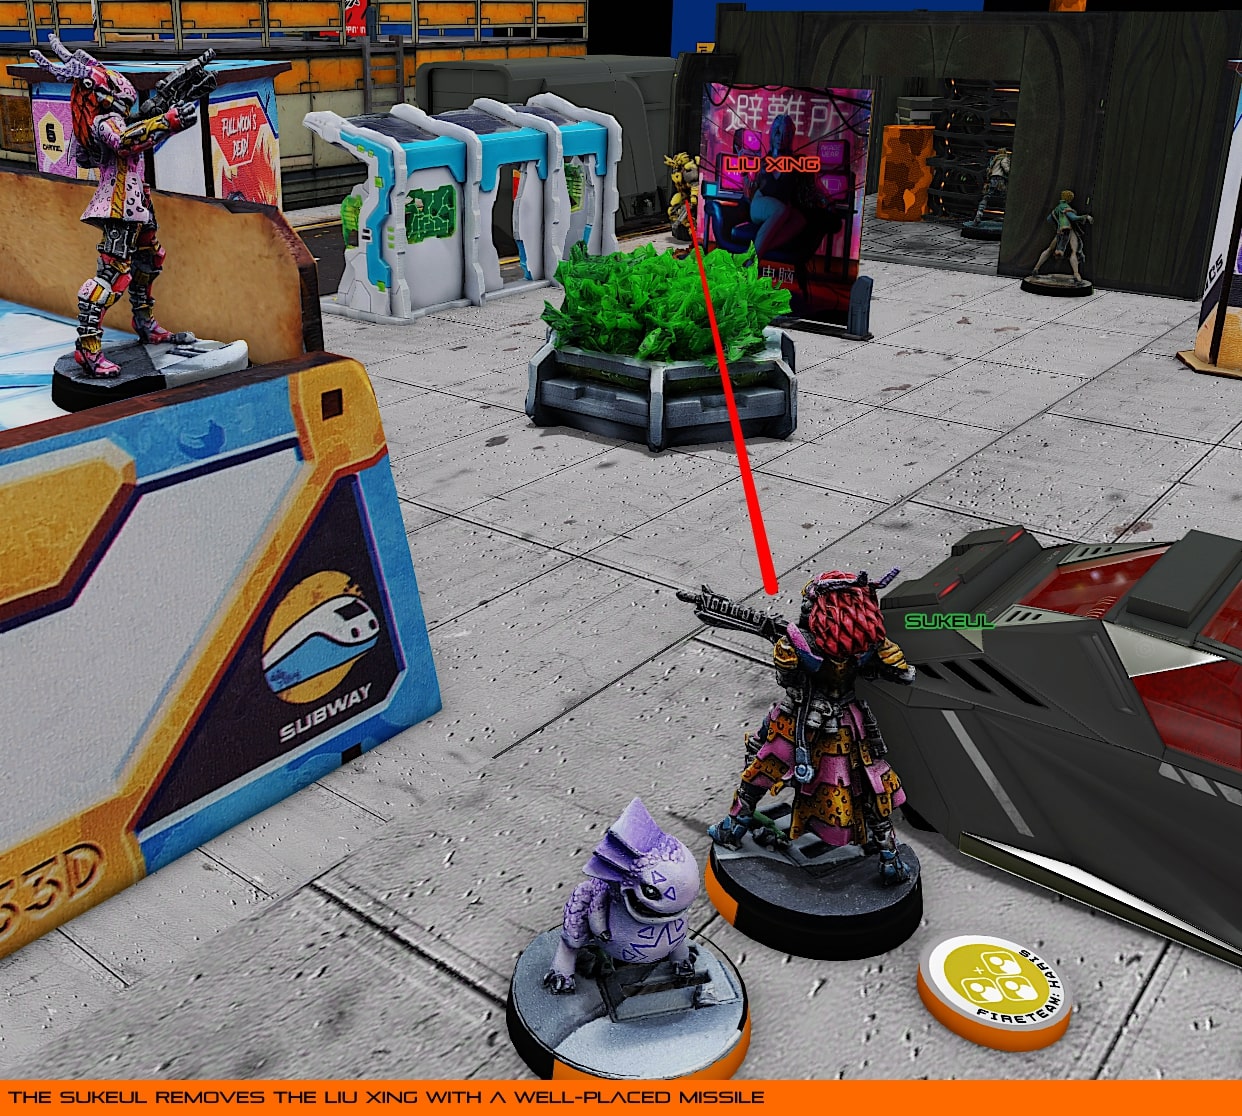
No longer blocked by an inconvenient poster, my Sukeul Missile Launcher triad repositioned to gain a line on the despicable Liu Xing. Fresh from having blown the Yan Huo to bits, the Sukeul took careful aim and obliterated the offensive jump troop, leaving the Tohaa path to the Armory open once again.
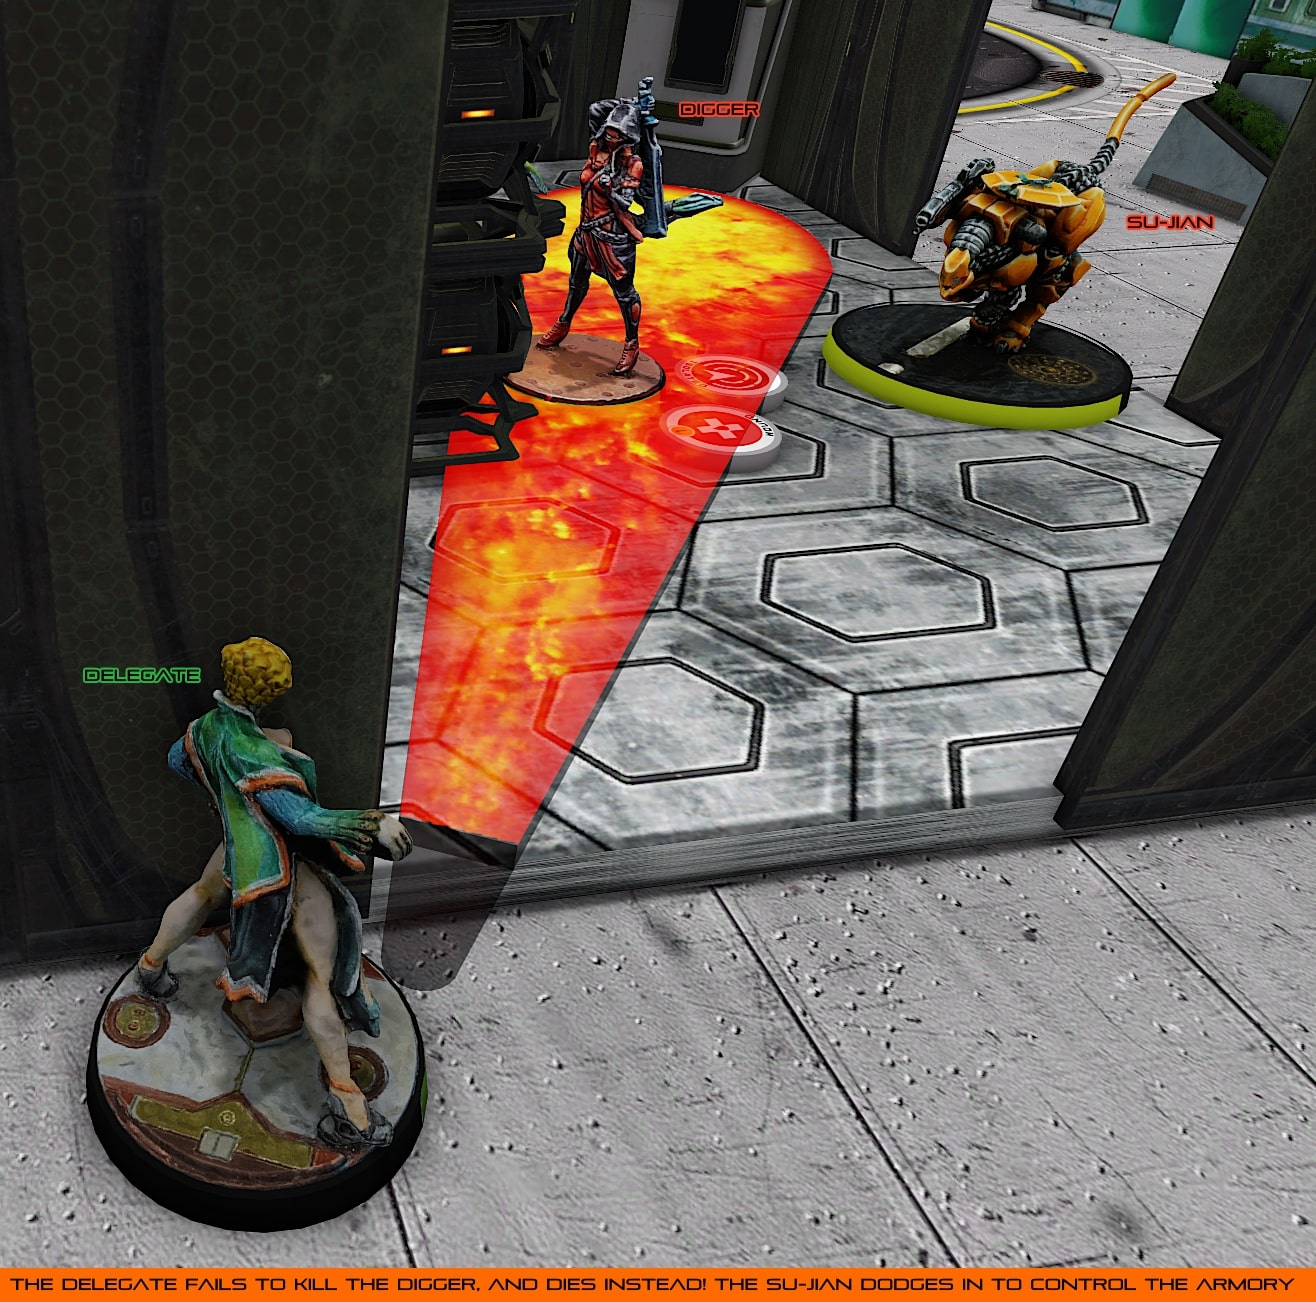
With the Chaksa dead, along with my plans for it, I pressed the Delegate forward in an attempt to attack from the opposite side of the Armory. Unfortunately, the angles weren’t as kind on this flank, and the Delegate wasn’t able to see both the Digger and the Liberto. Nevertheless, the valiant Diplomat engaged with the Digger, but wasn’t able to put the prospector down. Unfortunately, the Delegate wasn’t as lucky with its armor saves, and was gunned down. Worse yet, the movement allowed the Su-Jian to Dodge into the Armory, adding a vast number of points into the zone for Yu Jing!
Without many orders left, and having not made a significant impact despite Yu Jing having lost their Lieutenant, the Sukeul HMG Triad advanced forward. Activating its Symbiobomb, the Sukeul tried to kill the Liberto and Digger with Endgame, but failed both rolls.
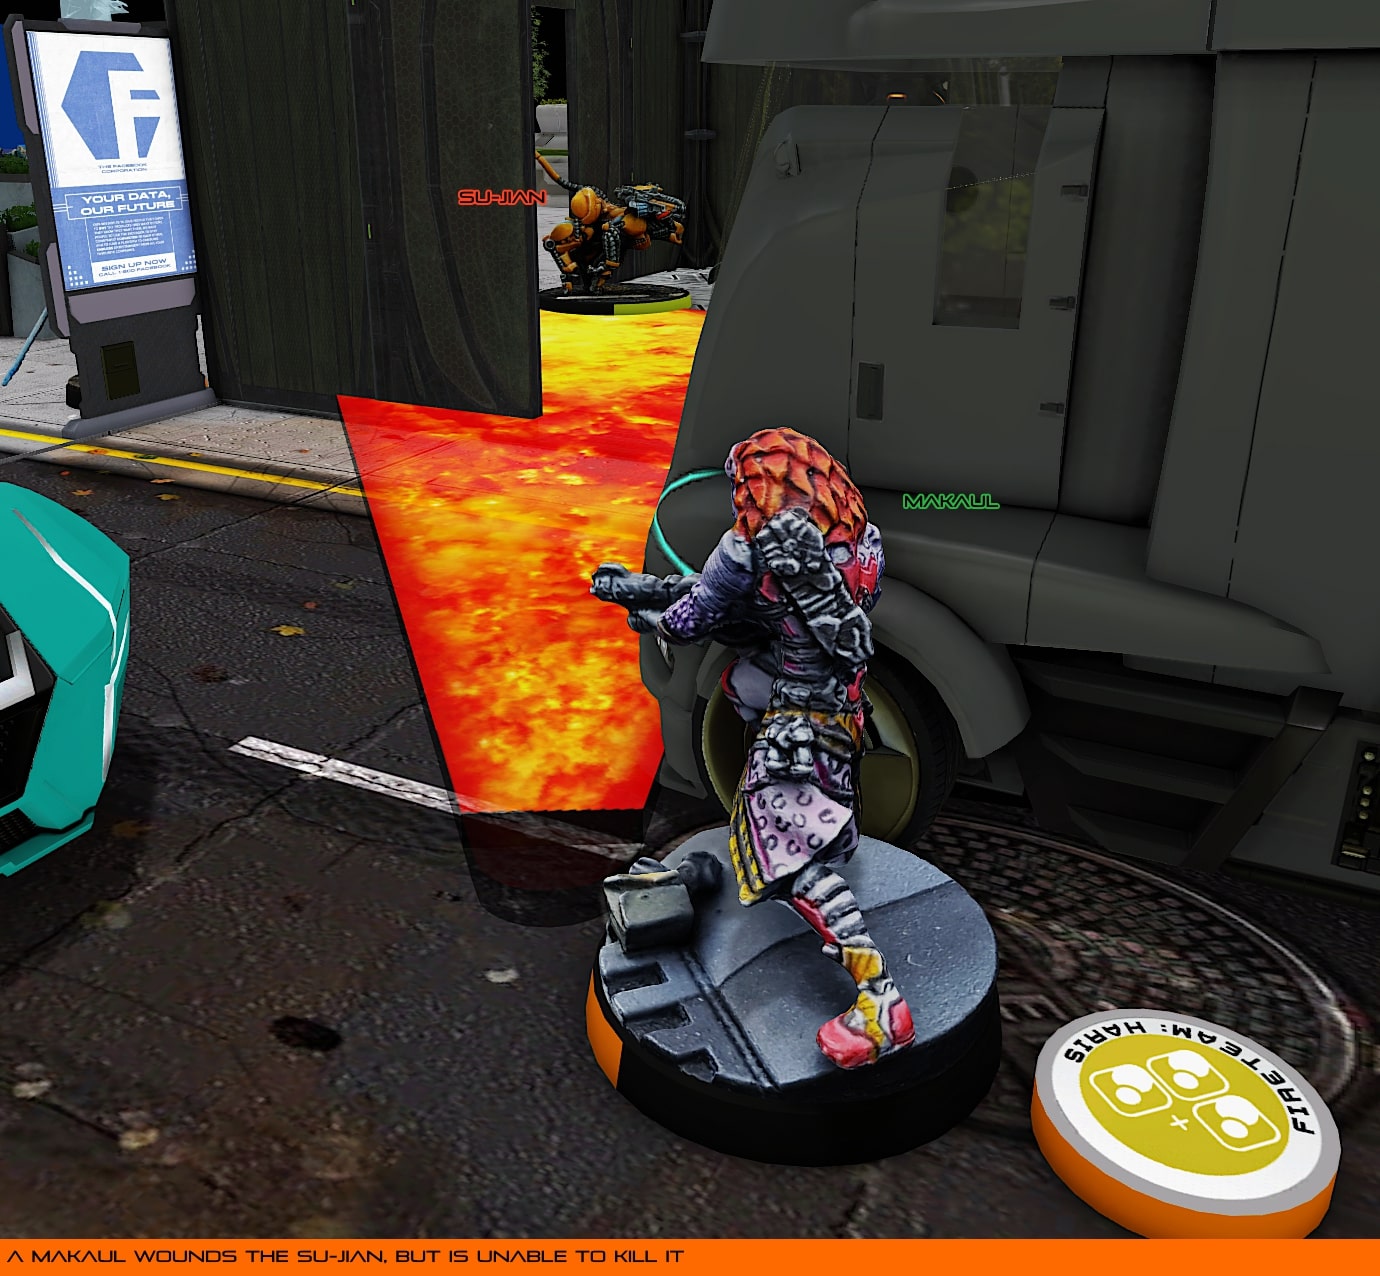
Unwilling to take a risk exposing itself to the Liberto’s mine, my Makaul crept forward to see the Su-Jian, and was able to wound the unit, but wasn’t able to outright kill it, leaving the Armory firmly in Yu Jing control.
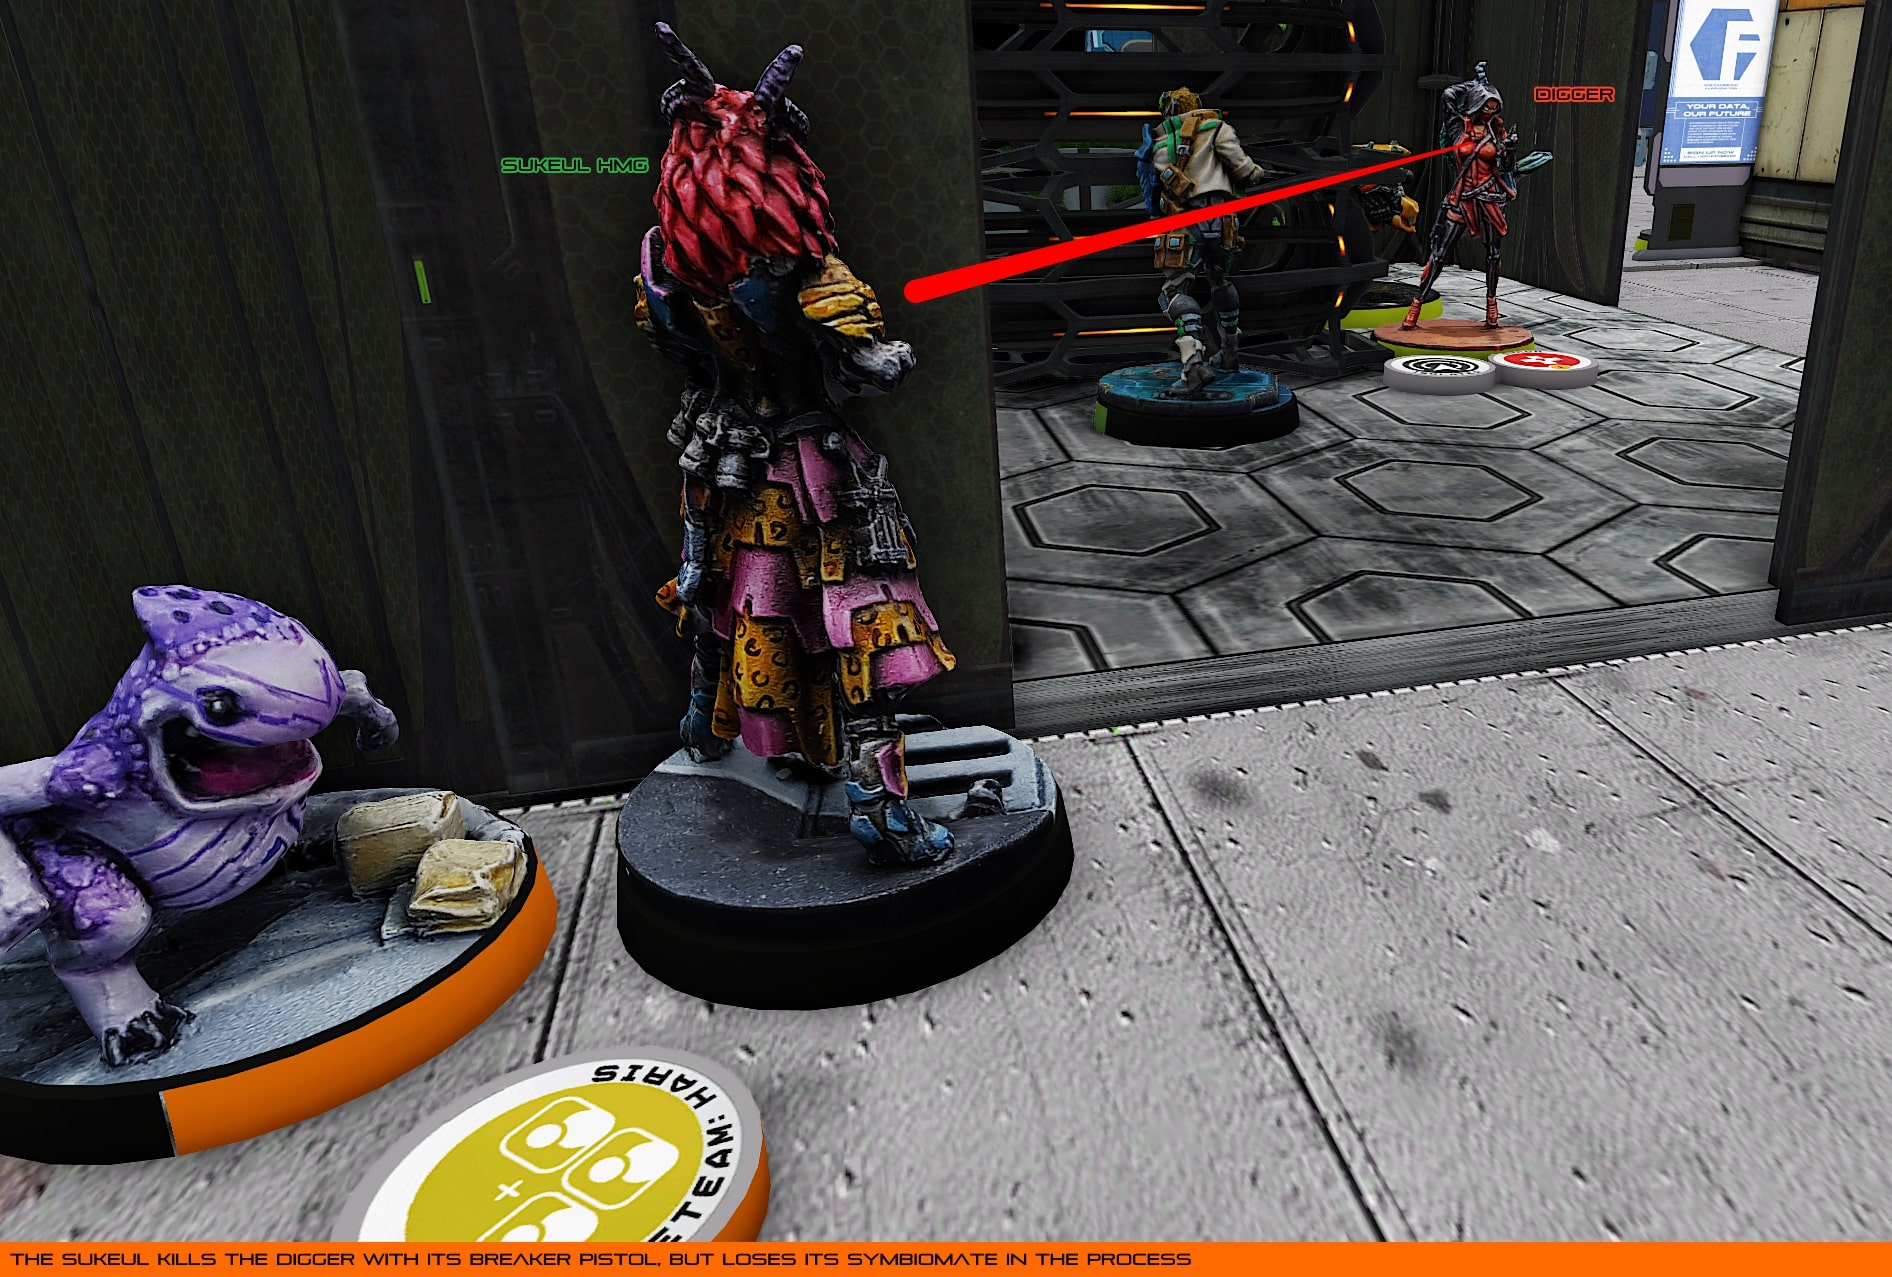
With my final order, the Sukeul rounded the corner to see the Yu Jing digger, and put four Breaker shots into it with a pistol, finally killing a Yu Jing unit in the Armory, but losing its Symbiomate in the process.
With the unlucky entrance of the Su-Jian into the Armory, Yu Jing firmly held the zone and was able to tie the game up despite having suffered a Loss of Lieutenant in their second turn!
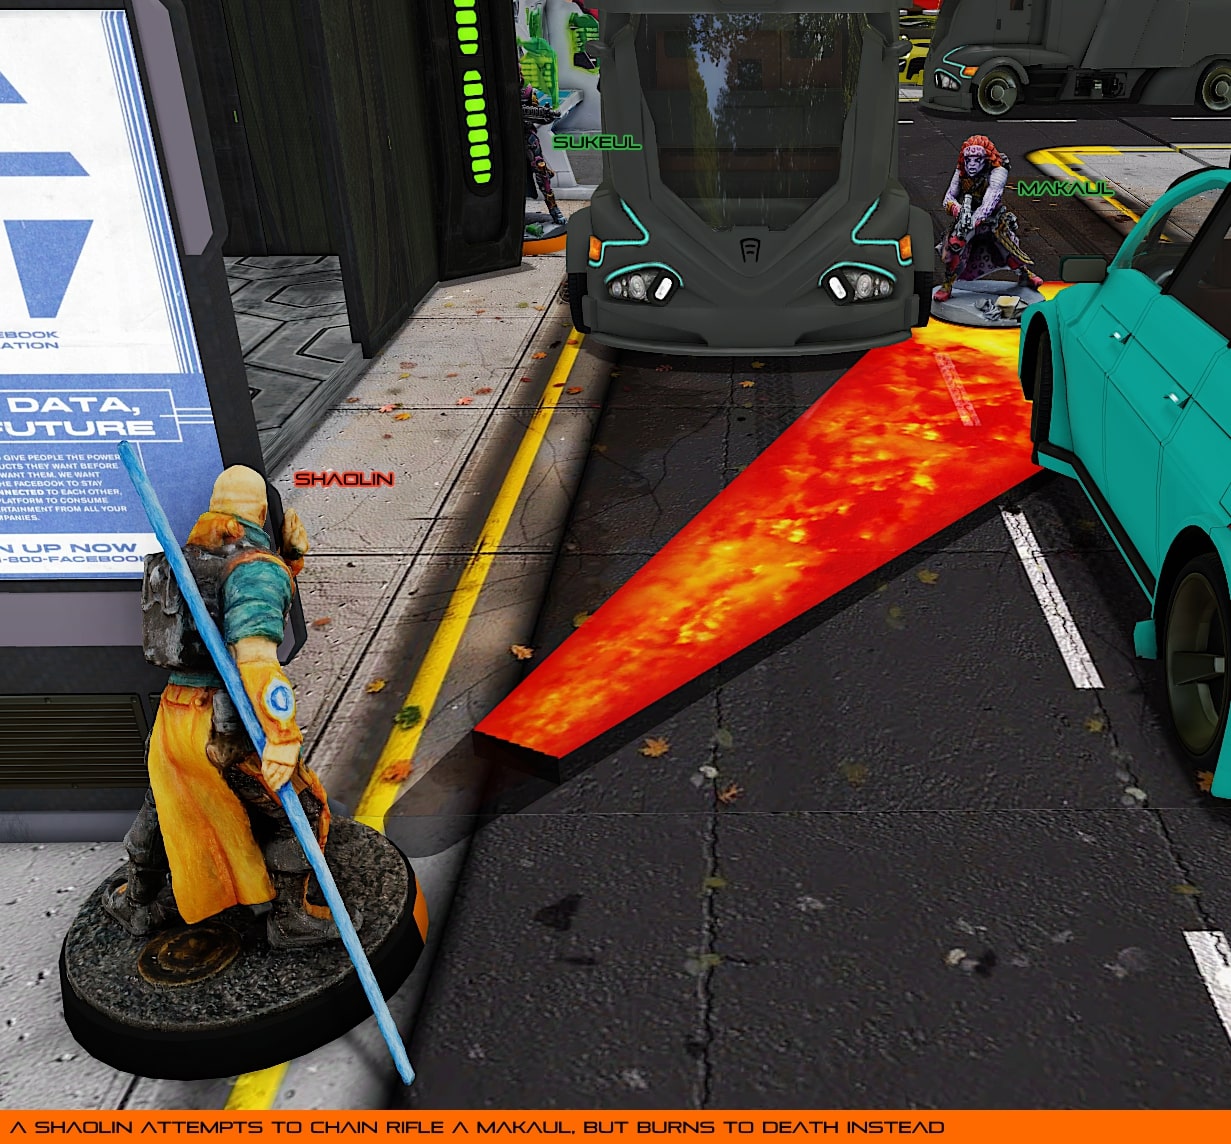
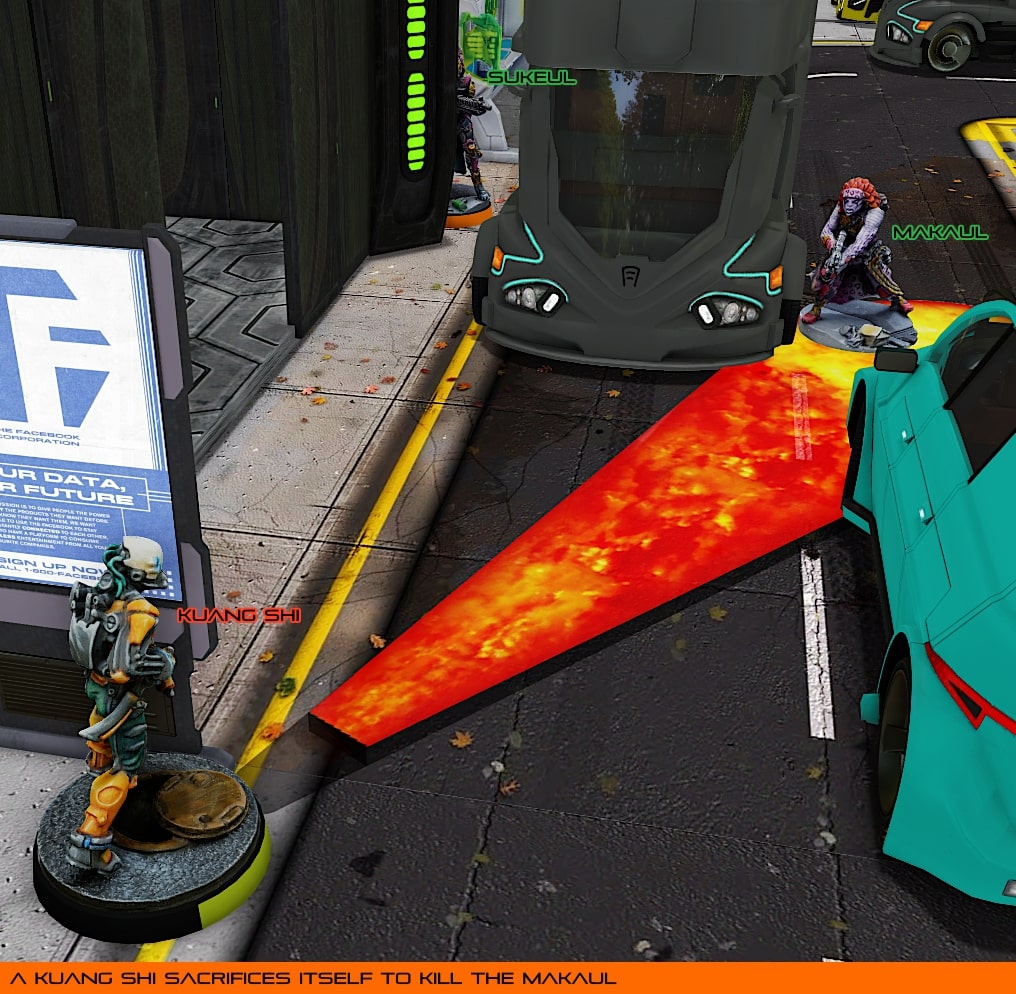
Feeling the pressure of the Tohaa advance, a Shaolin Monk spent its Impetuous order to try and kill a Makaul, but burned to death from a linked Flamethrower.
A Kuang Shi ran up to fill the gap left by the incinerated Shaolin Monk, exchanging fire once again with the Makaul, and this time killing the enemy threat but trading its own life in the exchange.
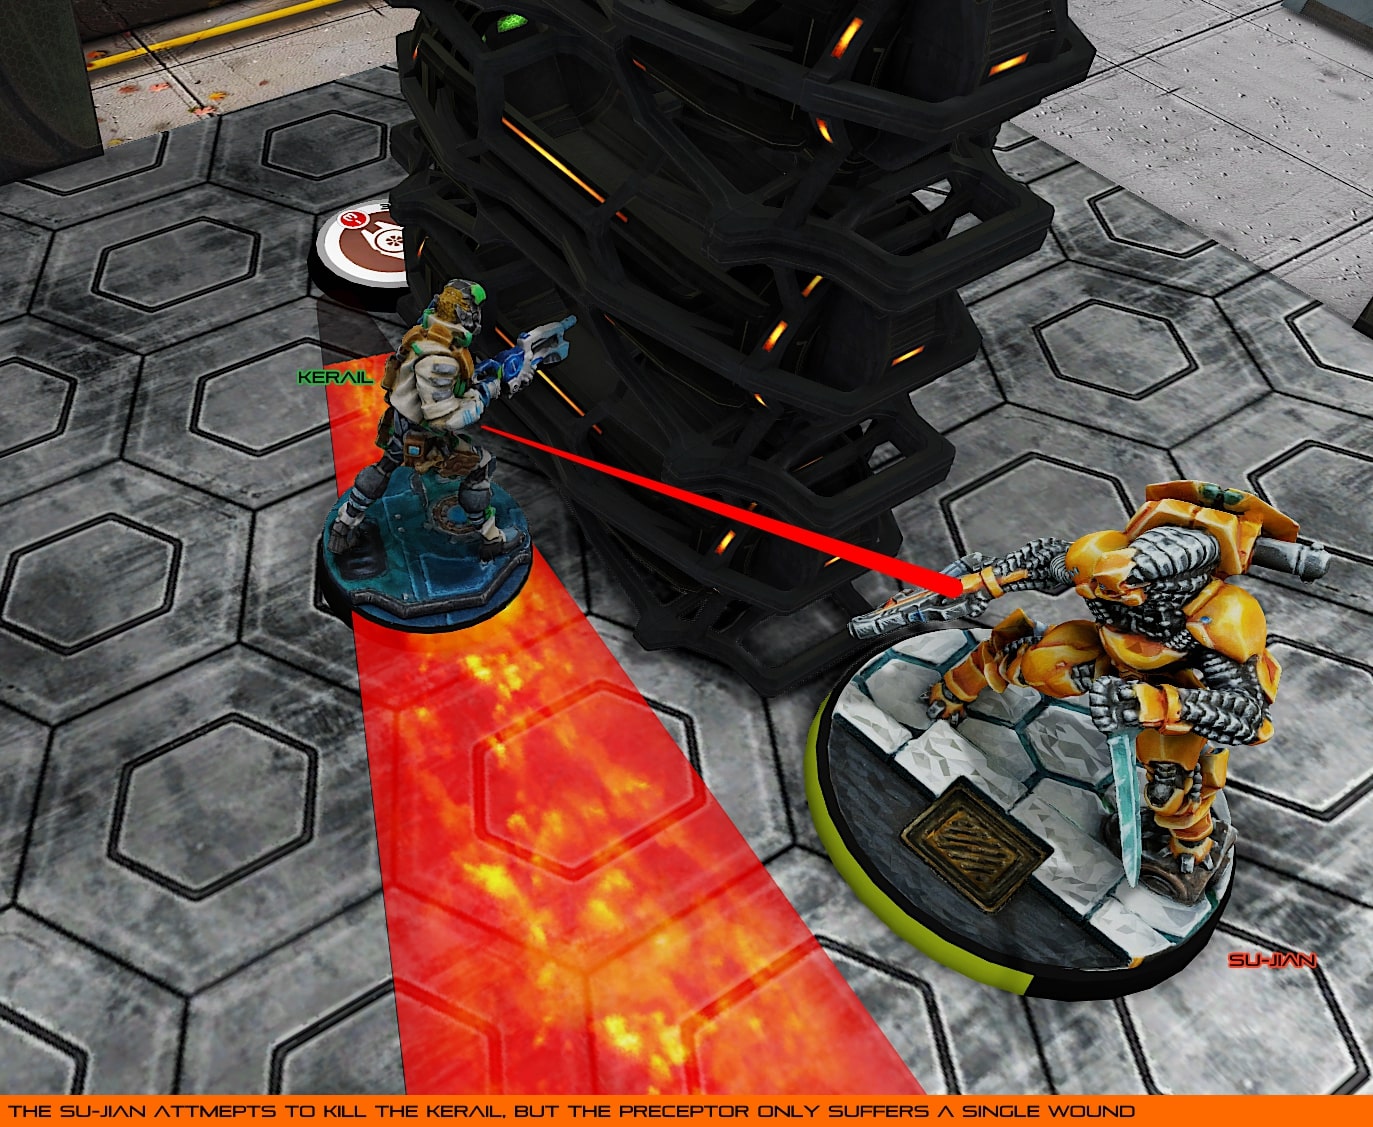
The Su-Jian, now the Yu Jing Lieutenant, moved forward to clear the Kerail Preceptor out of the Armory. The Preceptor fired back, hoping to further wound the Yu Jing robot, but wasn’t able to hit the enemy. The Kerail was able to weather fire from the Su-Jian, but took a wound from the Liberto’s mine.
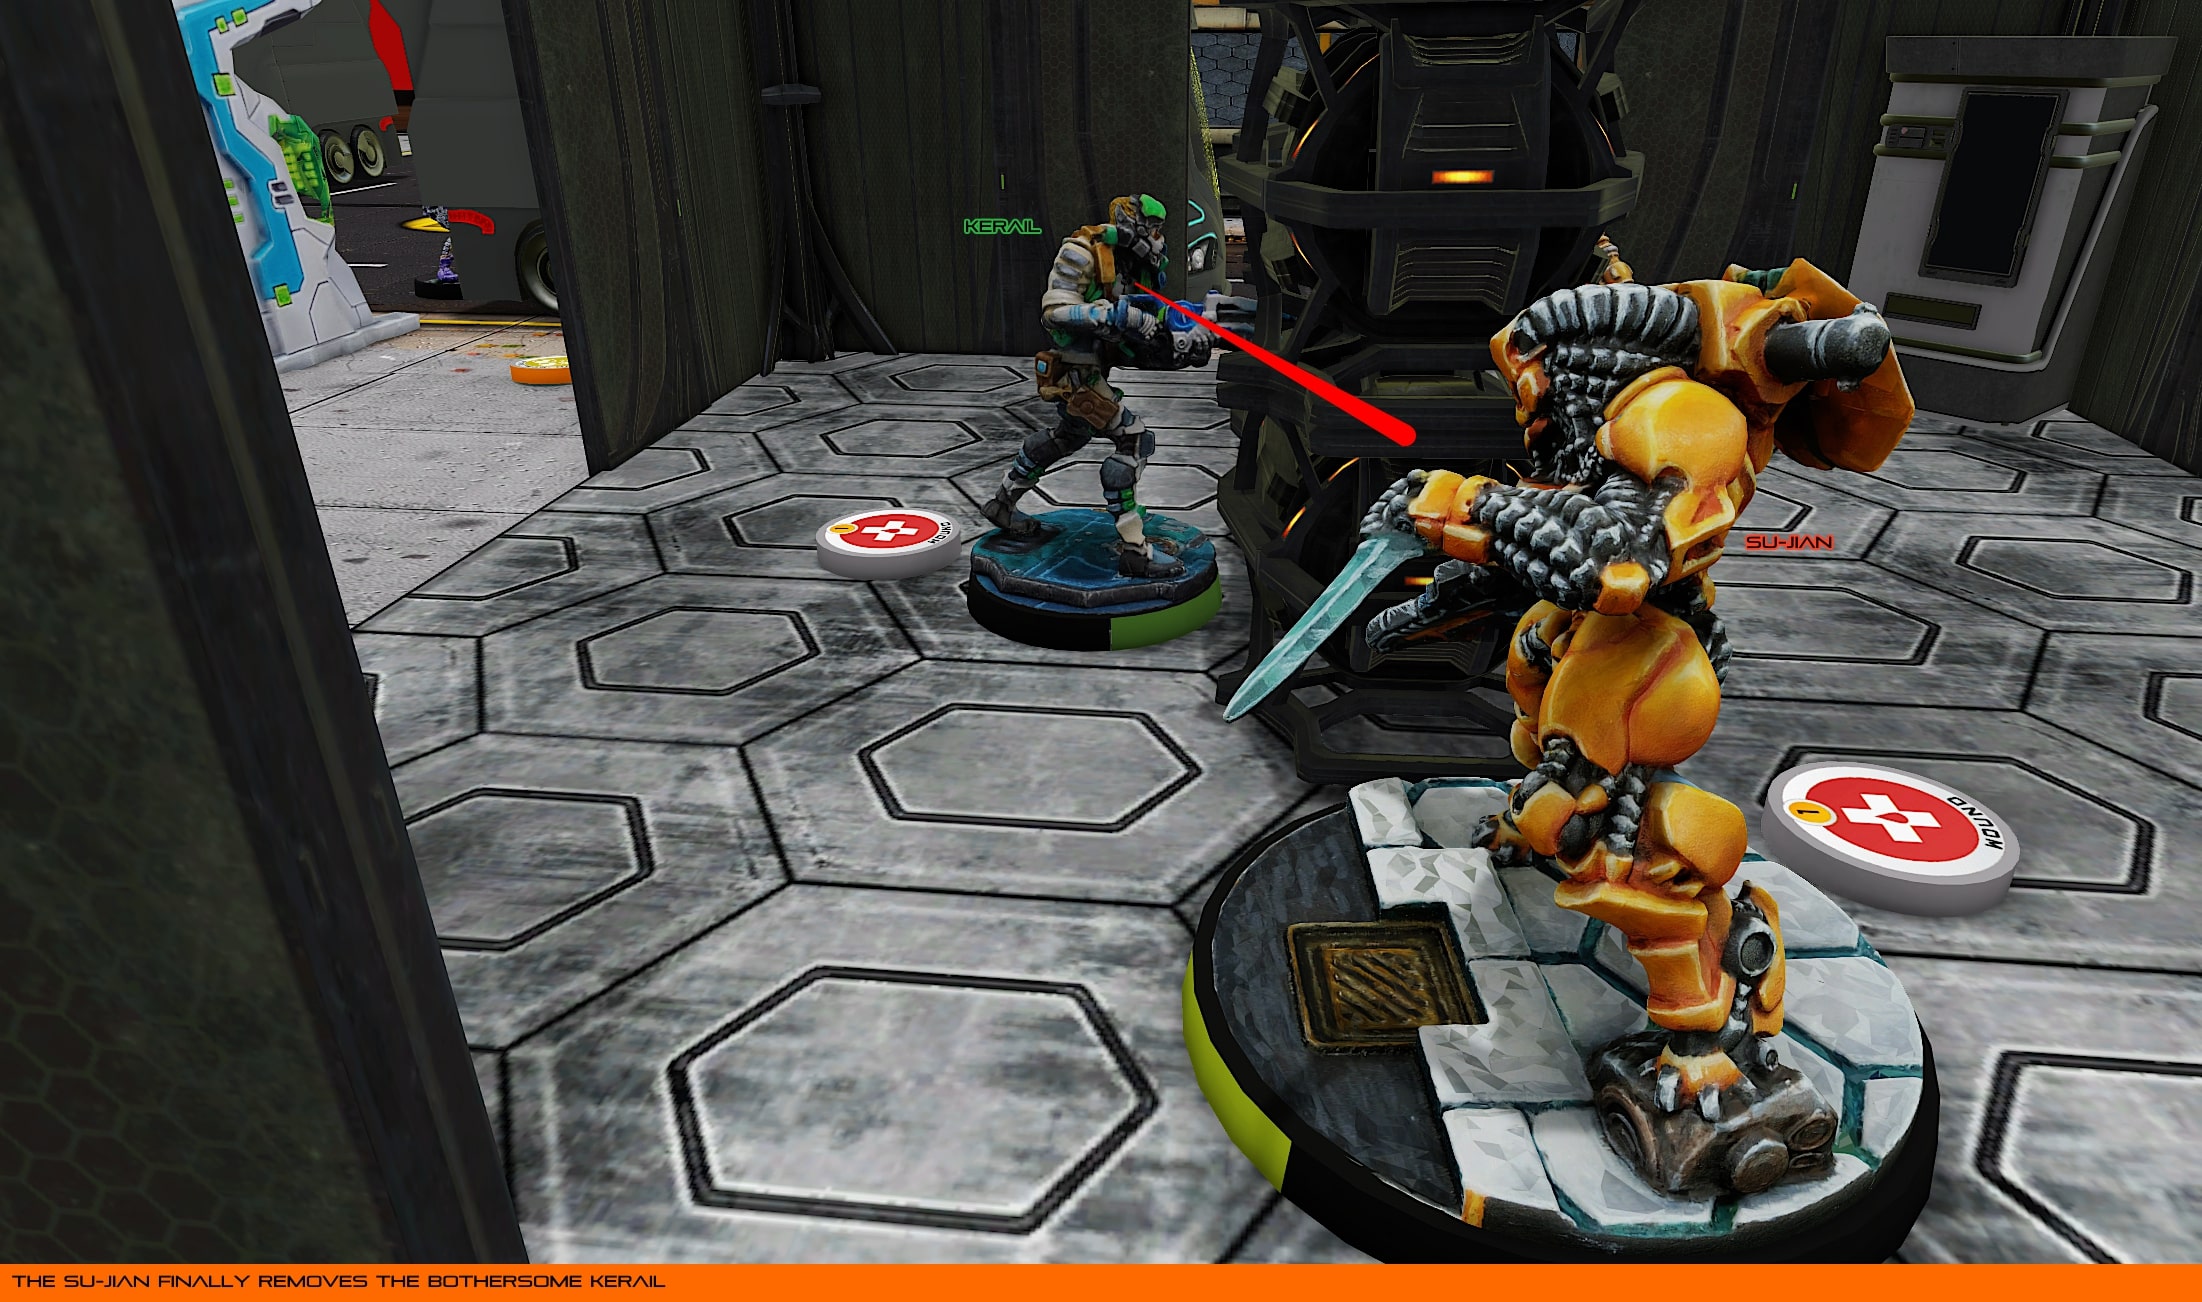
Having lost its Symbiont Armor, the Su-Jian activated again to kill the Tohaa Kerail, leaving Yu Jing in full control of the Armory.
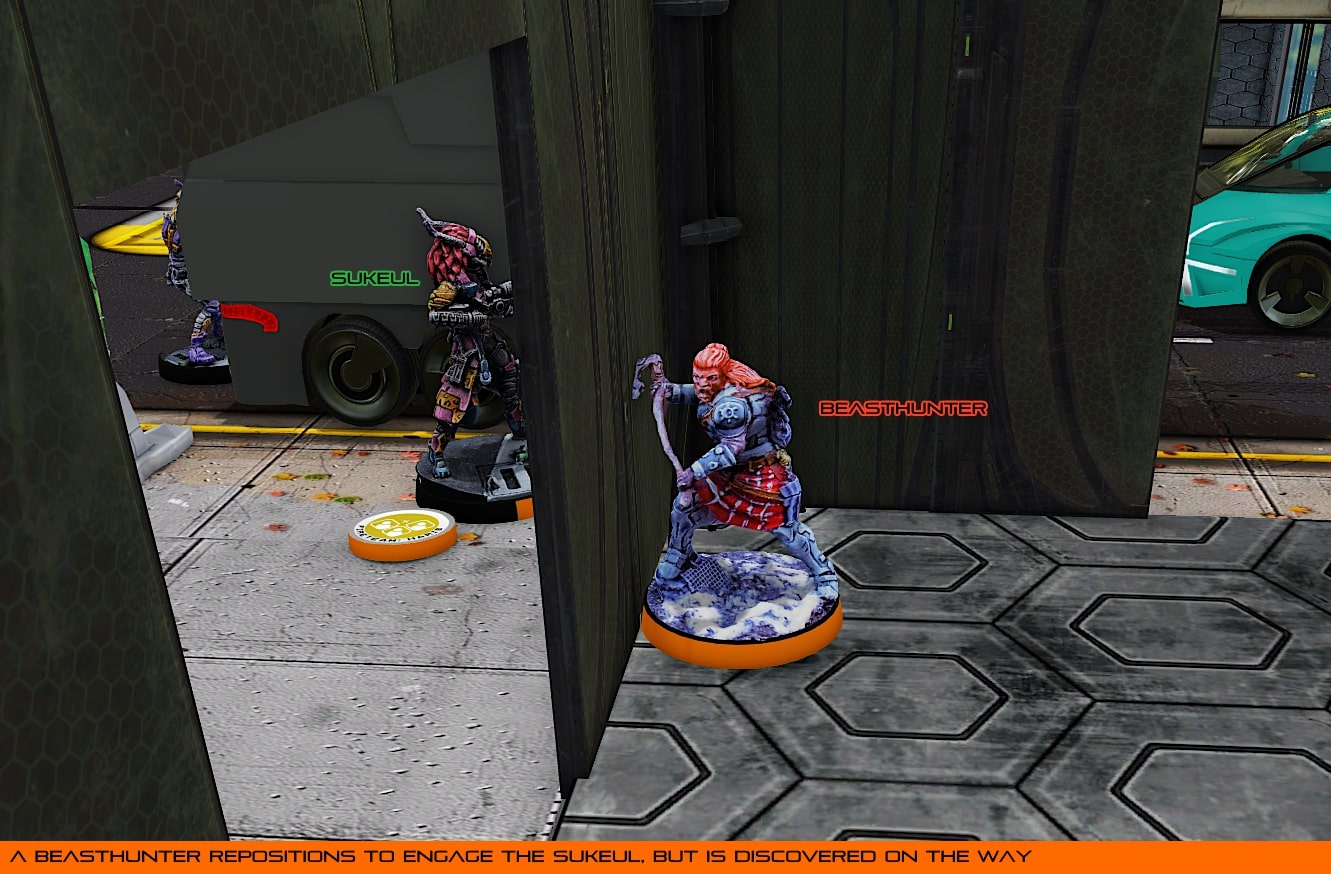
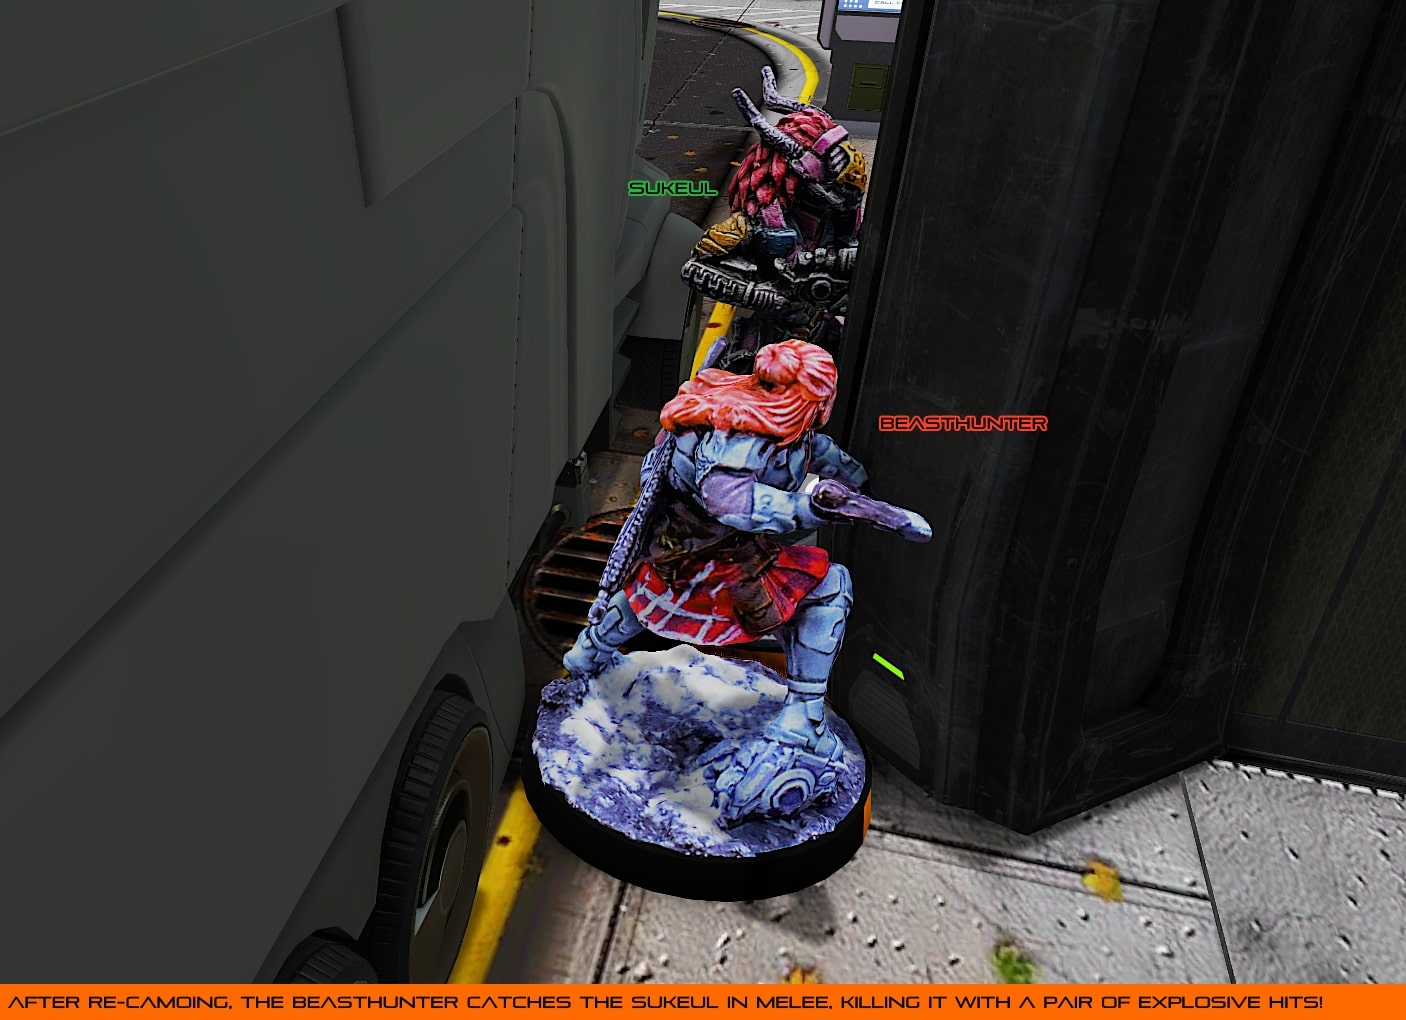
In an effort to reduce the direct pressure from Tohaa forces, the Yu Jing Beasthunter finally activates, moving up the table to engage the Sukeul HMG. An unlucky Discover roll from an onlooking Kaeltar revealed the mercenary, who spent a full order re-camoing before moving on. The Sukeul successfully dodges around the corner to try and evade the melee specialist.
The Beasthunter rounds the corner, and is able to catch the Sukeul. After a brief exchange, the Beasthunter’s Explosive CC Weapon eviscerates the Sukeul.
Low on orders, I spent three command tokens to move everyone into a single combat group, and another to reform the Sukeul Missile Launcher Triad after the move. I had kept my Taqeul Lieutenant hidden, and his Triad out of the action, but thought that they would be my best hope to dislodge the Yu Jing presence in the Armory, and secure the final round scoring.
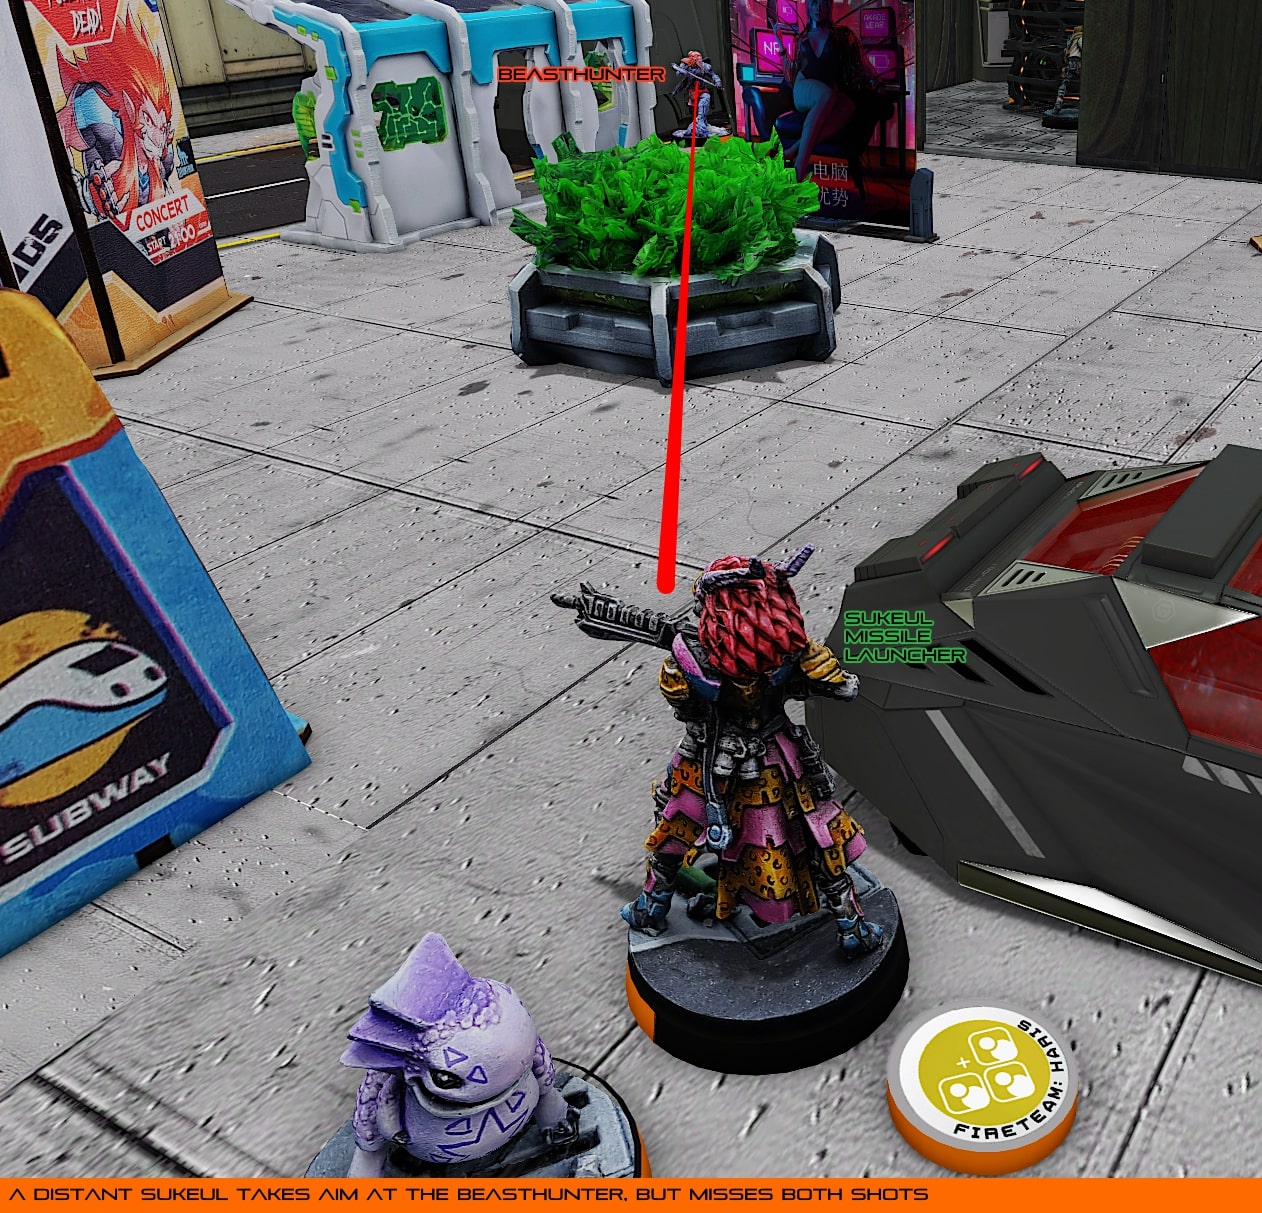
Even though I’d moved all of my remaining units into one group, orders were still at a premium. I didn’t have a lot of room to make mistakes, or lose die-rolls. My Sukeul already had a line to the Beasthunter, but all of my shots missed. Luckily, the Beasthunter’s Dodge also failed, so it was left mostly blind to my Taqeul’s triad.
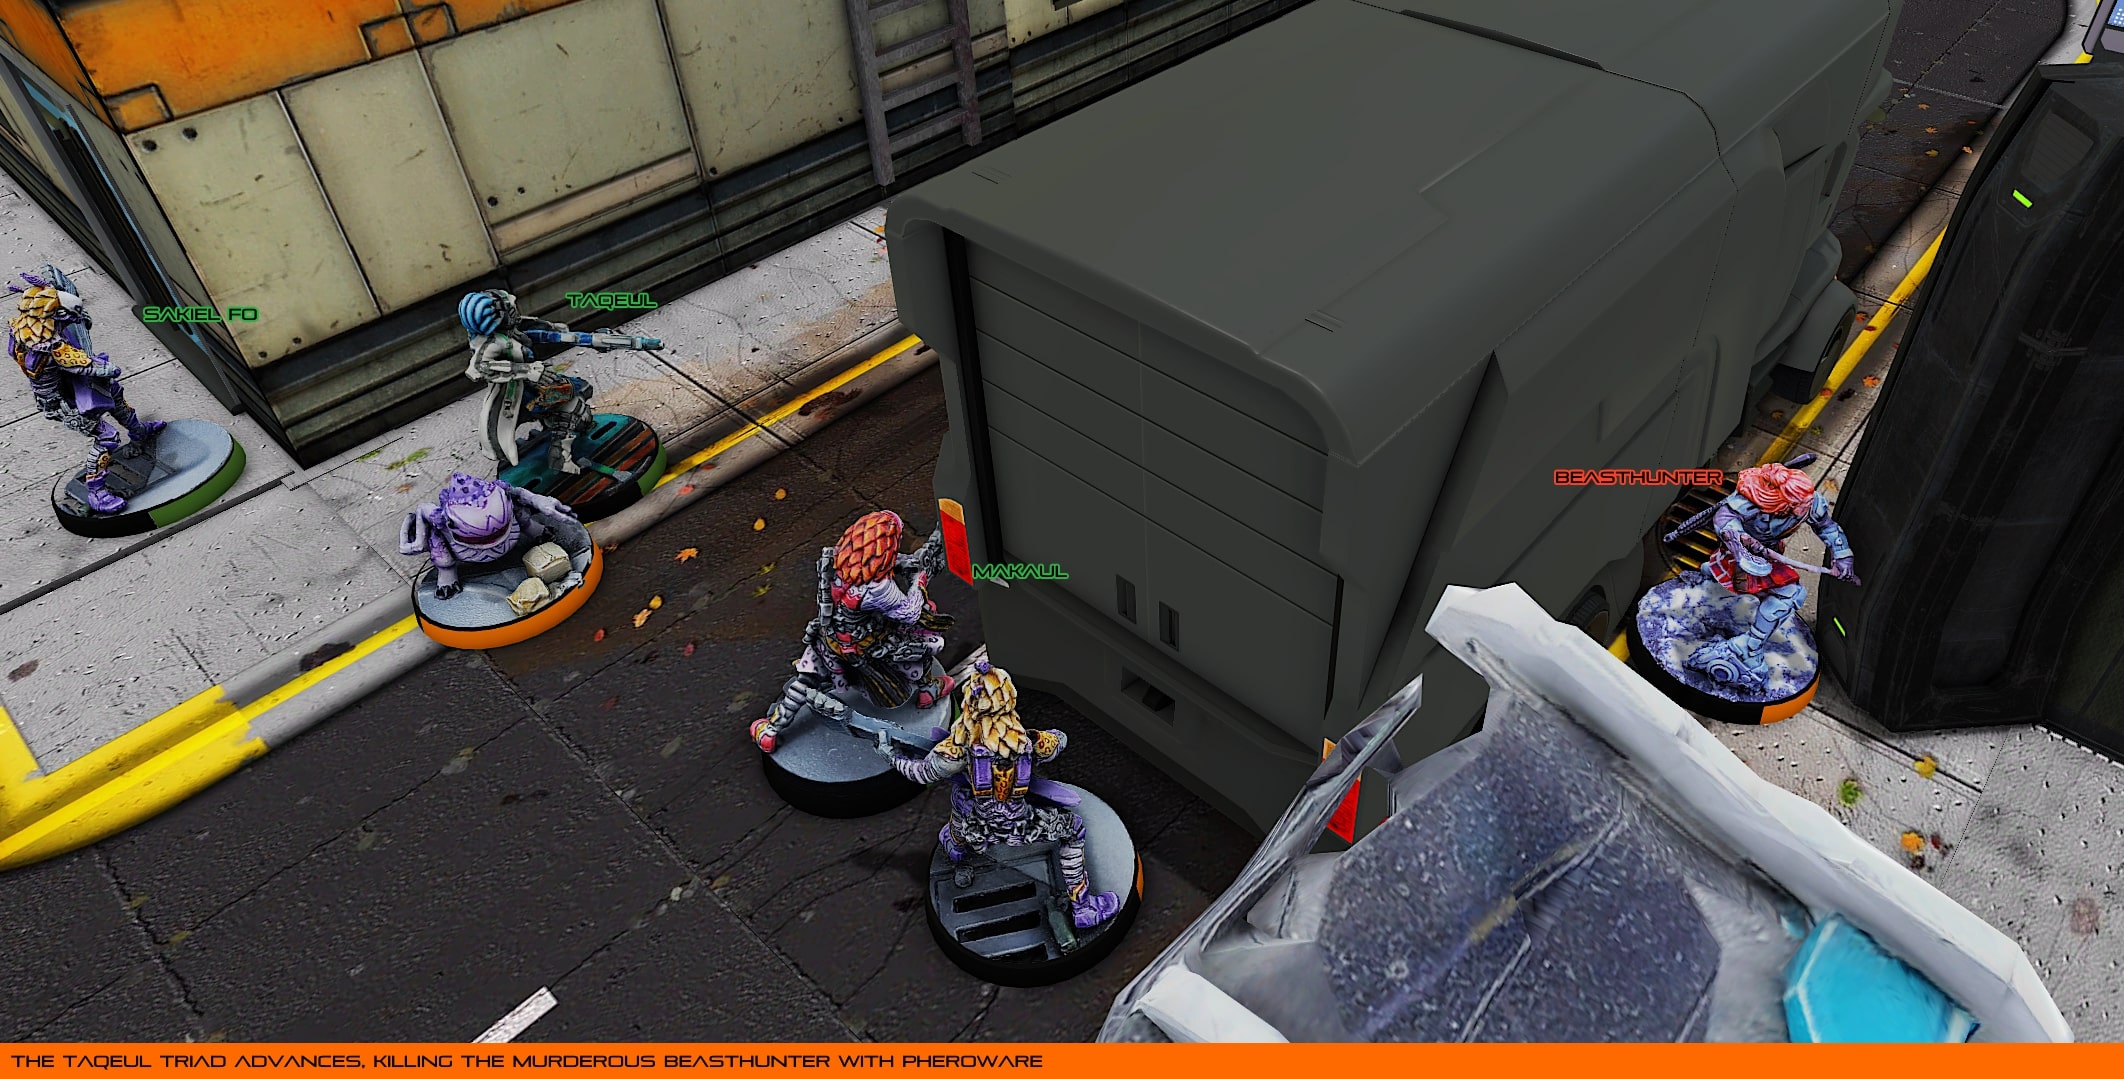
I spent a number of orders advancing the Triad up the table, reaching the Beasthunter and killing it with Endgame – one challenge solved.
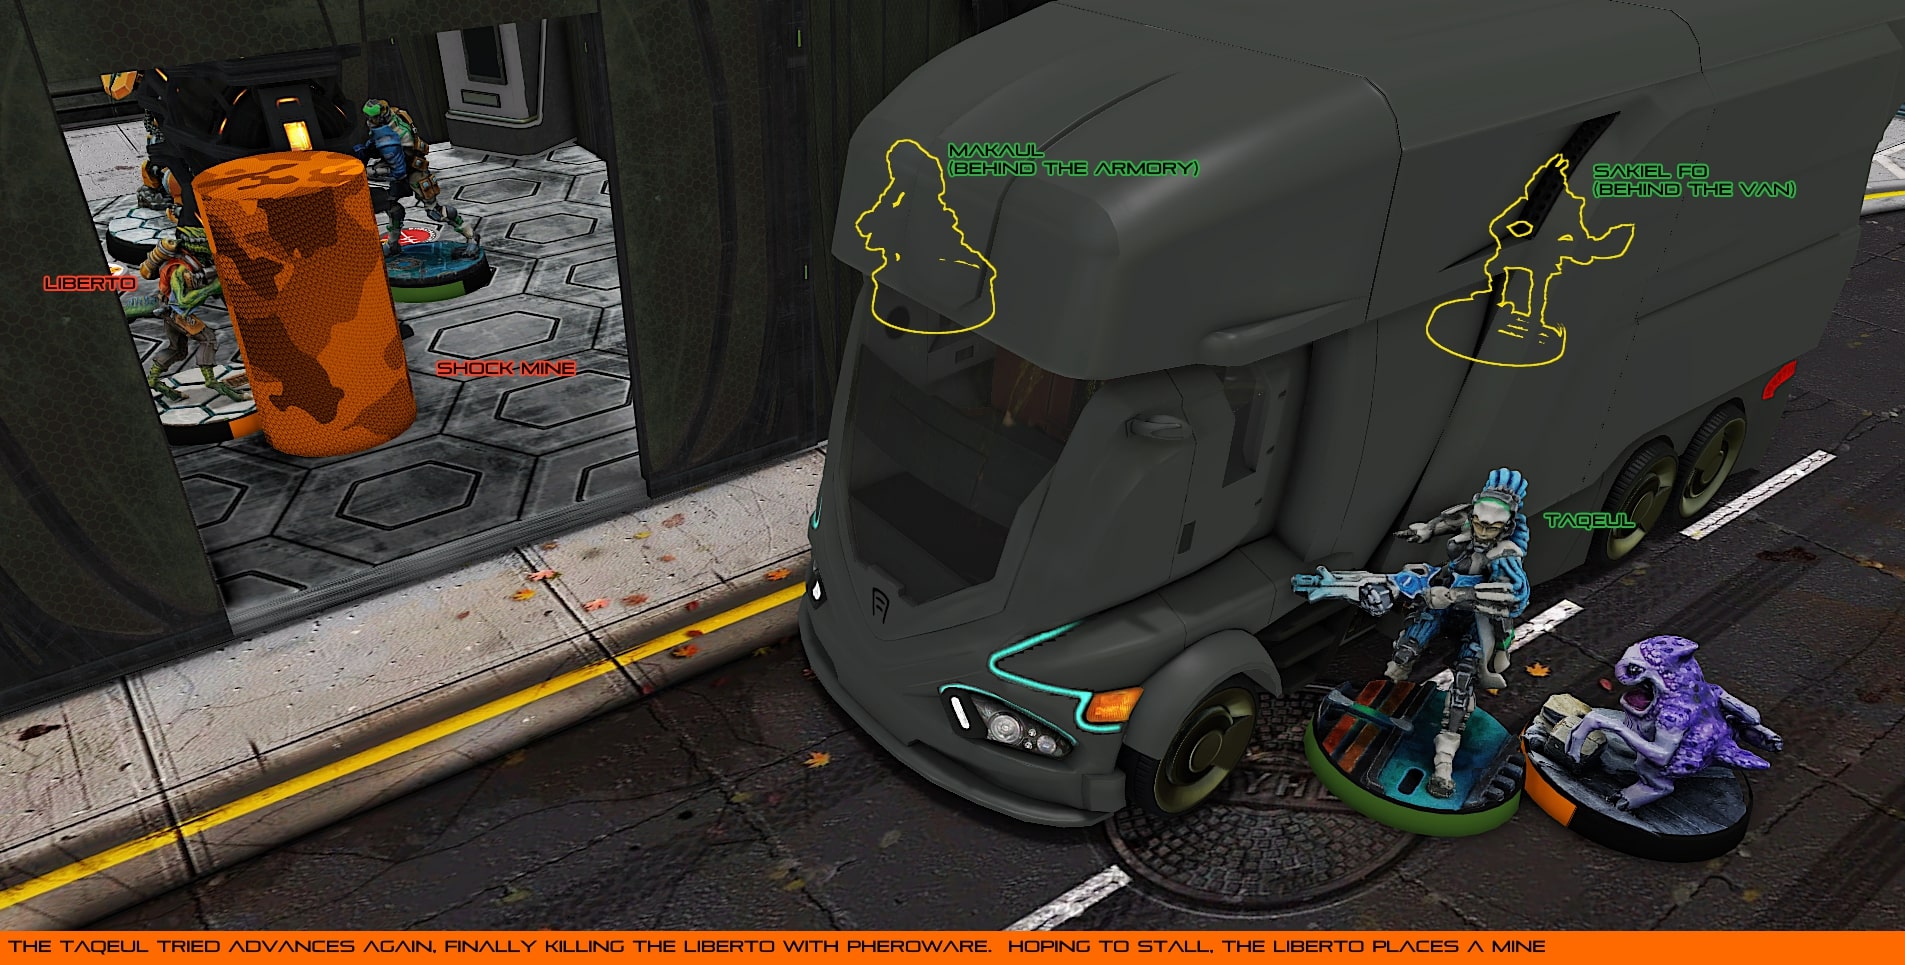
The next problem was the Liberto, who had been a thorn in my side all game, and had managed to survive everything I’d thrown at it previously. The Taqeul advanced again with its Triad and attacked with Endgame. The Liberto, counting its life cheap, put down a mine to stall further advances from the Triad, and thankfully died to the Pheroware.
With my last regular order, I moved the Makaul into the Armory. Yu Jing – knowing that they easily out-pointed the Makaul, put down a shotgun template, assuming that I would have to use the second short skill of the order to move again with the rest of the Triad. Instead, I had the Makaul shoot with its flamethrower, finally burning the insufferable robot to scrap. Somehow, the Makaul survived both the Liberto’s mine and the shot from the Su-Jian, and claimed the Armory for Tohaa!
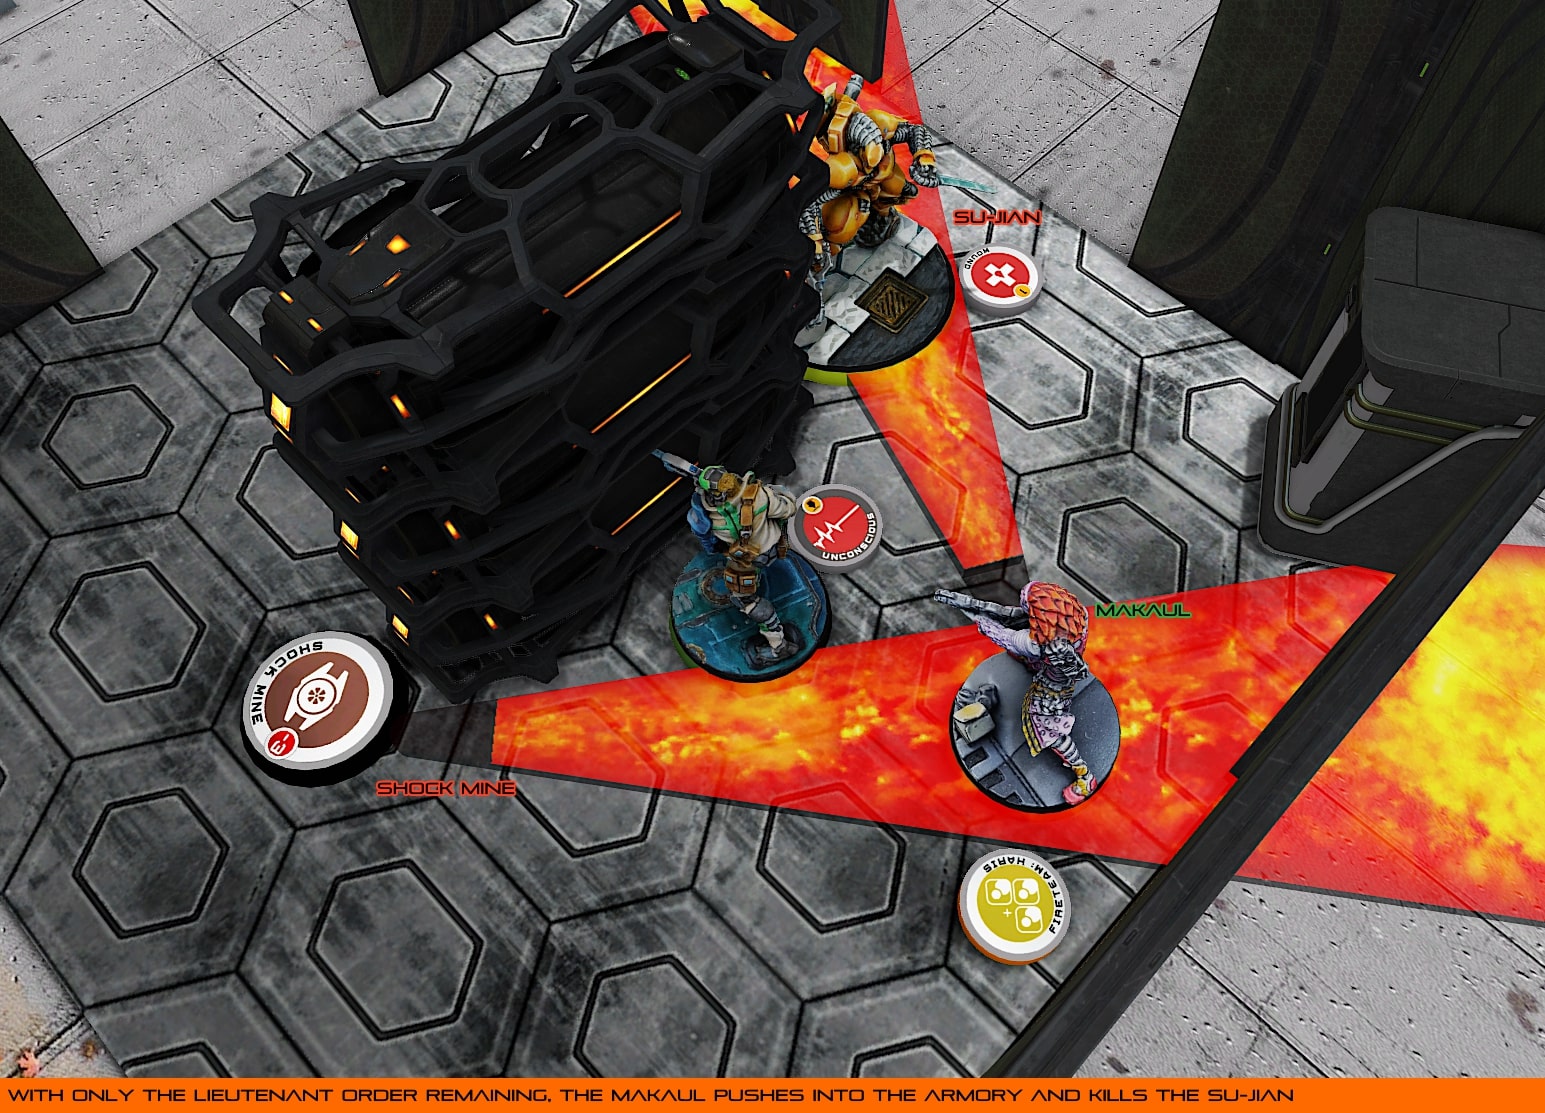
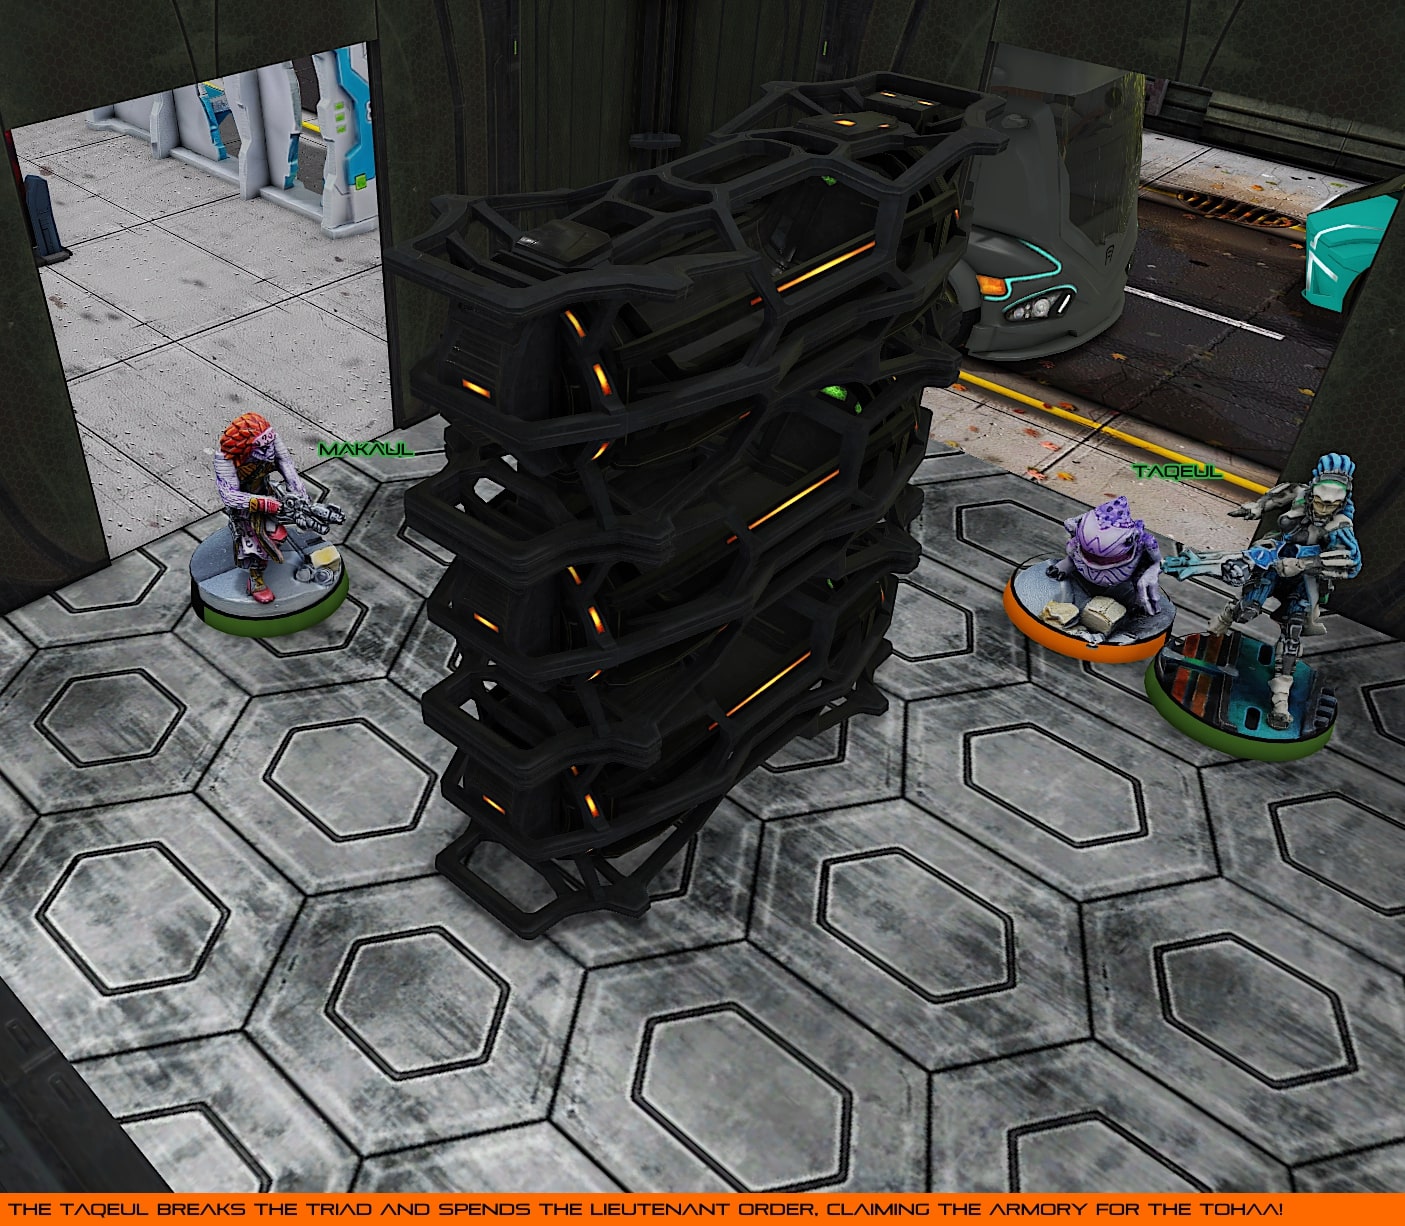
Spending the Lieutenant order, the Taqeul strode into the Armory, unchallenged to take control of the Cameliard Guard Post once and for all, ending the game with a 5:2 Tohaa victory!
Going in, I knew that there wasn’t much choice for deploying my Impersonators, with the Greif being quite poorly placed. I made up for this with Jaan, although, I probably should have placed a mine with him, rather than attempting the Dodge in turn 1. Despite the mediocre deployment of the Greif, it’s possible that by putting pressure on my opponent’s left flank, I drew them into moving the Yan Huo off to the side, and then up the ladder, which is what ultimately killed the piece.
I think in the second turn, attempting to remove the Liu Xing with the Chaksa was a decent play, but I also think that the Delegate should have tried to either shoot it with her Nanopulser or a Pistol once the flamethrower attack failed. If the Liu Xing still was lucky with the Dodge, and made its way into melee, then I could have had a second unit – either the Chaksa or the Delegate, whichever trooper wasn’t engaged – move in to attempt CC. As a third option, I could have just moved my Sukeul HMG triad up – after all, Makaul are incredible in melee. It would have saved me quite a lot of time, and probably would have made better use of the Loss of Lieutenant situation that Yu Jing found themselves in.
For some reason, I was also really careful with my Kerail, despite it having Symbiont Armor. Maybe this was because it was my only unit in the Armory, but I really should have tried to remove the Liberto with it, even at the risk of taking two wounds from a shotgun and the mine. I definitely could have used the Surda’s a bit better as well, with only being able to take a single wound off of an enemy Digger.
My third round was very tense, coming down to a really lucky save going my way on the Su-Jian. Had I positioned better in my second turn, a lot of the tension here could have been avoided and the game could have been sewn up relatively early. That said, the tension on those last orders had me and my opponent – an absolute pleasure to play against, by the way – on the edge of our seats.
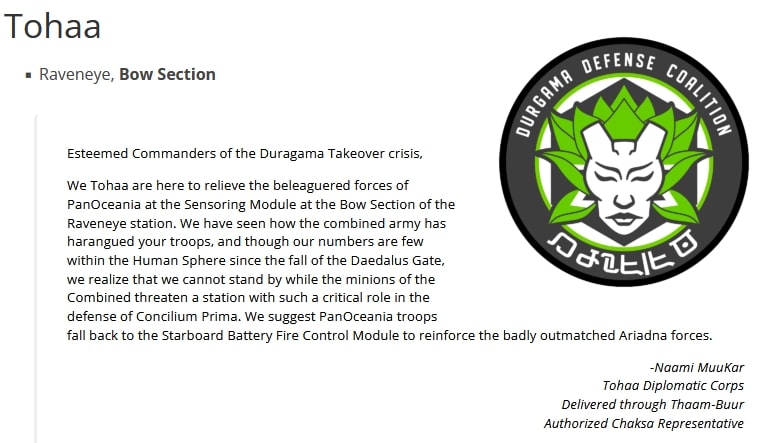
Commander, we’ve just received a communication from Jager Nadim. We’re not meant to be here at all – the rest of our forces are being directed to attack the Bow Section on the RavenEye. What’s more, we’re meant to be acting in concert with the Yu Jing forces! Best that we sweep this little incident under the rug, and abandon Cameliard to PanOceania…
Battle Report Author

Opponent

Army Lists Used In This Battle
Recommend Commander For Commendation
Share this battle with friends
heyitsbrenWins

What a great report full of awesome action shots! I love it!
Really enjoyed the battle report! Super clear to understand what is going on, and you whopped my ass real good xD
Great report!
Thanks all! It took forever to write up, but I should have another coming soon. Trying to reorganize toward the Bow Section this evening
Wow a fantastic report. Thank you Brohaa
(/^▽^)/ well done brohaa, great report.
Lots of great action shots.