Fought At Zebu Research Center: Symbioresearch Labs
646 days 4 hours 48 minutes ago
Symbiosample Rescue
200 POINTSWe've pulled back after the attempted capture of the Bow Section on the RavenEye, pursued by Combined Army hostiles. Our teams have split up, with a larger force moving to defend Cameliard and a smaller force - my command - withdrawing to the Symbiosample Research Station located in the Zebu Research Station.
Initial reports on the area aren't promising. The human garrison that were meant to hold this location have either been overrun, or were negligent in their duties. A massive Biotechvore plague has swept through the area, possibly being released due to combat, or as a salt the earth measure by the humans, abandoning their living subjects to a miserable fate.
Our priority is the protection and evacuation of the Symbiosamples in the Research Station. This will be a controlled withdrawal under fire from the Combined Army. Retreat is inevitable, but if we can rescue the Symbiosamples, this can be considered a success.
Mission: Biotechvore
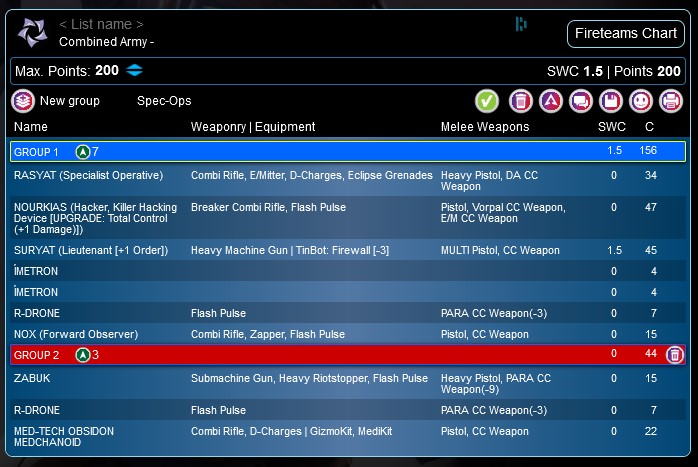
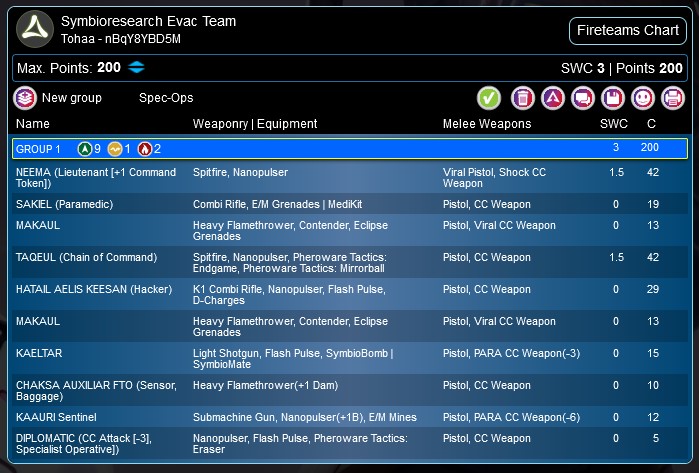
Forces: Vanilla Combined Army (Jummz) versus Tohaa (Hey It's Bren) - 200 points
Deploy First: Combined Army
First Turn: Combined Army
With this being a mid-week game played on Wednesday evening, we decided to go for a lower point total to finish at a reasonable time before having to work the following day. Such is the pressures of a two-week campaign.
Jummz won the Lieutenant roll (as is our tradition) and chose first turn, which I was pretty happy with. I wanted the opportunity to have the Combined Army units advance toward me, forced up and hopefully into weaker defensive positions due to the Biotechvore. Then I could thin them down with bursts from my Spitfire-wielding active pieces, or make use of pheroware through the bunker walls, which were just outside of the plague zone.
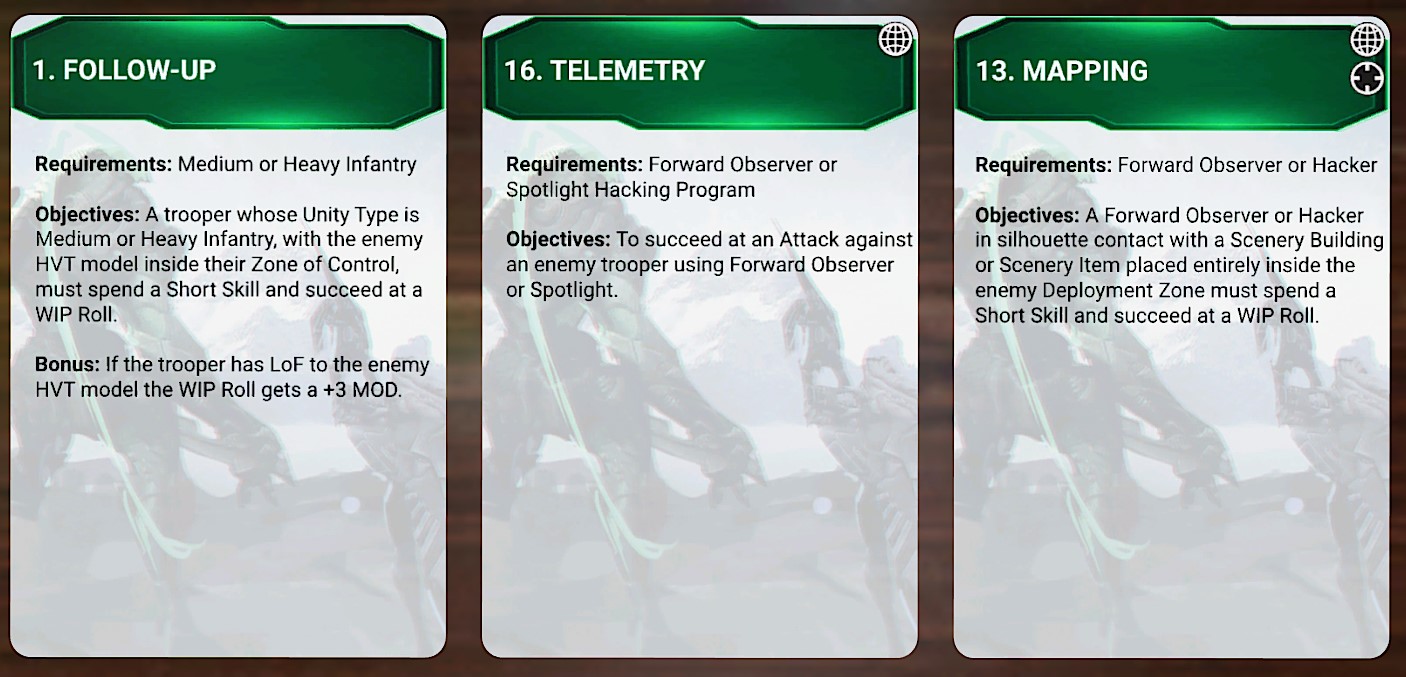
I pulled a set of relatively tricky Classifieds, given the Biotechvore effect present in Deployment Zones, with Follow-up, Telemetry, and Mapping. Follow-up seemed the simplest of the three, provided I could get it done while Neema or my Taqeul was still wearing their Symbiont Armor (and thus, still HI or MI, respectively).
Taking Telemetry was a mistake that I only realized near the end of the game. Normally, I bring a Sakiel FO along in my Triads, but I chose the Paramedic profile this time around, hoping to cover the Doctor Classifieds, and have Aelis manage the Hacking options. Unfortunately, doing so meant that I was missing the ability to Forward Observer and Spotlight since Aelis is a Killer Hacker.
Mapping, due to the map and the Biotechvore effect, was going to be quite tricky. The mission features 8" deployment zones, so I'd need to push quite far up in order to complete it, and the only two scenery elements I could select were on the 4" line of the opposing DZ. In a pinch, I could use Aelis to do this, and then either weather the Biotechvore with her BTS 4 (modified by the hazmat effect used in the mission), or more likely, regen her on a 15 (again modified by the Apotheke special rule) if I absolutely had to leave her in the enemy deployment zone.
Doing this wouldn't be easy though, especially given that I'd need to complete it on my first turn (impossible) or my second (challenging). Leaving anyone in the Biotechvore zone at the end of the game would kill them, shaving into my own objective points, and handing Jummz a free kill.
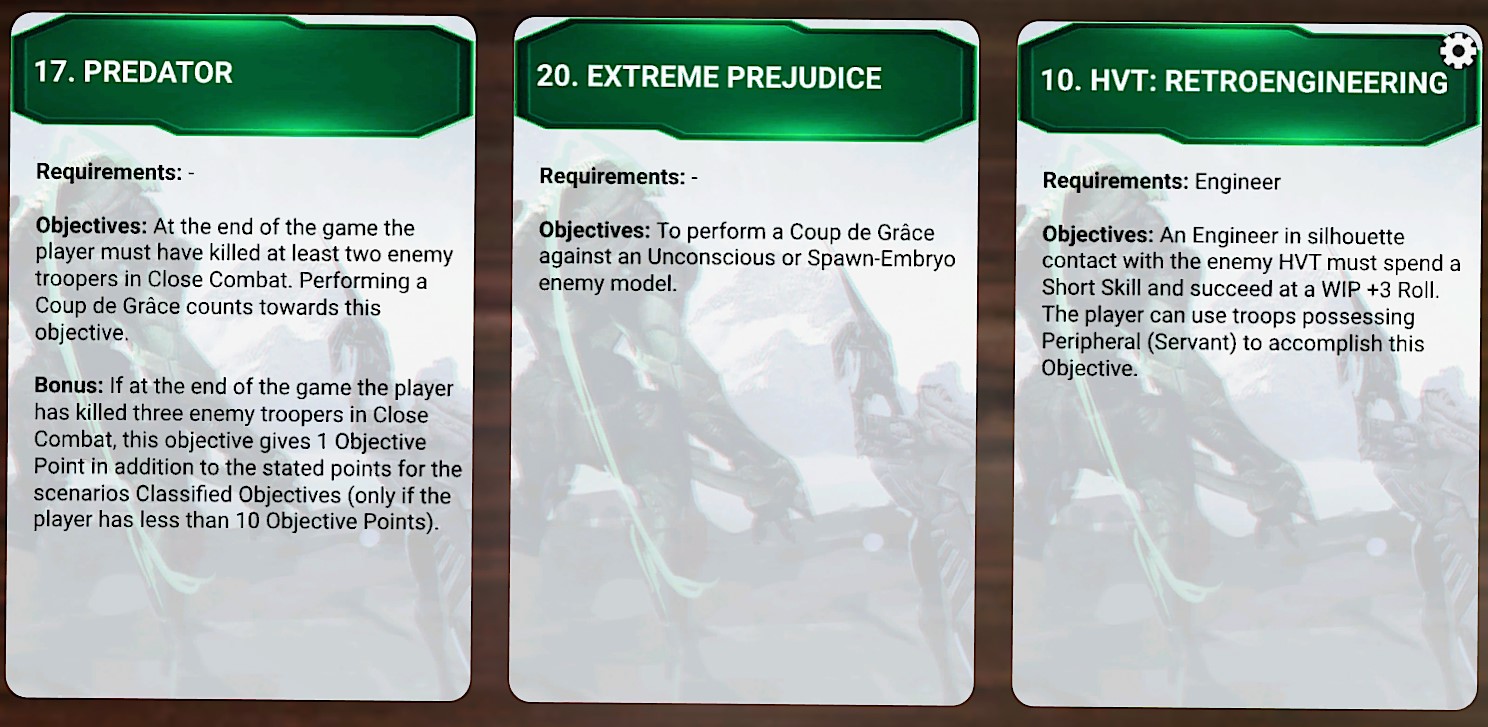
Conversely, Jummz pulled some incredible Classifieds for Combined, with Predator, Extreme Prejudice, and HVT: Retroengineering. The first two he planned to do quickly with Nourkias. The map we chose featured a narrow midfield that would provide ample opportunity for close combat.
HVT: Retroengineering would be possible, but difficult. With Dr. Worm's quick movement, the Med Tech could possibly get to the Tohaa HVT sometime in the third turn provided the path was already clear, but doing this objective wasn't as pressing as claiming the two possible points from Predator, and then mopping up survivors for more points.
Flipping a Command Token to hold an addition reserve, Jummz put down an insignificant amount of points on the table, opening the game with a pair of Imetrons - both of whom managed to deploy successfully, out of sight, next to the entrance to the bunker in the center of the table, near the Combined Army HVT. Unfortunately, both units weren't placed outside of the Biotechvore Zone, and would have to make rolls for the rest of the game to survive the lethal plague.
A pair of R-Drones went down in cover, watching the bunker entrance but located at the back of the Combined deployment zone, putting themselves at risk of the Biotechvore plage as well. A Zabuk went on Jummz' left side, taking cover against a tree, and a Nox FO went in the middle of the table, as far up as possible to claim cover behind a derelict ATV, left by the fleeing O-12 garrison.
Dr. Worm took up a position next to the Nox, out of cover, but obscured enough that it was unlikely that it would be shot before moving up the field. With only a handful of low-point units on the field to react to, Jummz passed deployment to me.
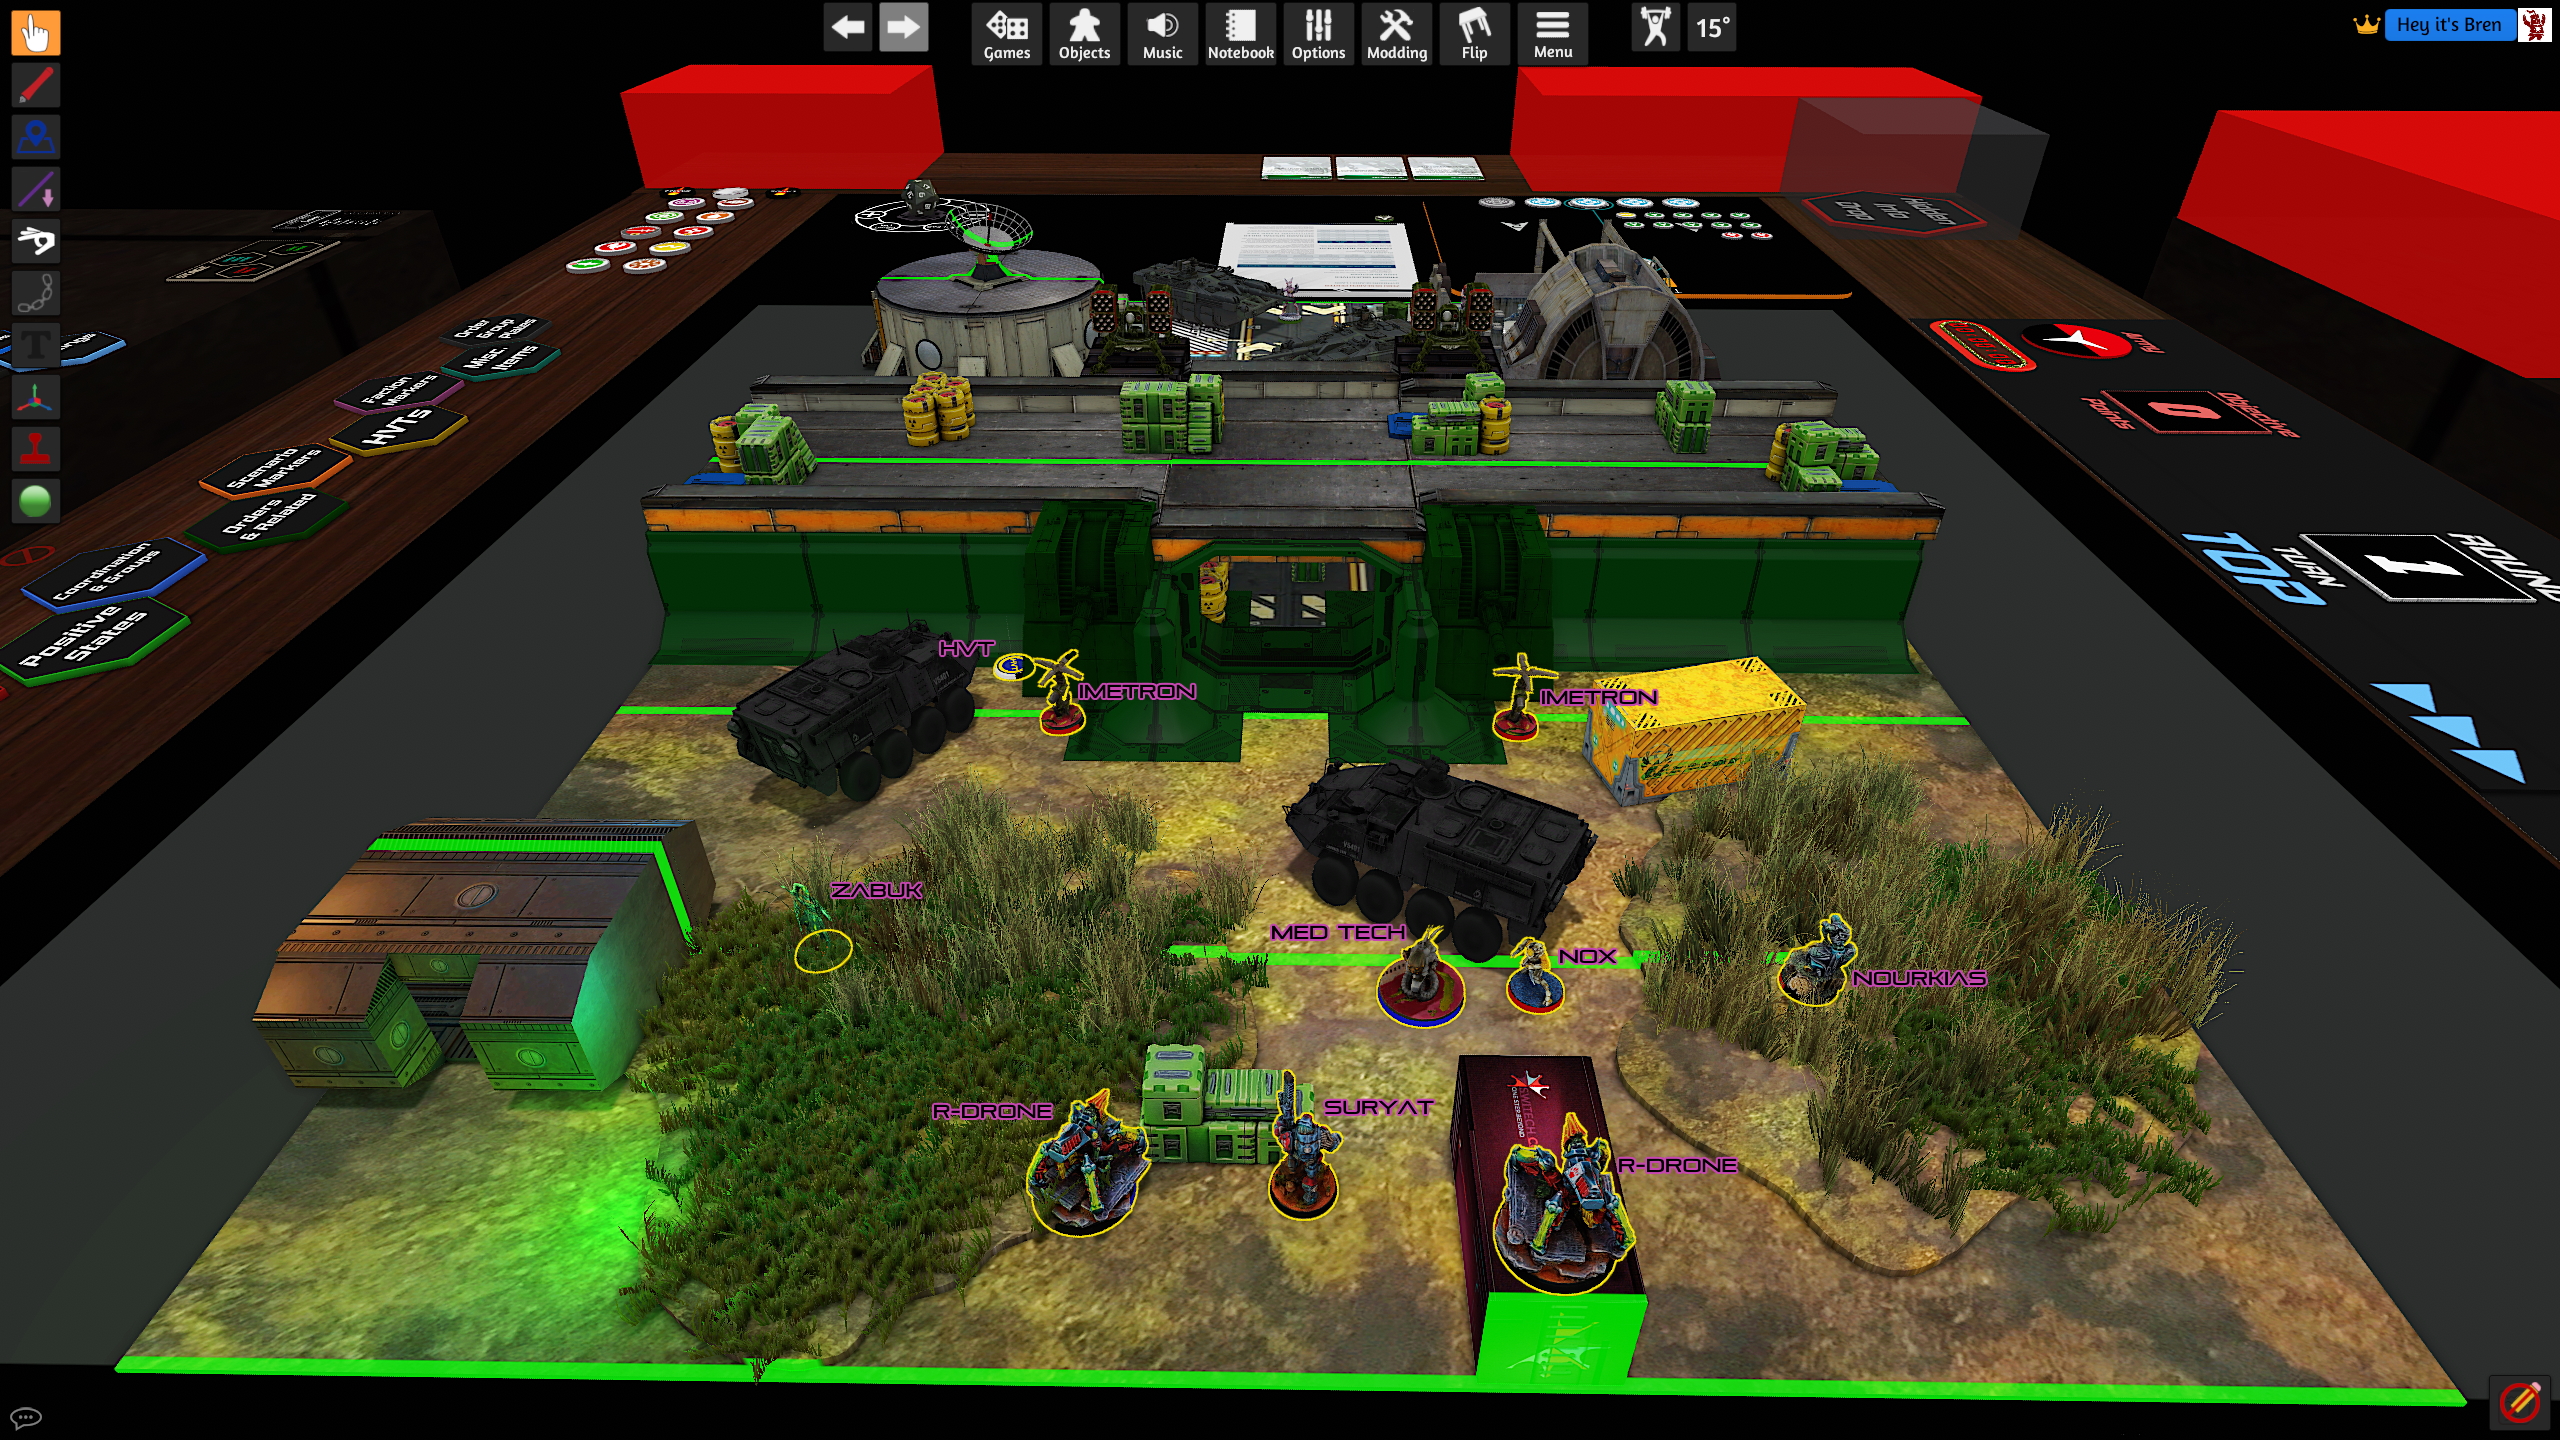
Once again faced with a nearly empty enemy Deployment Zone, I placed by two Triads carefully, with Neema's Haris going on my right flank, and the Taqeul with Aelis going on my left. Both Spitfires were watching the bunker doors, so anything wanting to come through the center would have to deal with linked ARO's.
I put the Delegate prone near the Taqeul Triad, hoping to run her up and use Eraser through the bunker's walls. Unsure if Jummz would risk an Impersonator, I put my Kaauri with its Biometric Visor in the middle of my Deployment Zone, hoping that it would be enough to deter any would-be "additions" to the Tohaa force. In retrospect, this should have been my reserve.
Watching my back line, I put a Chaksa Auxiliar prone. I'd need to move out quickly, so I was careful not to put anyone in places that would call for jumping or climbing. I wasn't too worried about moving up with my Triads, but I had a fair number of single units that would need to be managed with coordinated orders to keep safe, and I'd also need to juggle the Delegate, who would have to advance on her own due to being Irregular. Holding my Kaeltar back, I passed the reserve step back to Jummz.
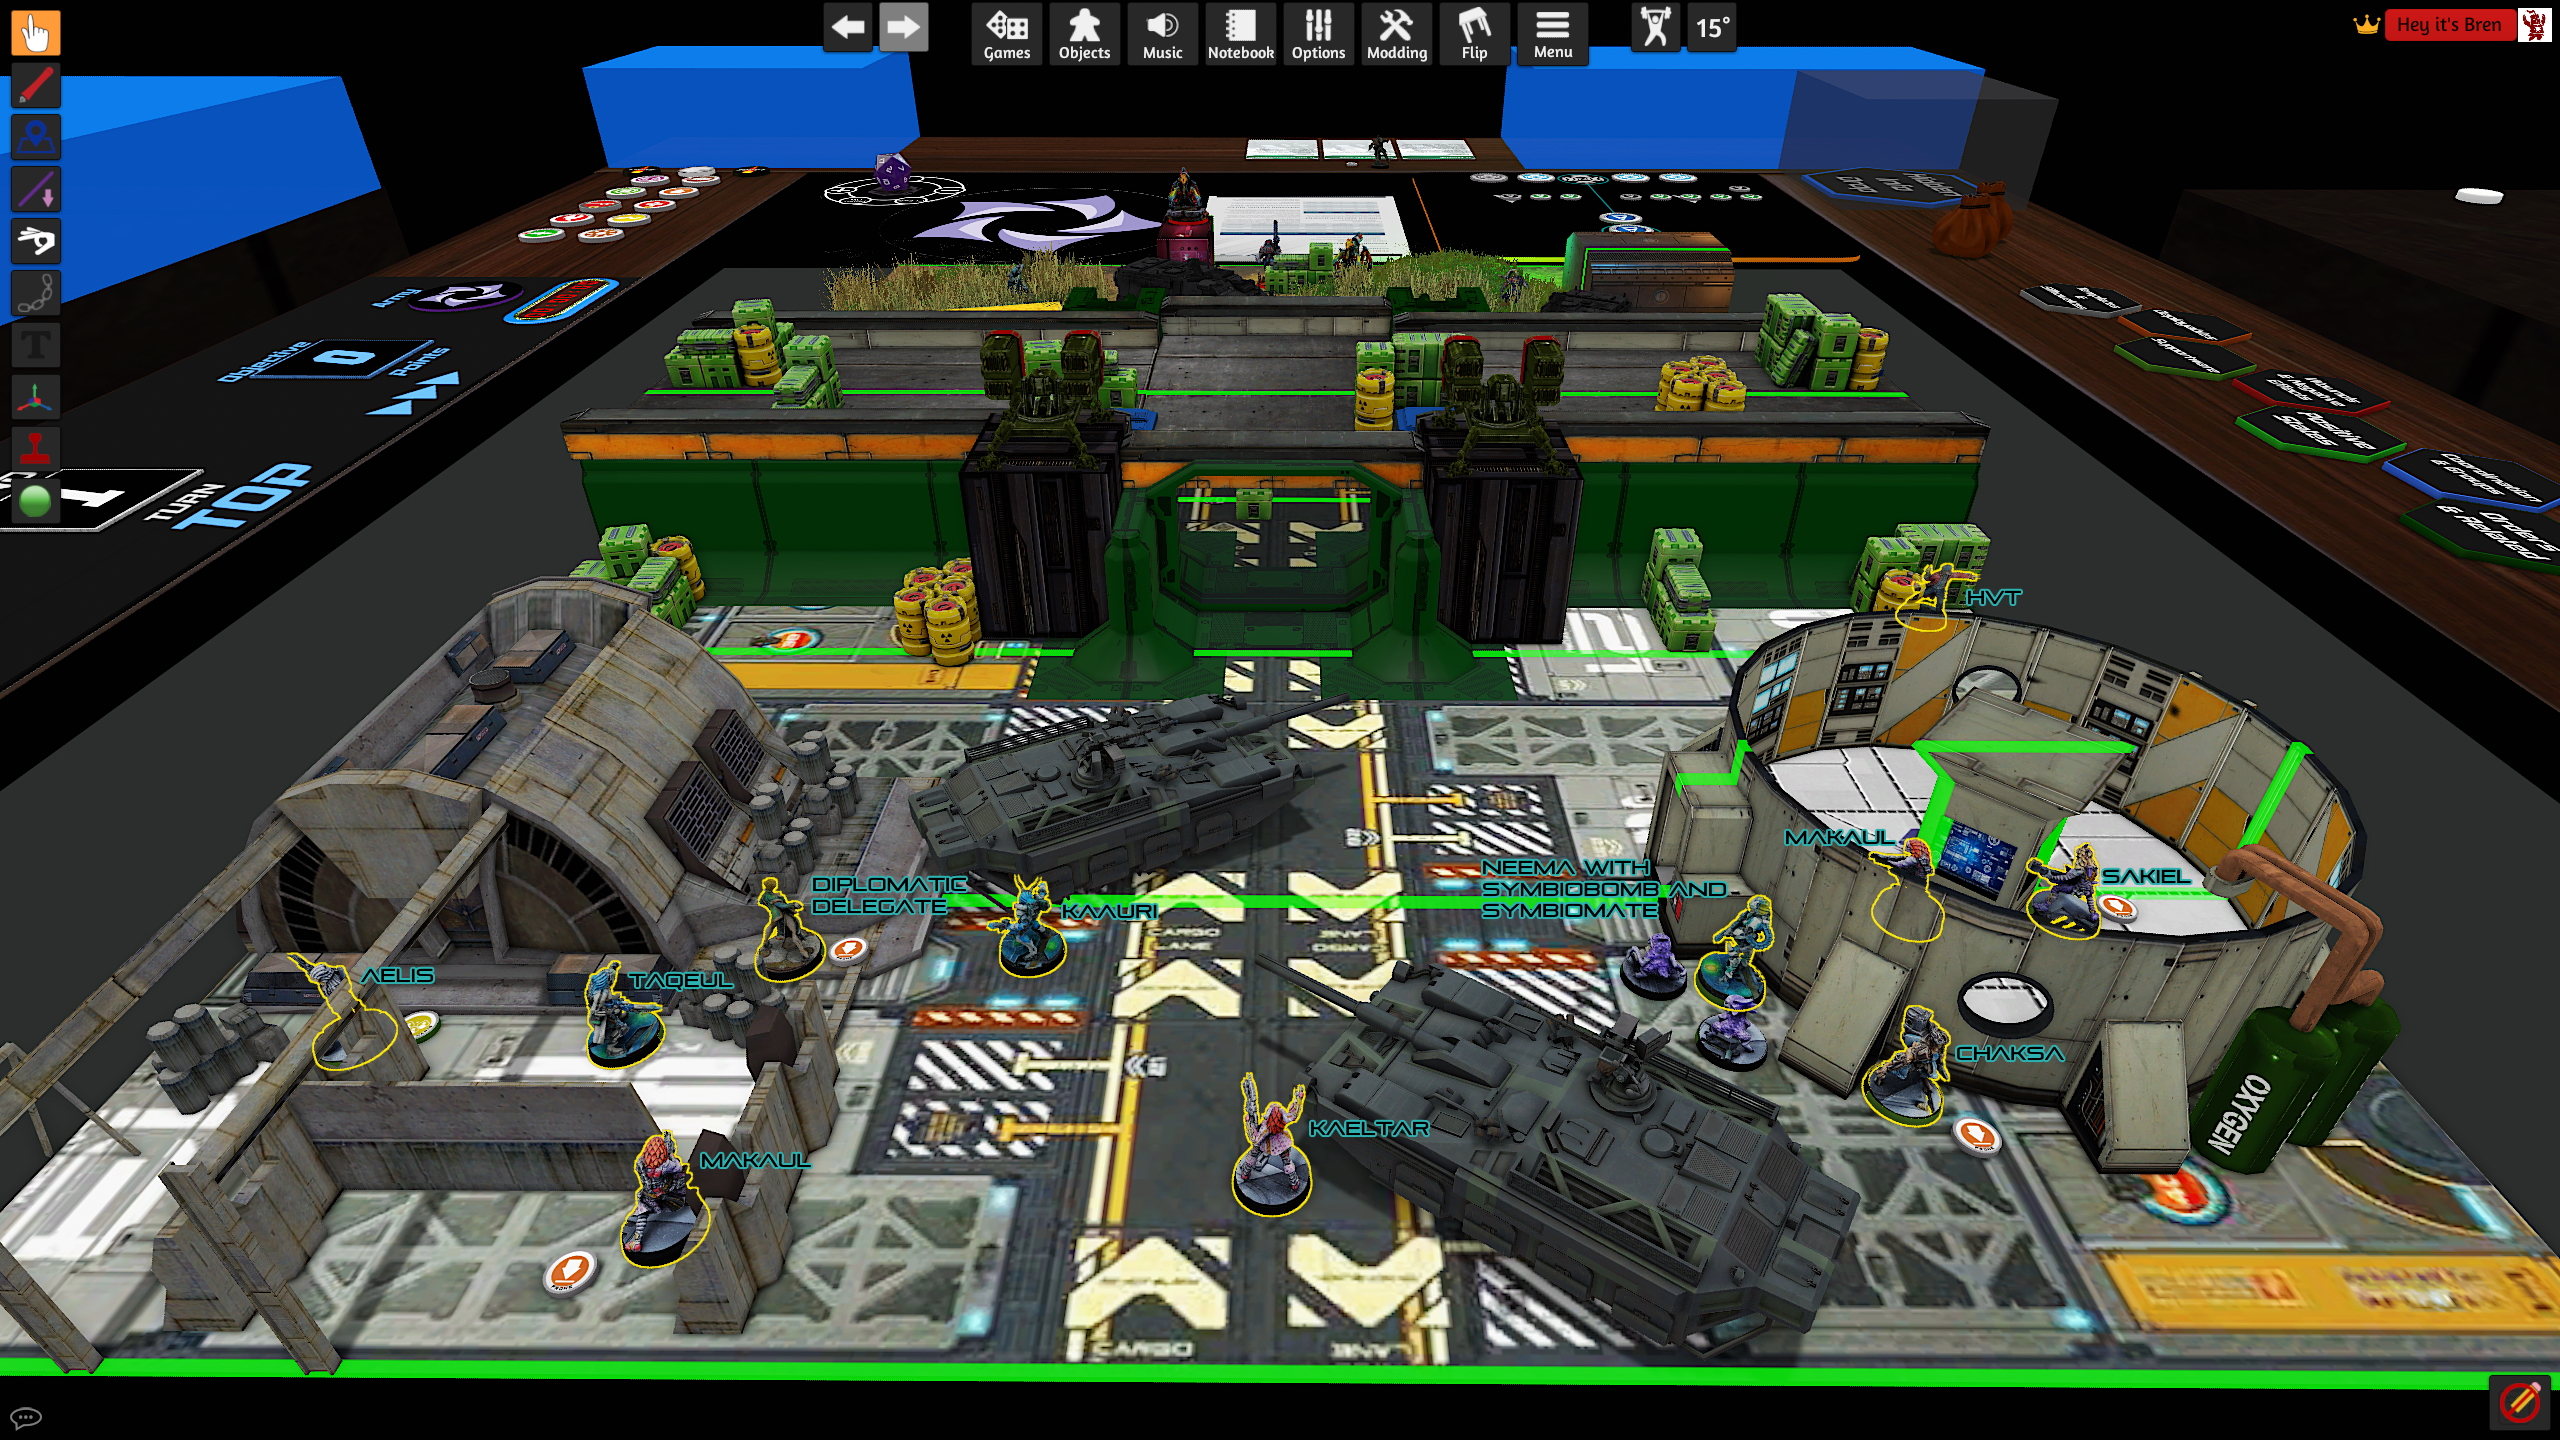
Jummz brought out his Suryat Lieutenant and Nourkias, placing the HMG wielding Morat looking down an alley into the bunker, and Nourkias on his right flank. I didn't think the additional two units were enough to add up to a full 200 points despite their cost, but wasn't sure where a Noctifer might lie in wait, especially on this board.
To support my two Spitfires watching the bunker, I put a Kaeltar down in the middle of my deployment zone in cover, hugging the front of a tank. Her Symbiobomb and Mate both went on Neema, who I assumed I'd be pushing with, and I wanted to leverage her WIP 15 for melting faces with Endgame.
With Deployment complete, we moved on to round one.
No sign of the Avatar - it must have followed our other team making their way toward Cameliard, but we're not out of the woods yet. We've made our way into the Research Center and secured the Symbiosamples, but we need to evac immediately.
The Combined Army is on our heels, setting up a substantial gun emplacement in the jungle beyond Zebu's gates. They won't be able to dig in there - it seems that O-12 agents have released a plague rather than let the Research Center fall into enemy hands - I'm not sure how that fits into their precious Concilium Convention standards, but we can investigate war-crimes later, if we survive.
I flipped a command token to strip orders from Nourkias' group, hoping that there wouldn't be enough left to move everything forward and out of the Biotechvore Zone.
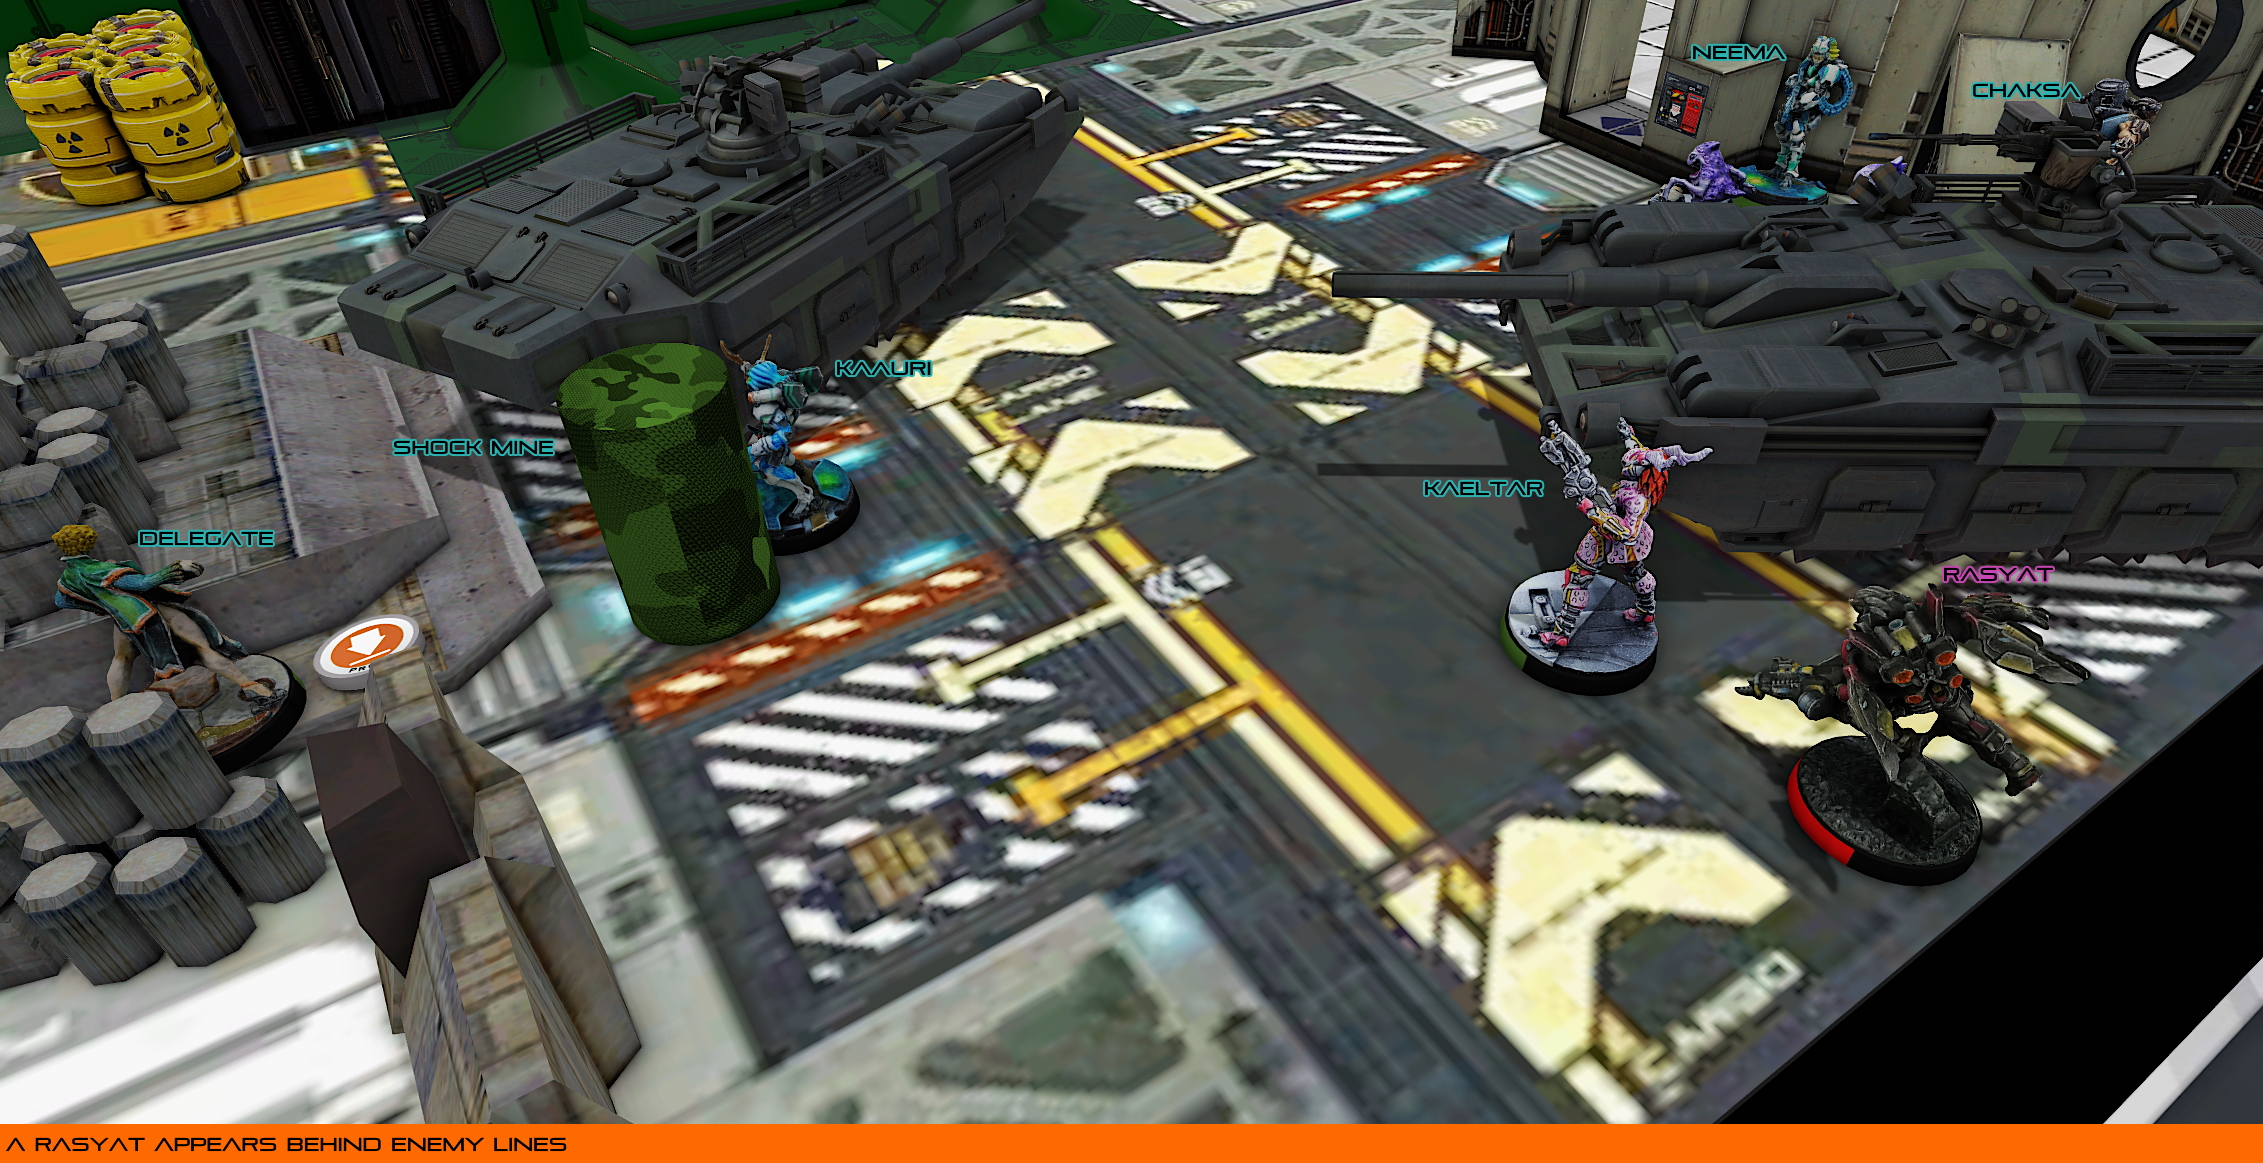
A Rasyat walked onto the Tohaa deployment zone, hoping to cause chaos in the Tohaa ranks. After a round of unsuccessful dodges, the Kaauri reacted by placing an E/M Mine, and Neema used her Symbiobomb to successfully Isolate the Combined Diplomat, leaving it without orders and at the mercy of the Biotechvore plague.
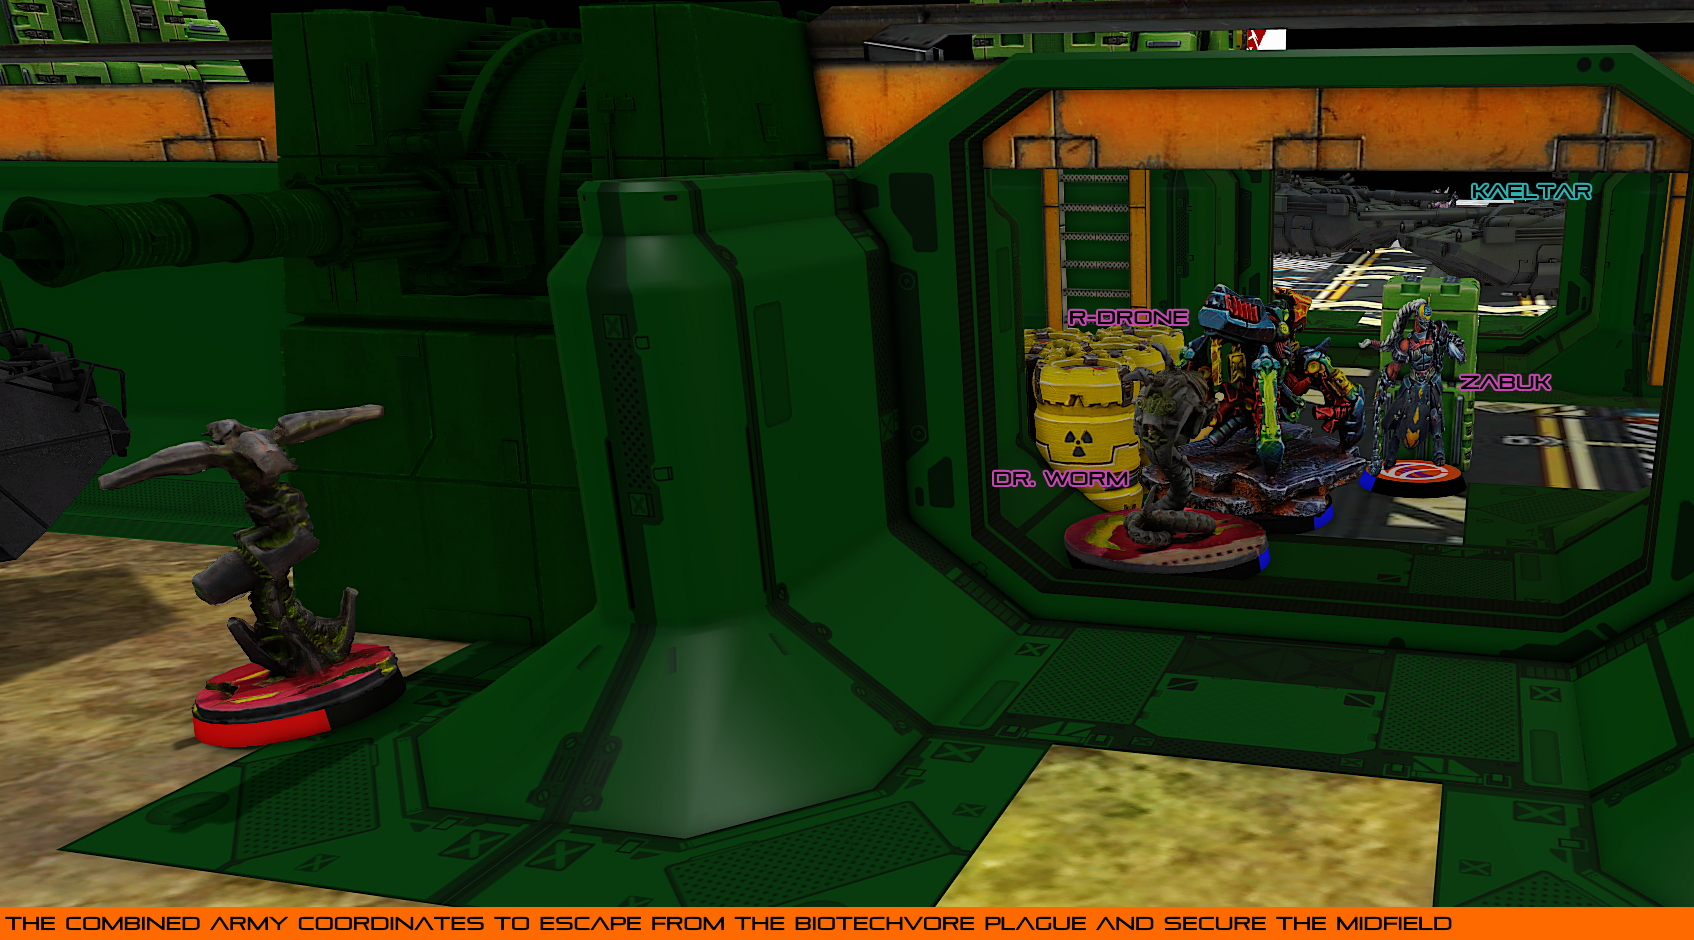
With his initial gambit countered, Jummz spent his group two orders coordinating his Zabuk, R-Drone, and Med Tech toward the center of the table in an attempt to protect them in the bunker and defend the entrance with the Zabuk's Heavy Riotstopper. Once inside, the Kaeltar tried to Flash Pulse the Zabuk, but missed its attack.
Moving back to Group 1, Jummz spent the remainder of his orders jumping Nourkias forward and onto the top of the bunker. The Kaeltar flashed a few times, but was unable to stun the Samaritan, who ended the turn by Cybermasking.
The Biotechvore plague ripped through the Combined troops, knocking the Isolated Rasyat, an Imetron, and an R-Drone unconscious and severely depleting Jummz'z order pool. The Suryat Lieutenant was unaffected, along with a Nox that had remained in place, and the second Imetron, but the pressure was on to move forward and out of the lethal cloud.
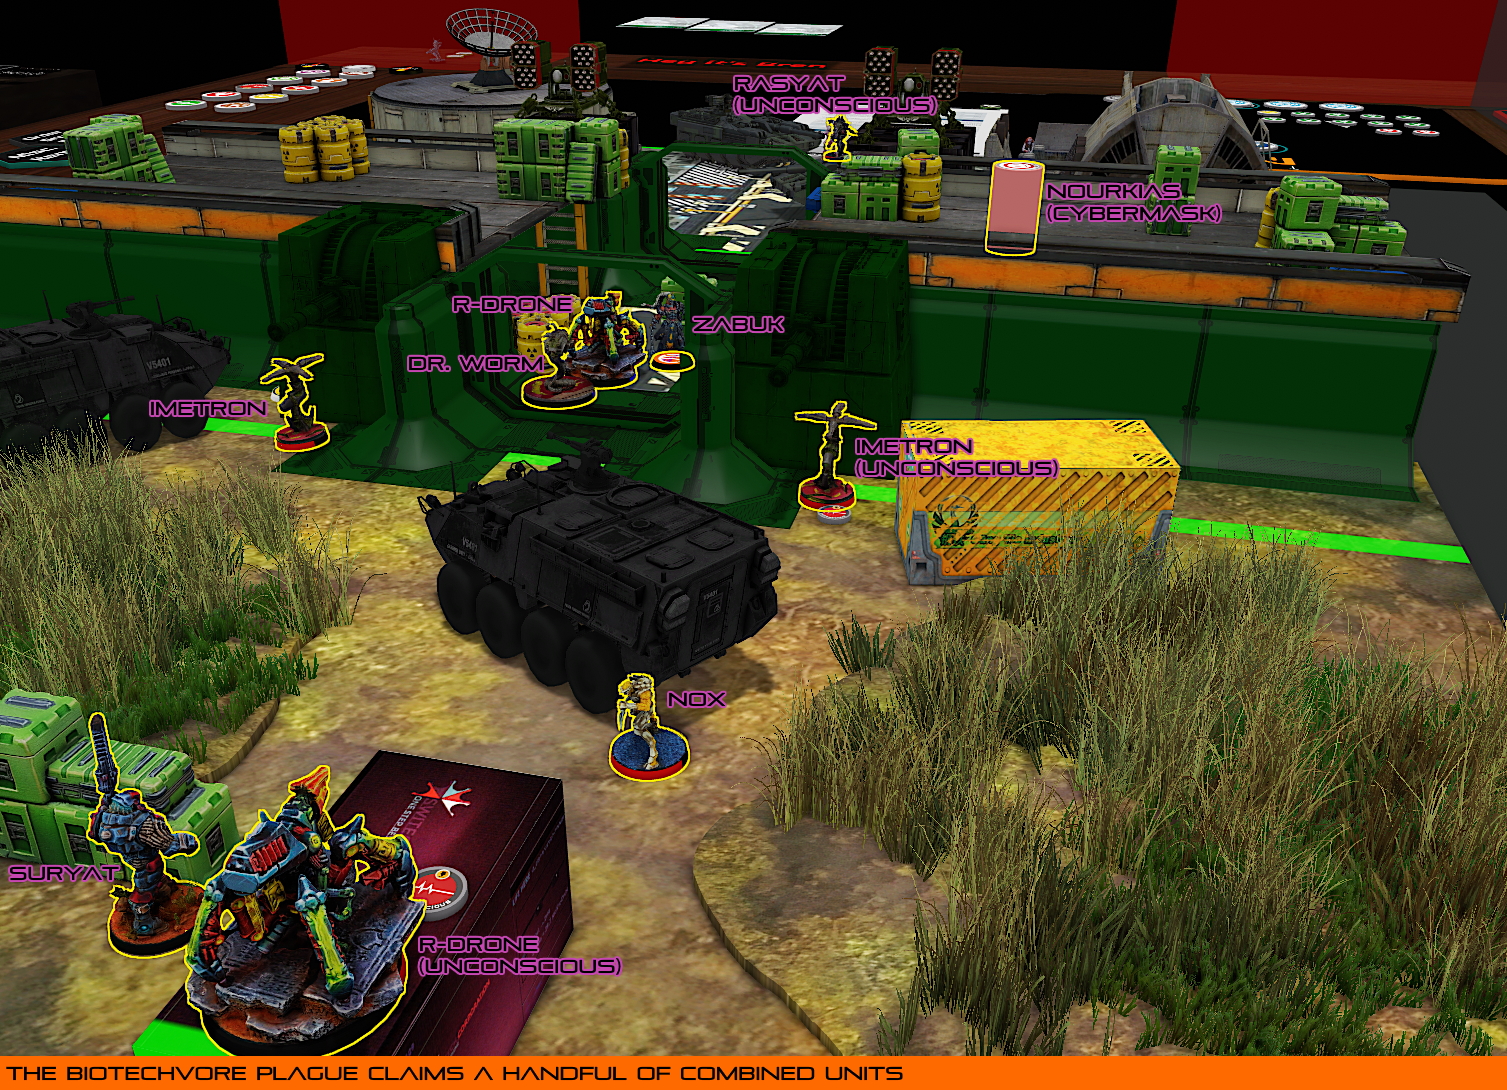
Still with a full order pool, and a number of exposed Combined Units - an out of cover R-Drone, and Dr. Worm claiming the barest shred of a radioactive barrel - I pushed forward, into the bunker.
Spending my Delegate's Irregular order, the Diplomat ran up the board trying to discover Nourkias, but she was too preoccupied with her own safety and wasn't able to reveal the Samaritan.
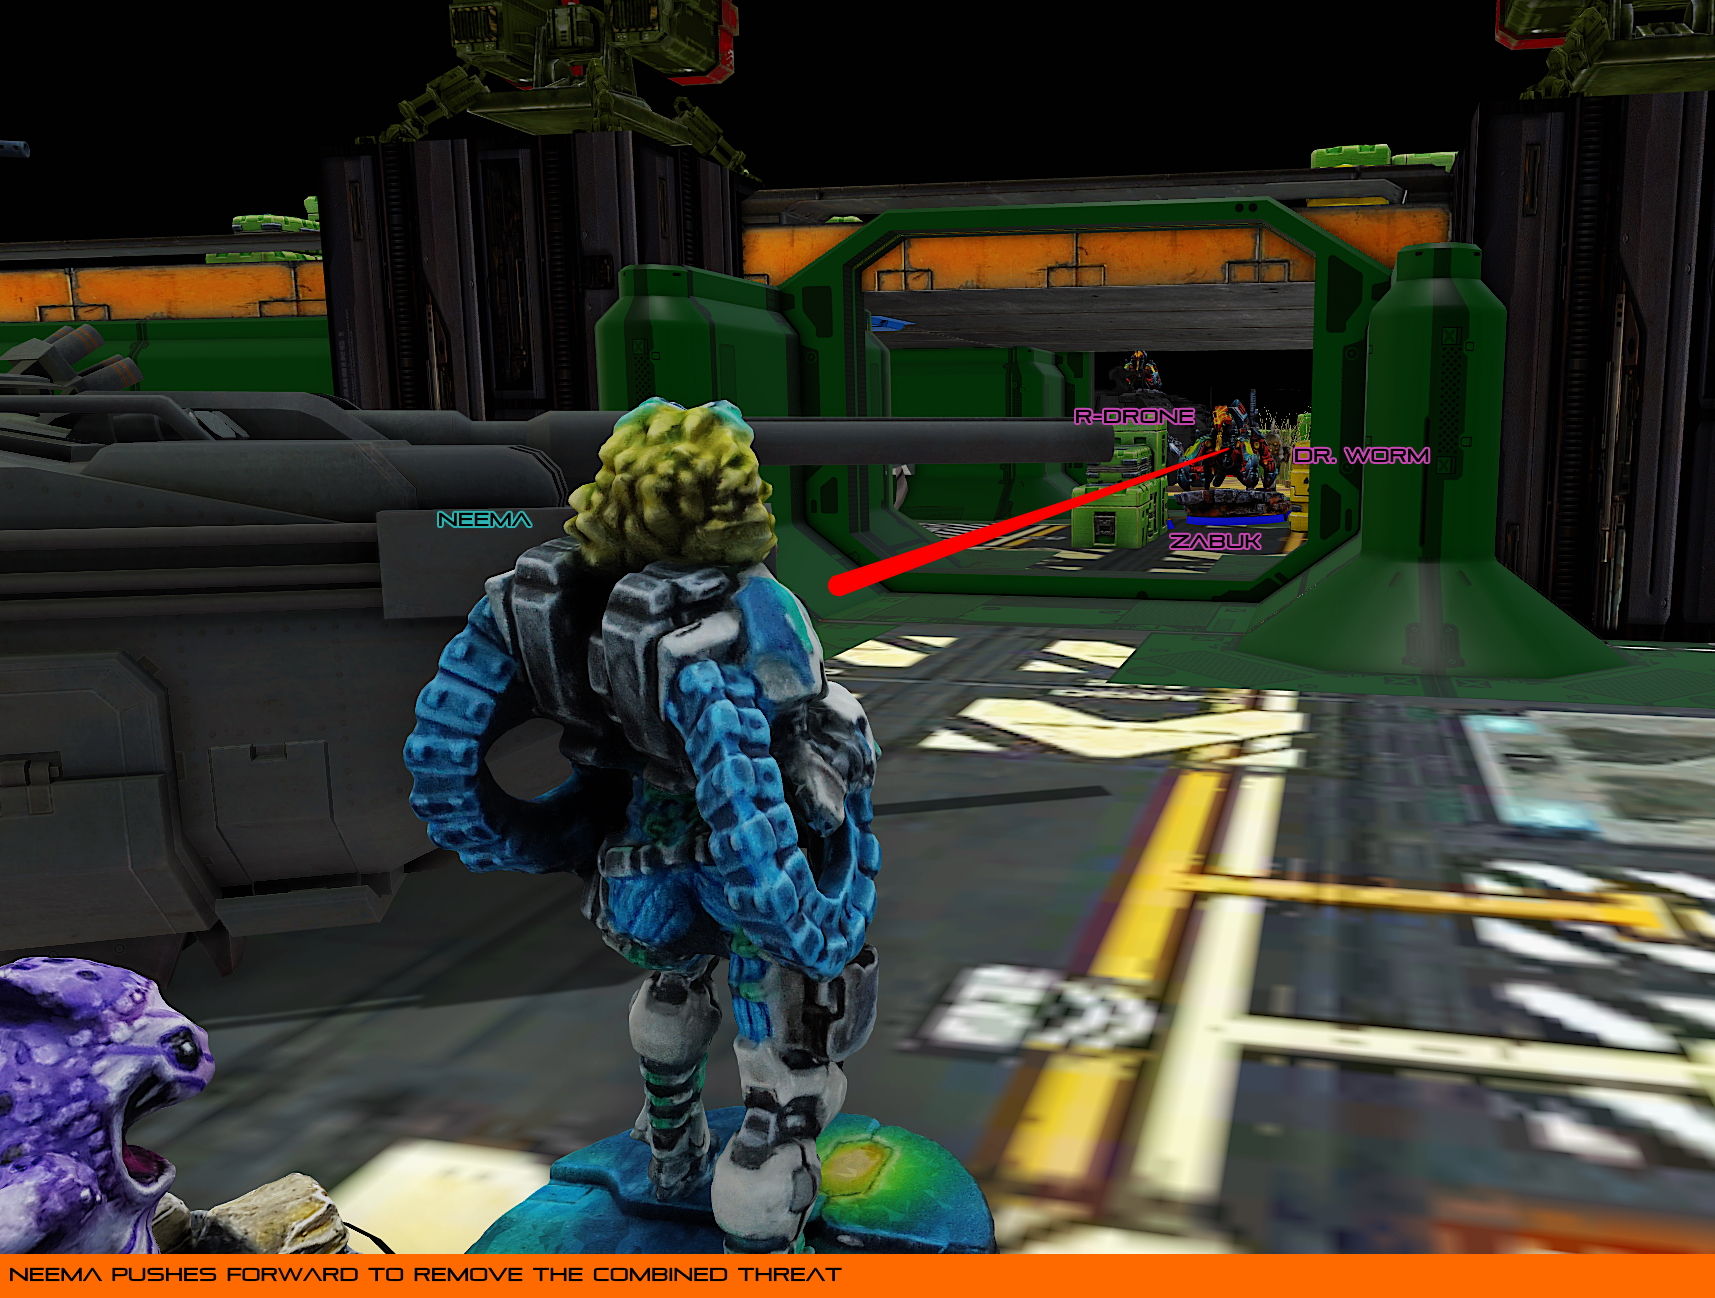
Neema ran into the middle of the board, not making much forward progress but gaining line of fire on the Combined Army's group two units. The Zabuk and Med Tech dodged, and the R-Drone tried to flash pulse Neema. Splitting her burst between the R-Drone and Dr. Worm, Neema killed the Med Tech but missed the R-Drone.
Spending another order on the Triad, Neema moved forward, killing the R-Drone in a spray of bullets from her Spitfire, and narrowly missing the Zabuk taking cover behind some abandoned supply boxes.
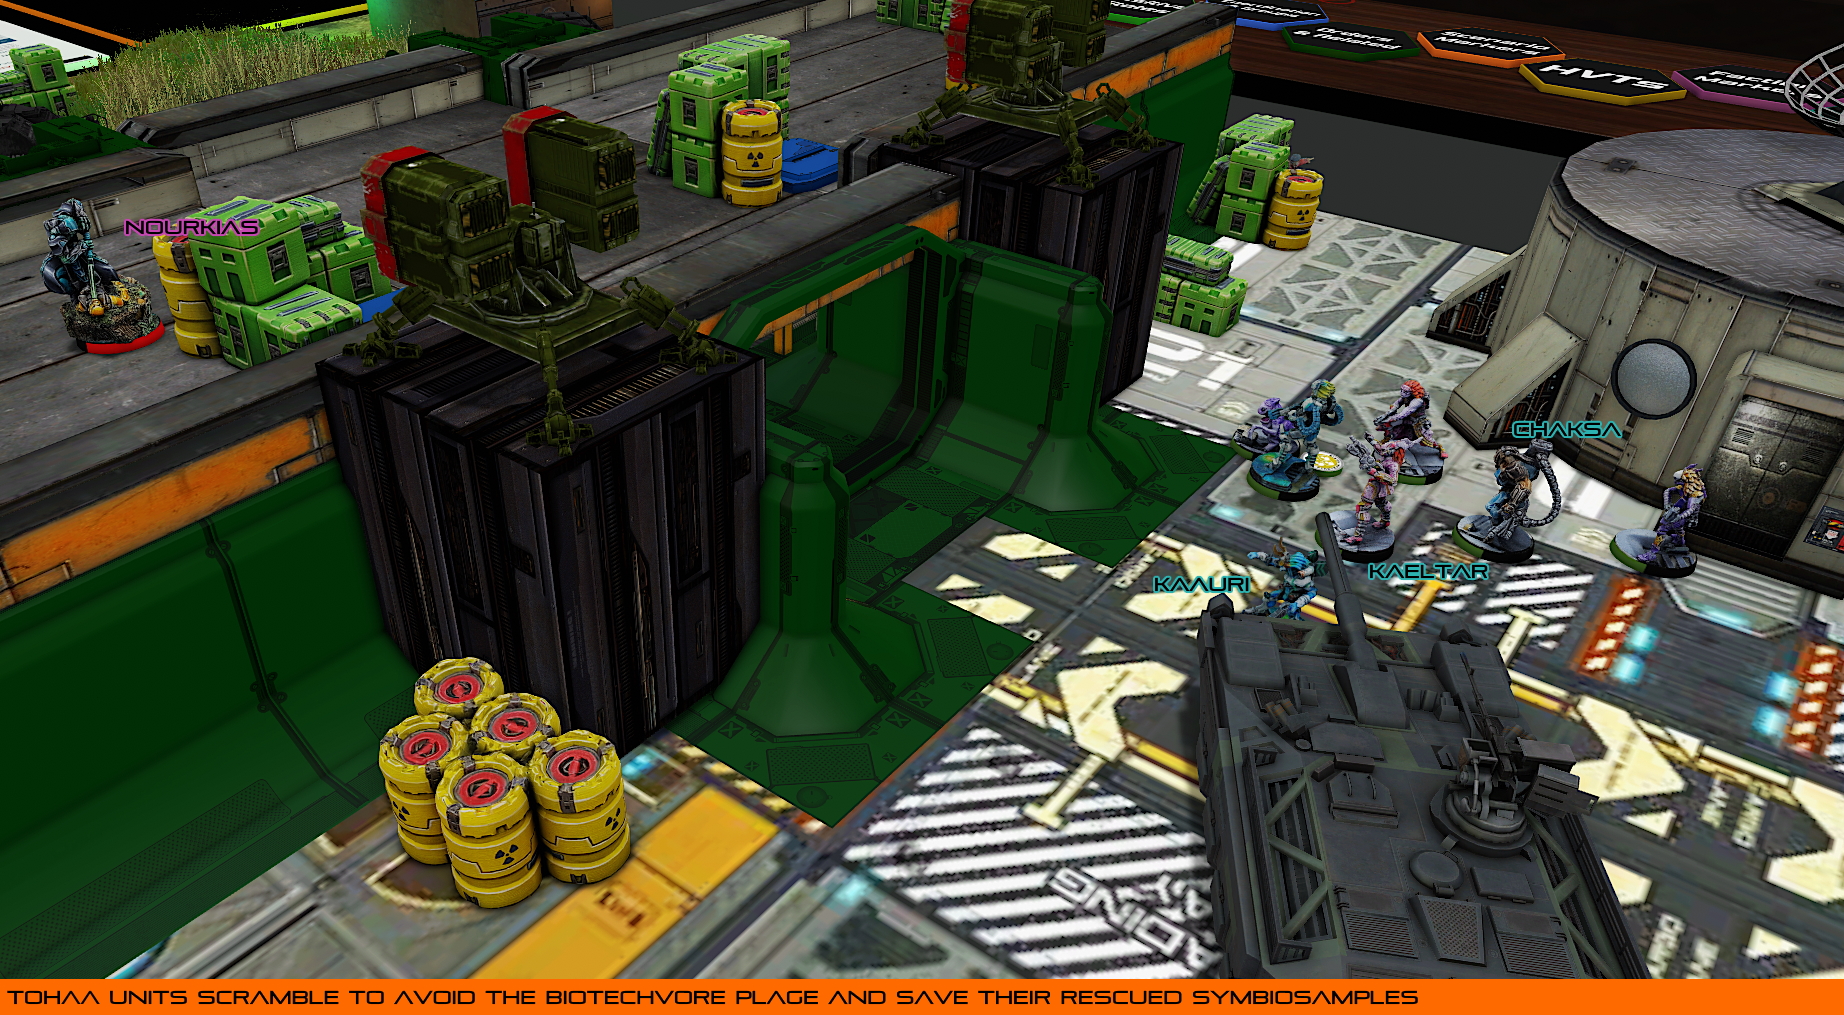
With the forces in the bunker significantly depleted, I flipped a command token to coordinate a Kaeltar, Kaauri, and Chaksa to advance toward the midfield. The Kaeltar and Chaksa were both able to see Nourkias and would have tried to discover him, but the Samaritan chose to Dodge to better close the distance between himself and my Tohaa forces in an attempt to bring his Breaker Combi into a more effective rangeband.
Rather than fire back now that Nourkias had broken his Cybermask, I advanced the three units up the board, trying to get them out of the impending Biotechvore zone, to the safety of the midfield.
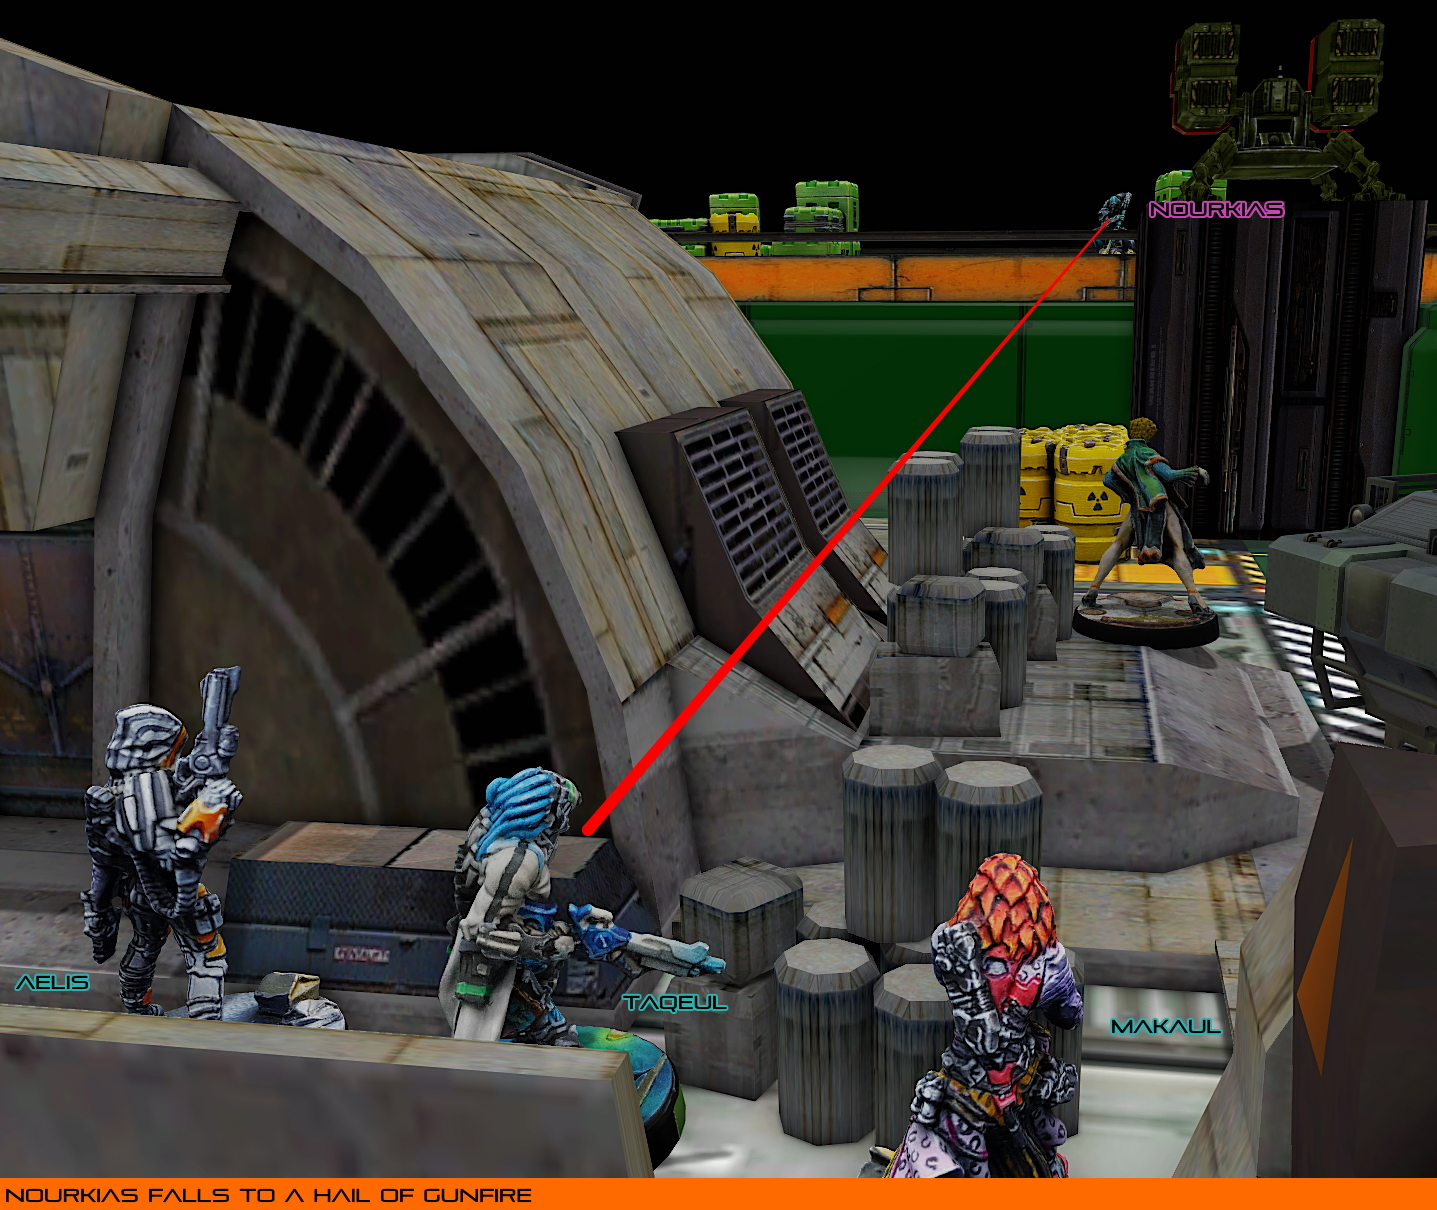
With Nourkias now revealed, my Taqeul Triad engaged at range with the Samaritan who tried to Dodge out of the way. Nourkias was hit three times and crit once by the Taqeul's Spitfire, dying to the murderous spray of bullets.
At this point, we paused to discuss options for turn two. I still had five orders left to maneuver units out of the Biotechvore zone and remove the Zabuk holding down the bunker. Jummz was down to four orders in group one, and by losing Nourkias, would only have a Nox with a Combi Rifle and his Suryat HMG Lieutenant to try and win the match with. He chose to concede, thinking that it was unlikely that he would be able to score a meaningful number of points with his remaining units.
As always, I really need to be more careful with deployment in case I get caught by combat jump units as was nearly the case here. If not for Neema being barely close enough to use her Symbiobomb, Jummz' Rasyat could have done some real damage in my back line. Thankfully, it was only the Combi Rifle profile, rather than the Boarding Shotgun, but missing the Isolate from Neema would have been disastrous.
I don't feel great about my mad dash forward with Neema's Triad or the Coordinated move with the three solo pieces right after, but given the fact that there wasn't anything to counter these moves, and the fact that I wanted to preserve orders (and precious Tohaa lives), maybe this was correct after all, if a little sloppy.
With my remaining five orders, I think I would have needed at least two or three to advance my Taqeul Triad up into safety, hopefully removing the Zabuk in the process. Neema would have needed another one to move her Triad up, and my last one or two would have been another coordinated movement with the Kaeltar, Kaauri, and Chaksa. In all likelihood, this leaves the Diplomat out in the cold, having to manage the Biotechvore save with her modified BTS of 1, but unfortunately I don't see a more efficient way of ending my turn and setting up for round two.
All in all, a pretty successful game.
Battle Report Author

Army Lists Used In This Battle
Recommend Commander For Commendation
Share this battle with friends
heyitsbrenWins

Really cool battle report, like the table and the immersive picture !
Excellent clean up work at Zebu Centre.
Well done brohaa!
Thanks very much, all!
Great report!
Awesome report and nice win Brohaa!!
Great. Go Go Go Brohaa