Fought At Raveneye Port Battery: Port Fire Control Module
650 days 13 hours 30 minutes ago
That's Morlock It
View Linked Report - CLICK HERE 300 POINTS
Alright, well, finally got a chance to play a more narrative game. Adam (TheDiceAbide) has been sepsitorized for this campaign as Zerxus, and since we're running the Rose City Raid together, neither of us need the tournament practice! We're playing the Capture and Protect variant at the Raveneye Port Battery Fire Control Module which apparently has a hull breach, so I broke out the damaged space station table to maximize thematic appropriateness.
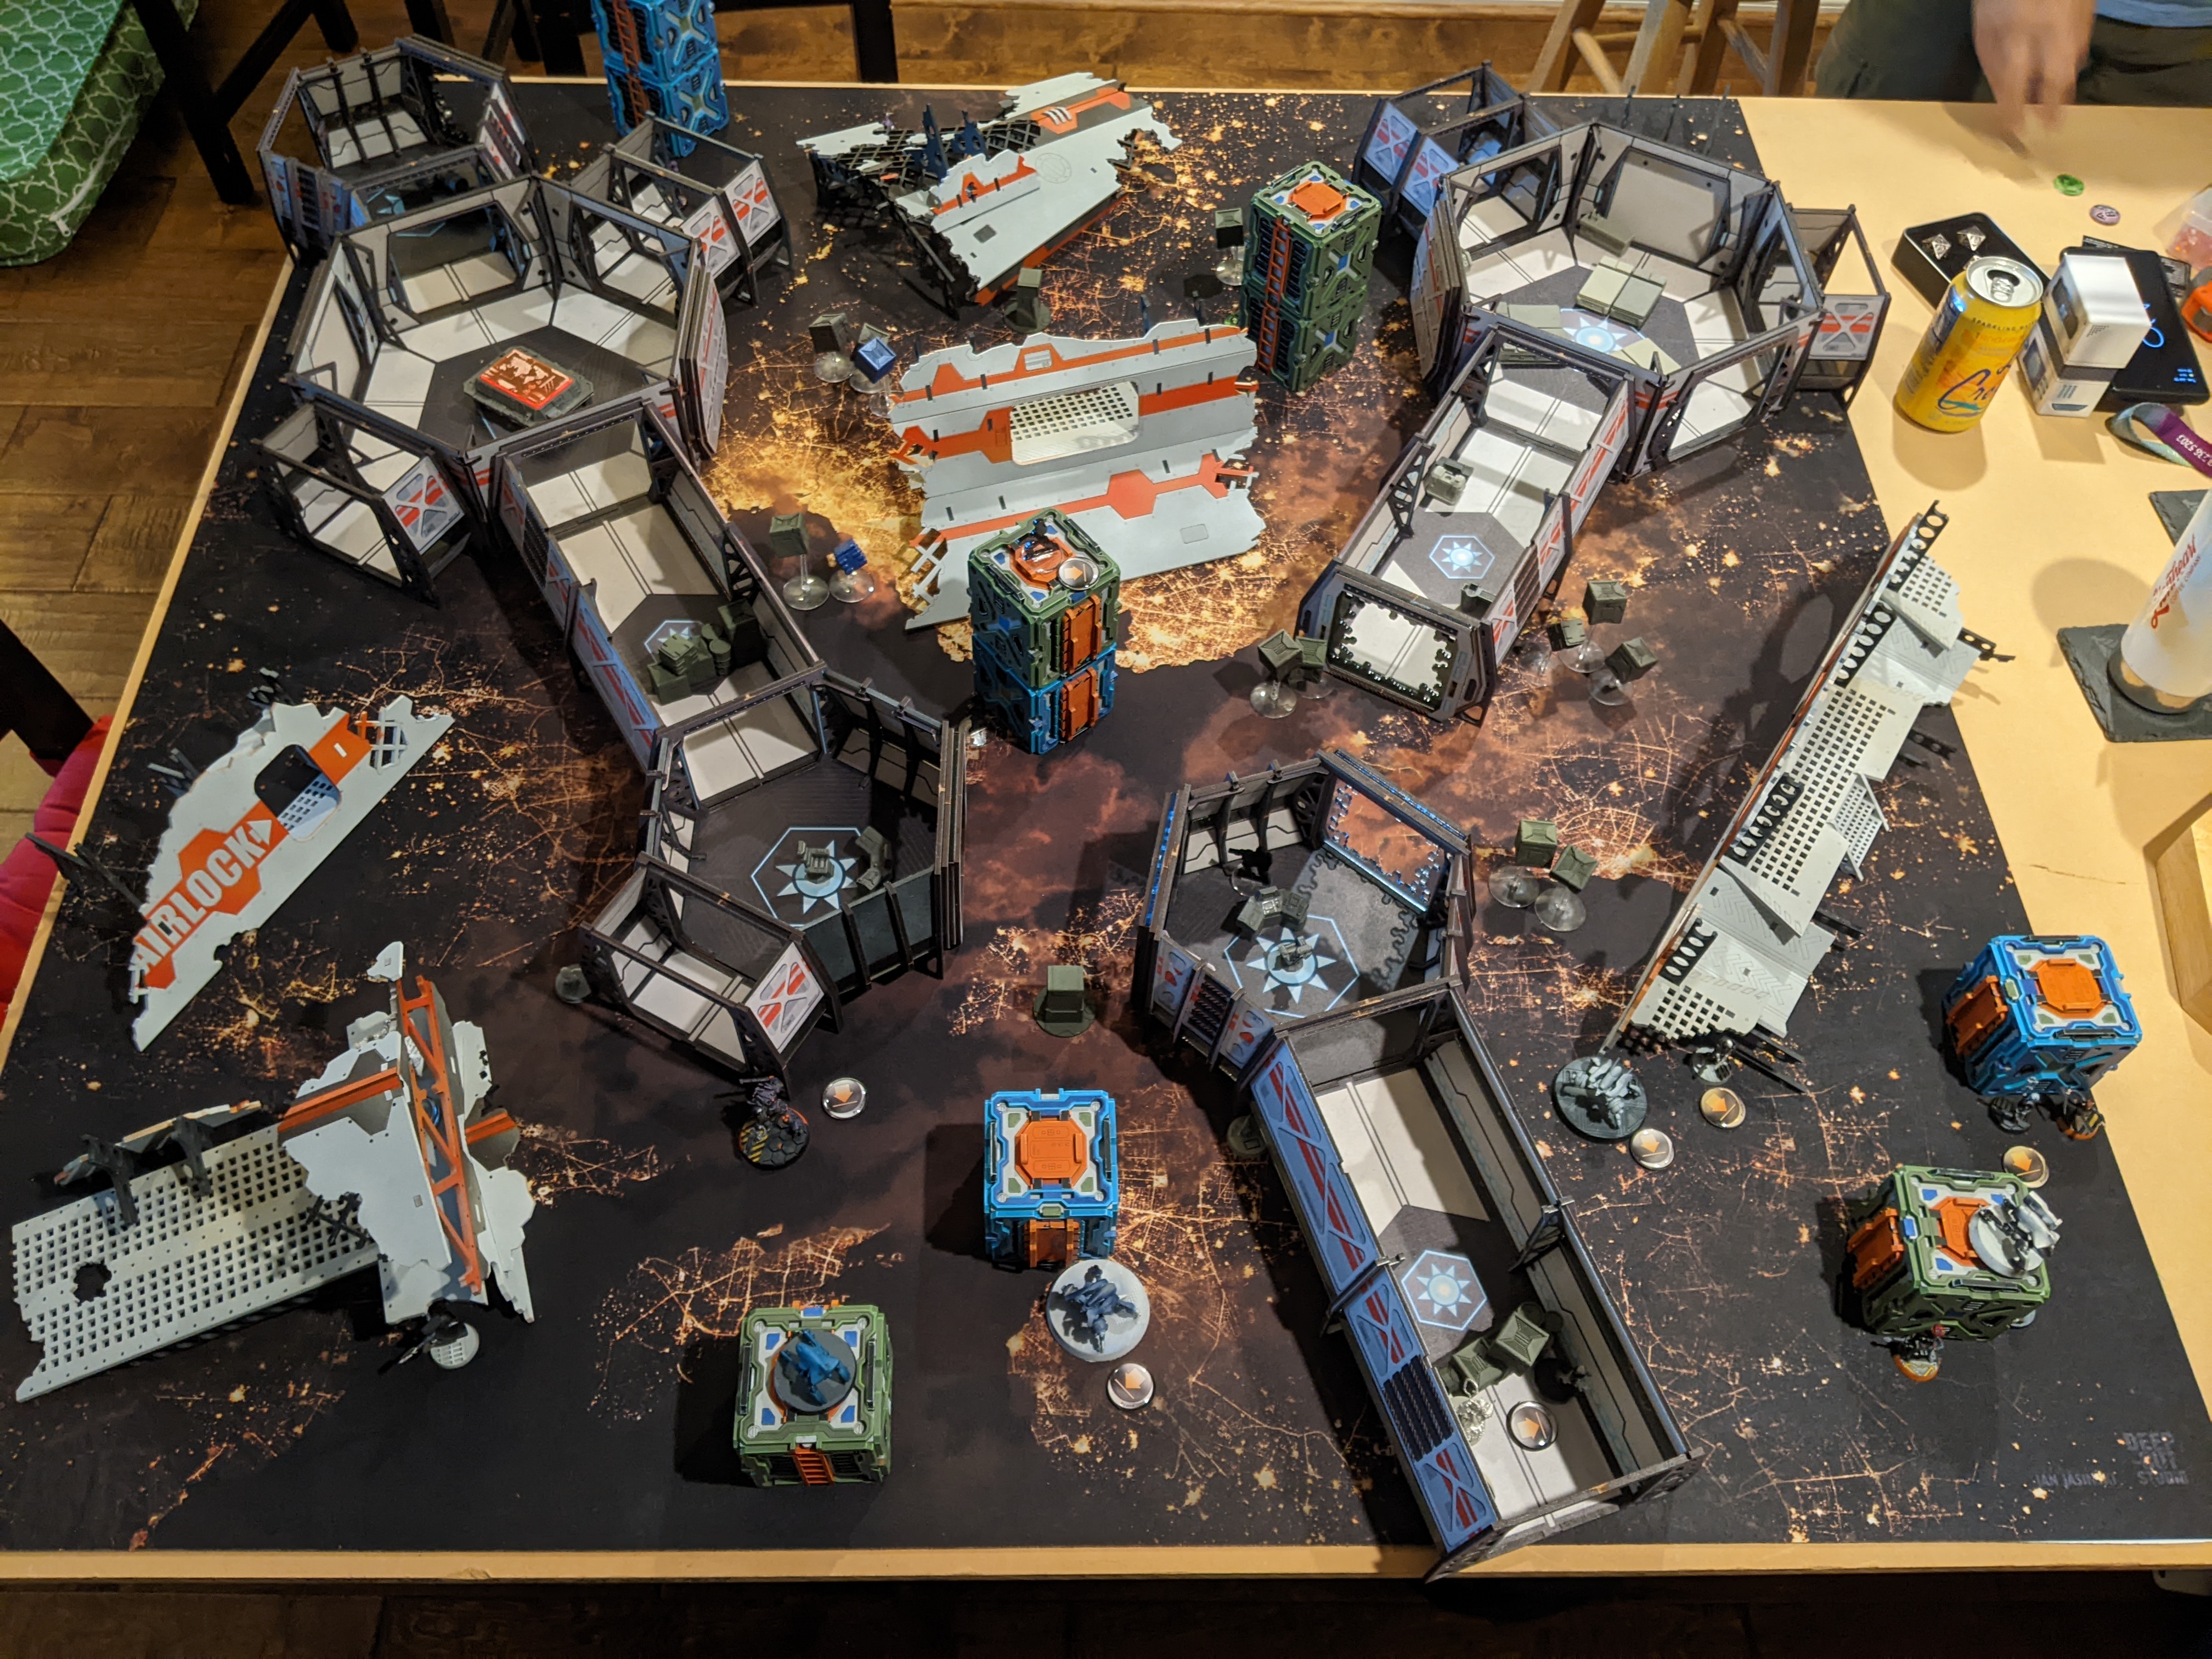
For this table, we play the bare game mat as Zero-G terrain and all openings into the corridors/space station rooms as saturation zones to represent the energy fields that keep the air in or whatever sci-fi nonsense you have in your head canon. Adam actually designed this space station terrain along with one of our mutual friends Dan. You used to be able to pick up a copy at Muse on Minis, but it seems they've discontinued it? The damaged space ship parts are from Blotz, the mat is from Deep Cut Studios, and the scatter is a mix of Warsen.al, Antenocities, and Blotz.
Olivia Harkin went to rub her temples but her hand met the smooth plastic of her vacuum helmet. She would never get used to these things. How did all those Corregidorians manage this all the time? She'd been transferred to The Amethyst Sky only recently and was just getting used to life out in the black.
The view here was magnificent though. The Durgama penisula glittered below her, the research stations on the ground lit up against the night. Her vision was suddenly obscured as a piece of the damaged Raveneye drifted beneath her. Humanity's hold on the stars was so fragile.
Her reverie was broken by the sound of her comlog going off in her ear implant.
Reverend Mira Rivera
Acting Theater Commander, Durgama Defense CoalitionAll stations, all stations, this is Reverend Rivera. Incoming Combined at the Port Fire Control Module! Any Amethyst Sky personnel over there?
Olivia Harkin
Moderator, Durgama Defense CoalitionReverend Rivera, Moderator Harkin here, I'm on site with a small detachment and-
Acting Theater Commander, Durgama Defense CoalitionGood. Harkin, you're in command, repel the boarders!
Acting Lieutenant, Durgama Defense CoalitionOh. Uhm. Yes ma'am!
Another quick reminder about the Durgama Defense Coalition patch giveaway! Click the image below to learn more about how to get some patches!
Overview
- Mission: Capture and Protect (Durgama)
- Forces: Jurisdictional Command of Bakunin versus Combined Army (300)
- Deploy First: Combined Army
- First Turn: Combined Army
Even though this is a narrative game, Capture and Protect is actually a mission in the Rose City Raid 2022 lineup, so I had prepared a list for it in case anyone wanted to practice it.
Rescue, Capture and Protect
GROUP 1
9
VOSTOK (Mimetism [-6]) Mk12(+1 Dam) / PARA CC Weapon(-3). (0 | 44)
BRAN DO CASTRO Combi Rifle, E/Mitter / Pistol, DA CC Weapon. (0 | 33)
ZERO (Minelayer) Combi Rifle, Shock Mines / Pistol, CC Weapon. (0.5 | 20)
FIDDLER (Climbing Plus) Drop Bears, D-Charges, Contender(+1B) / Breaker Pistol, PARA CC Weapon(-3). (0 | 35)
JACKBOT Vulkan Shotgun / . (0 | 7)
ZONDBOT PARA CC Weapon(-3). (0 | 3)
TRANSDUCTOR ZOND Flash Pulse / PARA CC Weapon(-3). (0 | 7)
GROUP 2
3
3
TASKMASTER Heavy Rocket Launcher, Light Shotgun, Crazykoala / Heavy Pistol, DA CC Weapon. (1.5 | 42)
MORLOCK Combi Rifle, Smoke Grenade Launcher / Pistol, DA CC Weapon. (1 | 12)
VERTIGO ZOND Missile Launcher / PARA CC Weapon(-3). (1.5 | 17)
LUNOKHOD Heavy Shotgun, Heavy Flamethrower, D-Charges, Crazykoala / PARA CC Weapon(-3). (0 | 27)
5.5 SWC | 300 Points | Open in Infinity Army
Capture and Protect (and Rescue, the other mission this list is designed for) is a punishing mission in terms of orders as resources for two reasons:
- It's hard to do the thing - Getting to the other side of the table, somehow dealing with all the AROs, and then getting the Beacon back to your deployment zone is incredibly costly in terms of order expenditure.
- Your stuff will die a lot - Presumably you want to prevent people from grabbing your Beacon, and in order to do that you have to leave things out to ARO... which means they're dead... which means you have less orders.
So, that meant I was going to try and cram in the full 15 orders, which in Bakunin meant a full Moderator core with as many actual Moderators as possible. We've got Olivia Harkin as my Moderator Lieutenant, a Paramedic, two Hackers, and a Vostok for some hitting power. The hackers are there to turn on the missile bot threat--you're going to have to spend an order resetting out of Targeted state if you've got the Beacon or I'm going to drop a missile on your face.
Bran is my primary Beacon grabber, backed up by a Zero Minelayer (who also helps drain orders with her mine), and then Fiddler is the tertiary Beacon grabber. I gave her a Zondbot to keep everything running, and then added a Transductor to round out the first group for obvious reasons--it's a flash pulse bot.
The second group is based around the new Taskmaster/Morlock Haris to get the cheapest possible orders in Bakunin. I chose the HRL version because I think it's better in ARO and a burst 3 HRL is just fine for the active turn. It also has Koalas like the Red Fury version.
Secret tech is the Morlock combi rifle with smoke launcher to cover the 16" rangeband and fire burst 2 smoke out to 24" on 11s! It's pricey in SWC but did get a discount in points since N3, so I'm more than happy to take it.
I mentioned the missile bot earlier, so that's in there, and then I needed a Lunokhod for repeaters and Koalas. To round out the list there's a 3rd Morlock, because why the heck not!
When you build a list, the first thing you do should be to mentally deploy it. This will immediately expose any serious deficiencies in active/passive turn capabilities. You can start to ask (and answer) questions like:
- Is there enough coverage for the beacon?
- Do I have enough in terms of big guns to push me out of my deployment zone?
- Do I have enough redundancy so I can have big guns on either side?
- How am I going to get across the board?
- What tools do I need to combine to get my Beacon grabber to the other side of the table?
My plan was to use the Koalas and the Lunokhod to defend the beacon. The Vertigo and Taskmaster could cover the approaches, and then Bran would be as far forward as was safe, ditto for the Zero. Then I can use the Morlocks and the Moderators to plug any holes in my deployment and ARO coverage.
Adam, as Zerxus, is playing vanilla Combined. He's got a pretty monstrous list. The usual suspects are there, 2x Imetron, 2x R-Drone for orders, and Dr. Worm with Slave Drone. Then he's got some spicy meatballs! Nourkias and an Anathematic to get some work done, a Mentor to feint as a Shrouded Minelayer, and then Bit and Kiss for pitcher coverage. A Rasyat rounds out the first group, and would serve as Adam's Beacon grabber or general problem solver.
Power Overwhelming!
GROUP 1
NOURKIAS (Hacker, Killer Hacking Device [UPGRADE: Total Control (+1 Damage)]) Breaker Combi Rifle, Flash Pulse ( ) / Pistol, Vorpal CC Weapon, E/M CC Weapon. (0 | 47)
RASYAT Spitfire, D-Charges, Eclipse Grenades / Heavy Pistol, DA CC Weapon. (1.5 | 37)
ÍMETRON . (0 | 4)
MENTOR (Lieutenant) Boarding Shotgun / Pistol, CC Weapon. (1 | 23)
ANATHEMATIC (Hacker, Hacking Device, Hacking Device [UPGRADE: Trinity (+1B)]) Plasma Rifle, Nanopulser ( ) / Pistol, Shock CC Weapon. (0.5 | 76)
MED-TECH OBSIDON MEDCHANOID Combi Rifle, D-Charges ( | GizmoKit, MediKit) / Pistol, CC Weapon. (0 | 22)
SLAVE DRONE PARA CC Weapon(-3). (0 | 3)
Bit (Hacker], Killer Hacking Device [UPGRADE: Oblivion]) Submachine Gun, Pitcher ( | Deployable Repeater]) / Pistol, CC Weapon. (0.5 | 21)
R-DRONE Flash Pulse / PARA CC Weapon(-3). (0 | 7)
GROUP 2
NOCTIFER Missile Launcher / Assault Pistol, CC Weapon. (1.5 | 32)
GAKI AP CC Weapon. (0 | 4)
5 SWC | 299 Points | Open in Infinity Army
Group two is disgusting--it's got four Gakis to keep me occupied, and a Noctifer. Because why not. What's infurating is that this is the courtesy list:
GROUP 1
Damage)]) Breaker Combi Rifle, Flash Pulse ( ) / Pistol, Vorpal CC Weapon,
E/M CC Weapon. (0 | 47)
/ Pistol, CC Weapon. (0 | 22)
Pitcher ( | Deployable Repeater]) / Pistol, CC Weapon. (0.5 | 21)
Weapon(-3). (0 | 6)
GROUP 2
0.5 SWC | 131 Points | Open
in Infinity Army
Over half the list and 4.5 SWC is missing! There's just so much in Combined that could be coming my way--especially because the Avatar could be held in reserve. At this point I didn't know what Adam had going on in his list, and it was also at this time that he reminded me of the weapon range restriction in the scenario--all shooting over 32" automatically fails. Thankfully, most of my list save the farthest shots on the Vertigo would still function, so I wasn't too worried.
Deployment
I won the rolloff and looked at the table. One side had a door right next to the beacon and what looked like far more defensive shooting positions, so I chose that one. Looking at it now, it funnels movement towards the beacon, so I could more easily defend it with fewer pieces. I had Adam deploy first, so he dropped in his two Imetrons and set up some flash pulses on the approaches to the Beacon with R-Drones. He also put his Mentor Lieutenant right near the Beacon and put the Decoy down on the ground as if it were a mine.
Bit left one of her repeaters next to the Mentor, and Dr. Worm hid in the back. What I didn't know was where the other HALF of his list was--turns out the Noctifer was watching the center of the table as well as the Beacon from a rooftop on the left, with the very expensive Anathematic hiding basically right below it. Then four Gakis came down onto the table, proxied by Taigha because Adam couldn't find his Hungies models on short notice. It happens. They're somewhere.
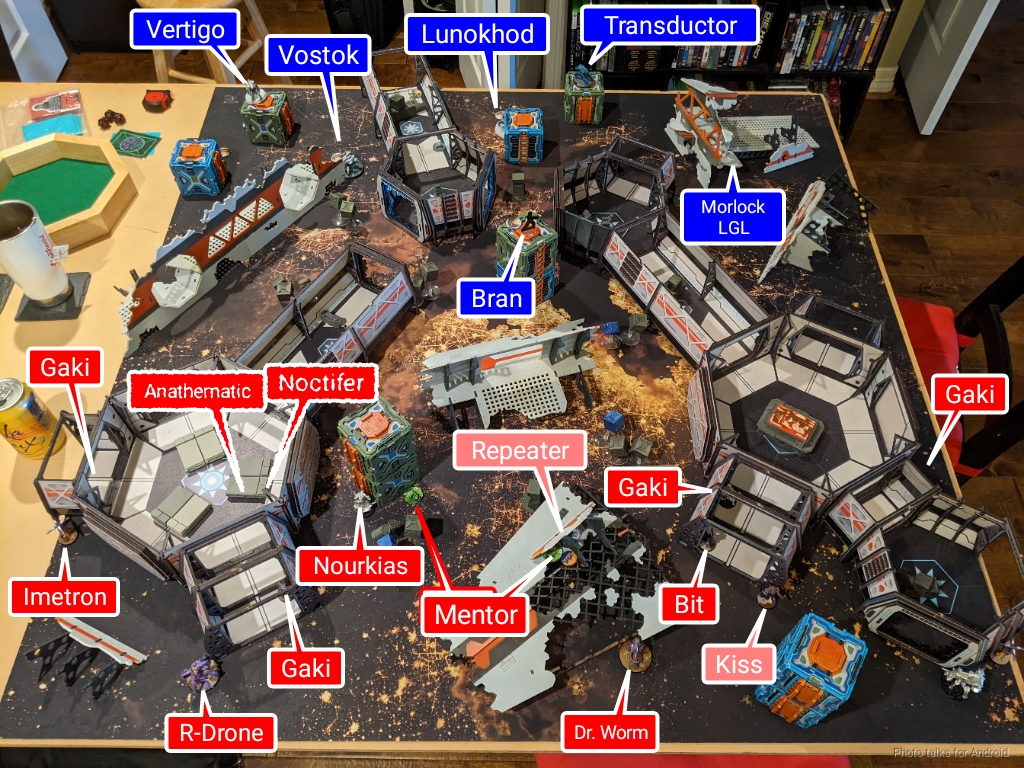
Nourkias was Adam's reserve, so I was really at a loss for what kind of list I was facing. All I saw were Bit & Kiss, Dr. Worm, 4 Gakis, and a bunch of order generators. Not really a lot to go on. I decided to just build defense in depth to keep the Gaki's out of my deployment zone, and then just hope I wasn't dealing with an Avatar that could shoot everything I had off the table.
I started by placing the Taskmaster on my left, watching the left hallway just in case Bit & Kiss decided to go that way. I also had diagonal lines of fire to the opening of the other hallway on the right and the Beacon, as well to the "Airlock" door on the left, should a Gaki come that way. I knew I also had to worry about Rasyats, so I put the Taskmaster's Koala far to the left, right at the edge of my deployment zone.
I wanted it on the approach to the Beacon, but not covering the Beacon. That way, Adam would have a harder time trying to trigger a bunch of Koalas and mines simultaneously. In my mind, mines and other deployable equipment like Crazy Koalas can't be relied on to actually kill anything. With relative ease of getting access to Dodge +3 on cheap, expendable profiles and the increased usage of high ARM models, either they'll get dodge-cleared or just tanked on high ARM, multi-wound models.
All you're really trying to do is create an order tax on your opponent. To do this the most effectively, it's best if you cannot trigger multiple deployables with a single order. If Adam could pop my Zero's mine, the Taskmaster's Koala, and the Lunokhod's Koala all simultaneously, well, that would really suck! One thing that deployables do very well though, is deny area to airborne deployment troops, hence the positioning of the Taskmaster's Koala.
I used the Assault Pistol Morlock attached to the Taskmaster to watch the back table edge for unwanted diplomatic relations, and then pushed the combi-rifle armed Morlock to the edge of my deployment zone to force Gaki to dodge instead of just moving up for free. I figured that once the situation had stabilized, I could climb the Morlock over the corridor on the left to land smoke on the beacon and be in the right range immediately, so this positioning wasn't hurting my future plans of, well, winning the game. Both Morlocks on this side rolled Climbing+, giving that all important +3 Dodge thanks to the Hull Breach special rule.
The Transductor went down on a box in the back to back them all up, and then I put the Lunokhod right on top of the objective with its Koala covering the right rear of the Beacon and helping defend the right side of my deployment zone. I left the Lunokhod peeking out slightly to cover the objective. This opens it to take some fire from the center of the table, but I figured the +3 dodge from the scenario would give me a little bit of statistical cushion there.
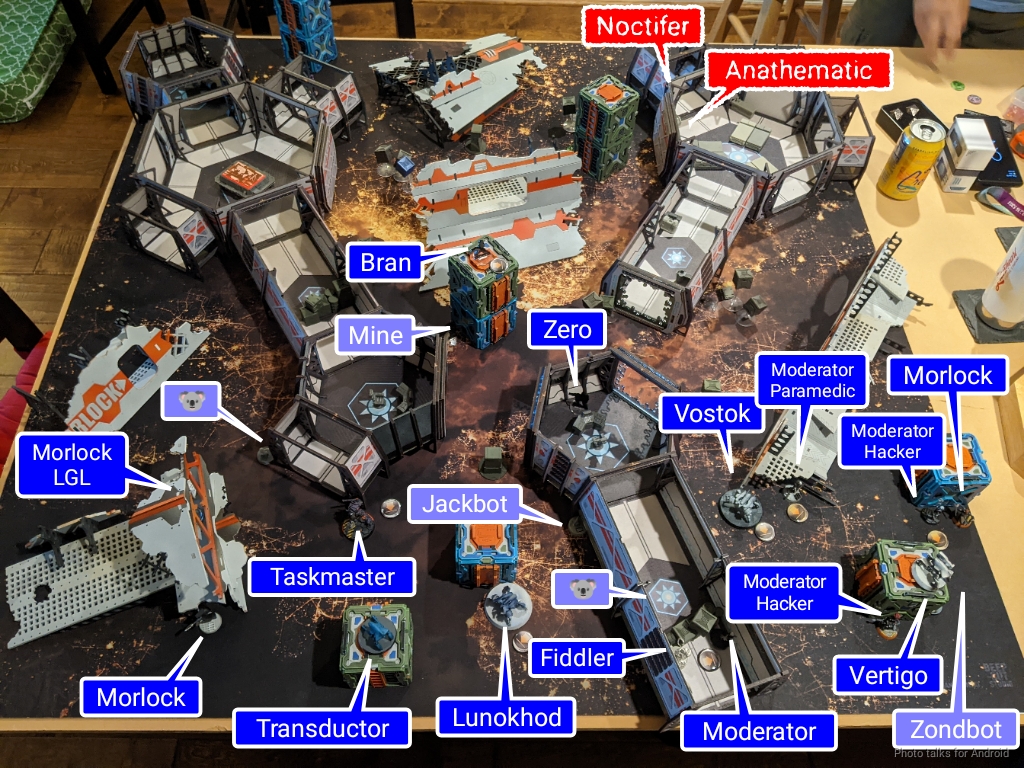
The Vostok got put down to cover the two Gakis on the right as well as the opening to the right far corridor system. I backed it up with the Vertigo, then sort of sprinkled Moderators around to cover where I thought a Rasyat might land. To ensure no shenanigan and to enable some of my own, I put my unlinked Morlock, who we'll call Anya Galanis, all the way on the right. She rolled Regeneration, which would become pretty relevant!
Next I put my Zero Minelayer watching the Beacon through the doorway, with her mine covering the direct central approach tot he beacon. Fiddler went down last, with her Zondbot ready to pick up the Vertigo and/or Vostok and her Jackbot looking directly at the beacon. I hid Olivia, my Moderator Lt, next to Fiddler in the corridor, so that they both were protected from a Rasyat walking on.
Adam's reserve was Nourkias, and mine was Bran, sitting on top of a box and therefore relatively safe from stuff... or so I thought.
Turn 1
Olivia sprinted up the corridor towards the hull breach in the fire control module, her breath fogging up the visor of her flimsy vacuum helmet. A makeshift barricade of various bits of cargo blocked her way, so she slid to a stop behind a crate to catch her breath and absentmindedly try to wipe away the condensation on the inside of her visor.
"Breathe through your nose--your visor will fog less."
Olivia turned to see the Ariestia legend herself, Fiddler, rolling up beside her.
"Oh my god, you're-"
"In the flesh," Fiddler interrupted, gently laying a hand on Olivia's shoulder to keep her from standing up and breaking cover. Fiddler's tail twitched and her face twisted into a grimace. "Okay. Here they come!"
Top of 1 - Combined Army
I docked Adam an order, because of the Mentor's Countermeasures. This should've clued me in to the fact that the "mine" was a decoy, but I didn't pick up on that. This is the price of not playing Infinity competitively at tournaments for the last two years and spending more time playing other games. I'm still reasonably comfortable with the mechanics, but these little nuances can result in a 1-2 order swing during games, as we'll see later. Not a big deal, but against an evenly matched opponent it can matter.
In any case, Adam started things off by taking the impetuous move on his Gakis. This served a few purposes, the first and most obvious one to get free movement. The more insidious reason was to get some free measurement from my shots to the Gaki, allowing him to better estimate what range his Noctifier would be in when it started shooting. I only got one real shot, and both the Vostok and Vertigo missed, so Adam got everything he wanted out of the exchange!

His next order of operations was to make things difficult for my Taskmaster. Adam knew I was planning on playing Nomads in the campaign, so he assumed he'd be facing a Brigada link out of Corregidor or a Riot Grrl link out of Bakunin. He hadn't expected me to go with a Moderator link, so the only really hackable targets were the remotes and the Taskmaster. There was a tiny pie-slice of a shot for Bit & Kiss to land a pitcher near my Taskmaster to lock down the corridor, so they manuevered to set up a hacking net.
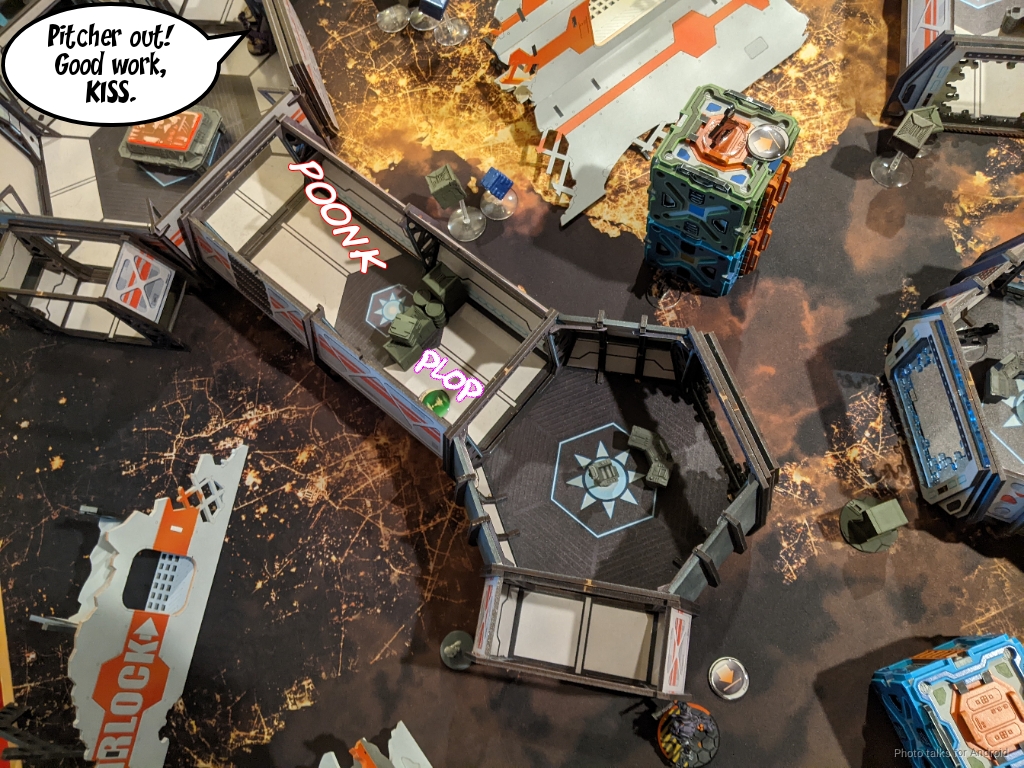
With the Taskmaster's advance at least blunted--really all this meant is that I'd send in a Morlock first and assault pistol the repeater--Adam set about actually kiling the Taskmaster. He revealed an Anathematic and started moving it forward. He just moved it into view of the Vostok and dared me to discover it. I held instead and discovered with the Vertigo.
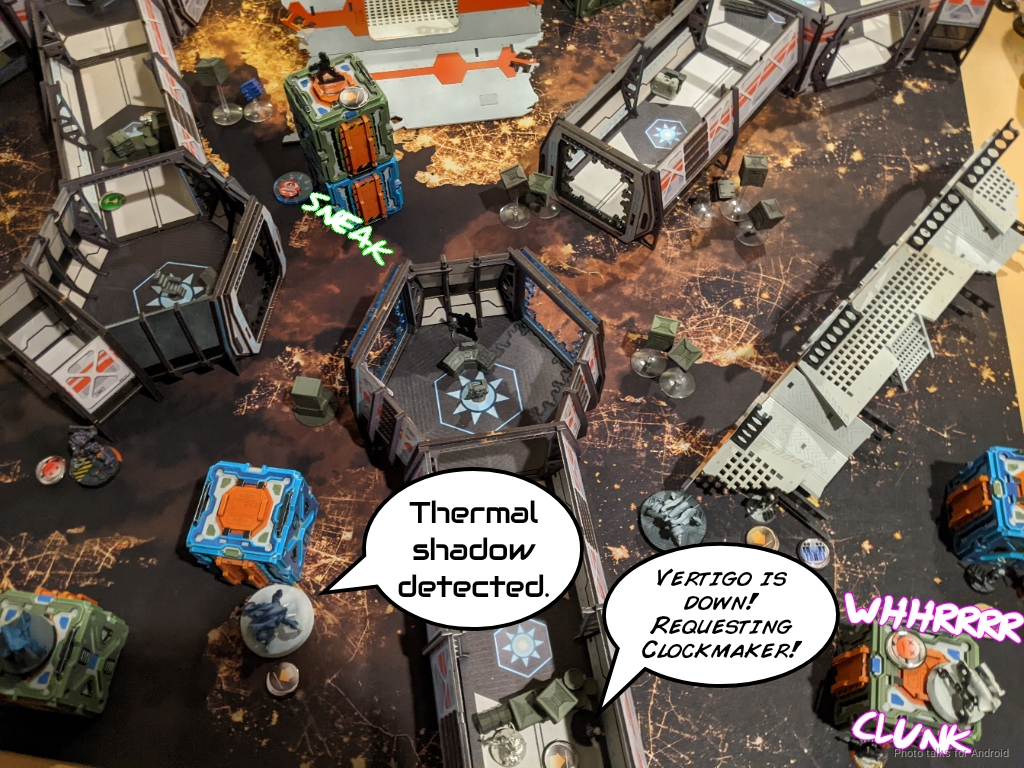
Acting Lieutenant, Durgama Defense CoalitionWe don't have the heavy weaponry to take it out!
Acting Theater Commander, Durgama Defense CoalitionOlivia! Calmate! Keep this channel clear. You can kill it. Make it happen!
Durgama Defense CoalitionI'll burn it to a crisp!
Acting Lieutenant, Durgama Defense CoalitionOhhhh kaaaay... All units! Take out that Anathematic!
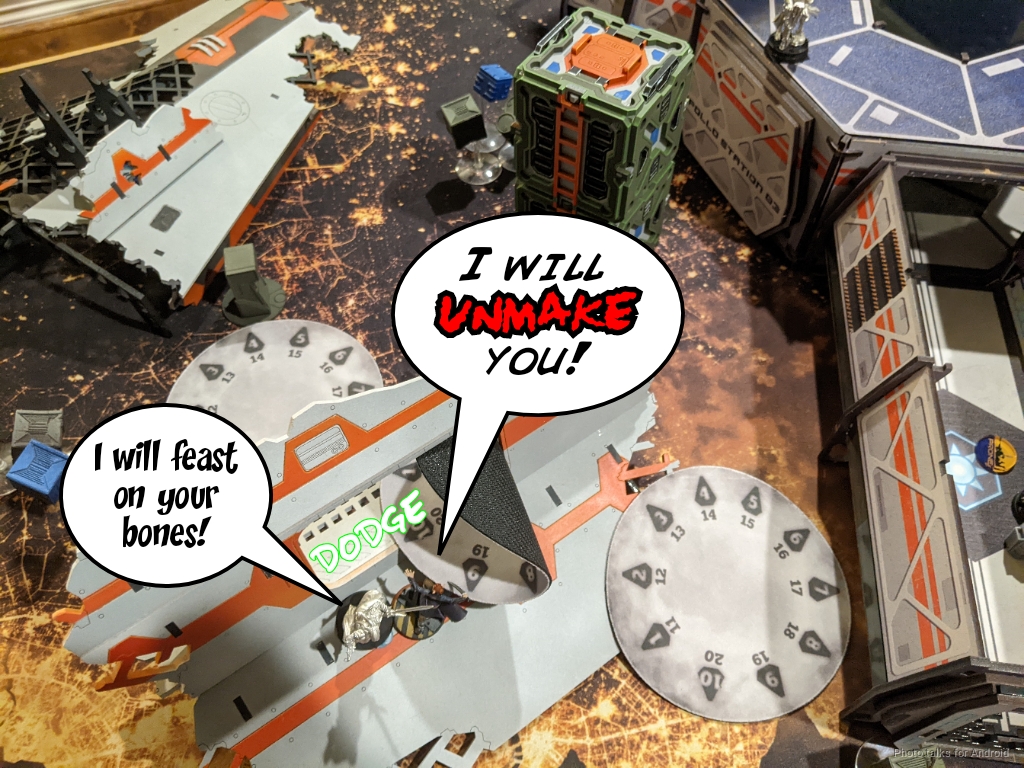
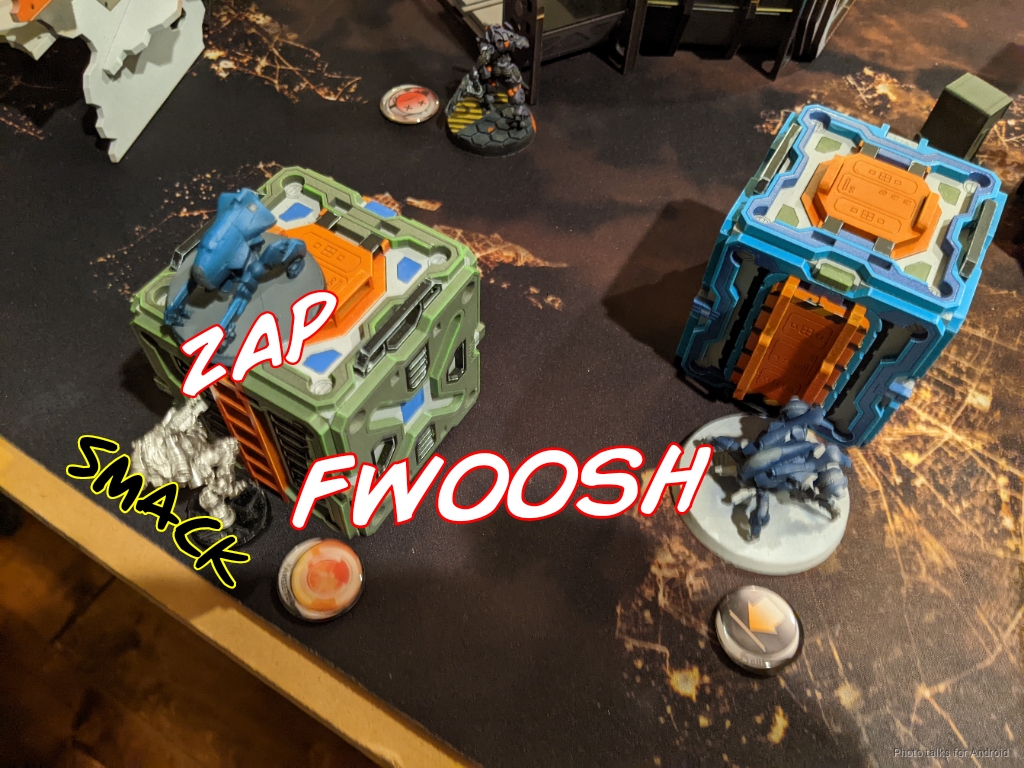
Fortunately for me, Adam miscalculated his movement and second short skill moved into my mine, popping the Anathematic out of camo and actually taking a wound!
Less fortunately for me, the Anathematic one-shot my Taskmaster. I passed both ARM saves but failed both BTS saves.

After slicing the pie and taking out the Vertigo, Adam decided he didn't have enough orders to make a play for the Beacon. He recamoed the Anathematic and then retreated.
Bottom of 1 - Bakunin
With that, it was back to me. Killing the Taskmaster is sort of a 3 order swing as not only do I lose the Taskmaster's order, both Morlocks' orders become irregular! I've got a pretty sad secondary order pool now, but I'm very comfortable running solo Morlocks so it's probably not all that big of a deal.
Olivia gulped in another lungful of air. She hated these temporary vac helmets. Say what you will about the Praxis Black Labs and the seedier sides of Bakunin, at least the air was free, unlike on Corregidor.
It didn't make sense, she thought. Why was an Anathematic here, of all places? The Evaders had disabled the fire control systems, but--oh no. They hadn't removed the systems, and there were two systems in the near vicinity!
After marking them with Beacons ond updating the local tactical map, Olivia flicked her gaze at the icon in her HUD to set her comlog to broadcast to all Nomads in the vicinity.
"All Nomad forces, the Combined are trying to steal the fire control computers at the two marked tactical beacons on your map! Secure those computers at all costs!"
Okay, board state is bad. I have an Anathematic and 4 Gakis breathing down my throat, and two big SWC weapons down. I don't feel confident in my ability to get to the beacon this turn. Any attempt will surely be an overextension, and then the Anathematic and Gakis will just attack my order pool and get the beacon on Adam's second turn, and I've definitely lost the game at that point. My objectives for this turn are to get rid of the Anathematic, get rid of the Gakis, and set up for a push on the beacon the following turn, in that order.
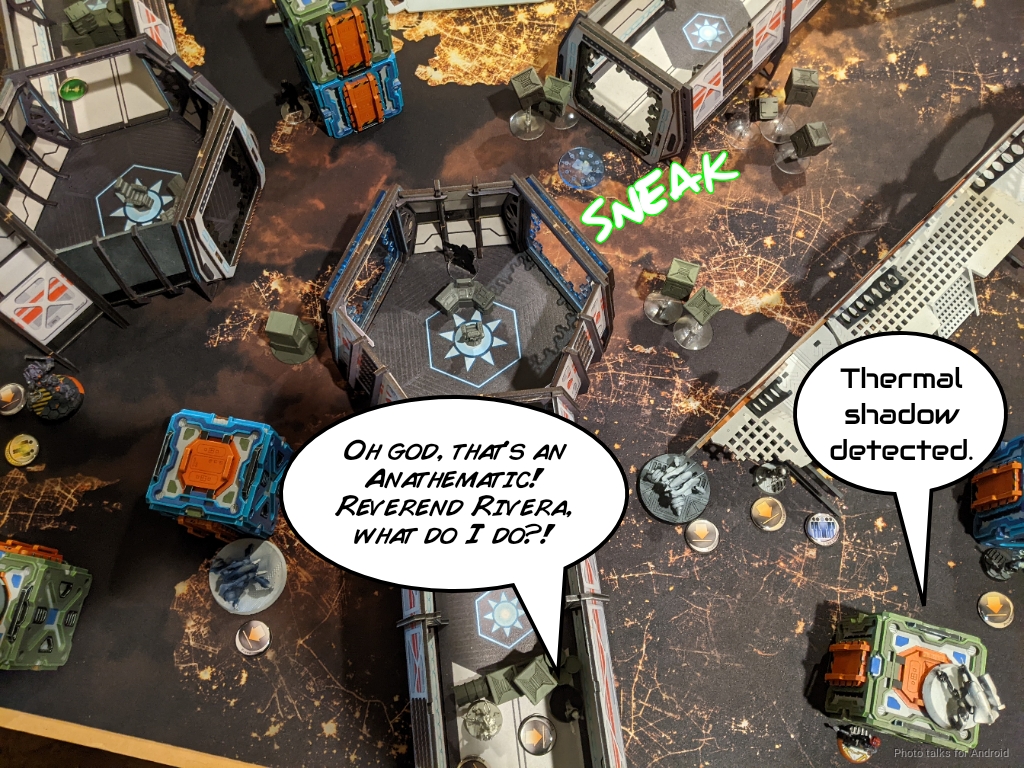
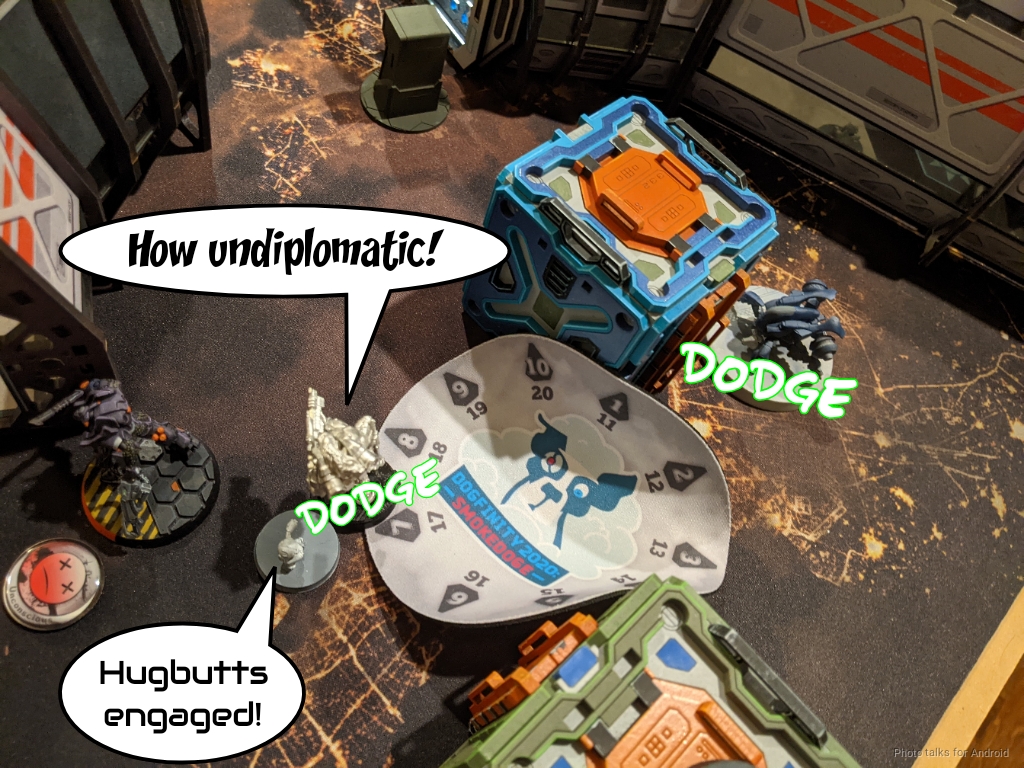
I started things off by moving the Morlocks forward. Nothing of import happened, Adam wasn't about to reveal a Noctifer for a Morlock. Next, I pushed Fiddler and her Jackbot into view of the Anathematic's camo marker while simultaneously moving the Zondbot attached to her. As far as I can tell, this is legal? In any case, Adam declined to respond, so I just picked up the Vertigo with the Zondbot.
A second order on Fiddler pushed the Jackbot right next to the Anathematic, with Adam again declining to ARO, and this time I rolled discover and passed on the Jackbot. Success! This let me jump Bran off his box and behind the Anathematic. There was a bit of a miscommunication here, so Adam revealed his Noctifer to delay against Bran's camo token. Eventually we cleared it up, and Adam decided to take a free Discover from the Anathematic to reveal Bran.
Bran was now under the Noctifer's baleful gaze, and Fiddler was out of position, so I had to do something.
Acting Lieutenant, Durgama Defense CoalitionAnya, get up there and get some smoke out!
Durgama Defense CoalitionYou got it, boss!
Durgama Defense CoalitionI'm going in!
Adam got a a free dodge on a Gaki out of the deal, but I landed my smoke, letting Bran close into base to base with the Anathematic.
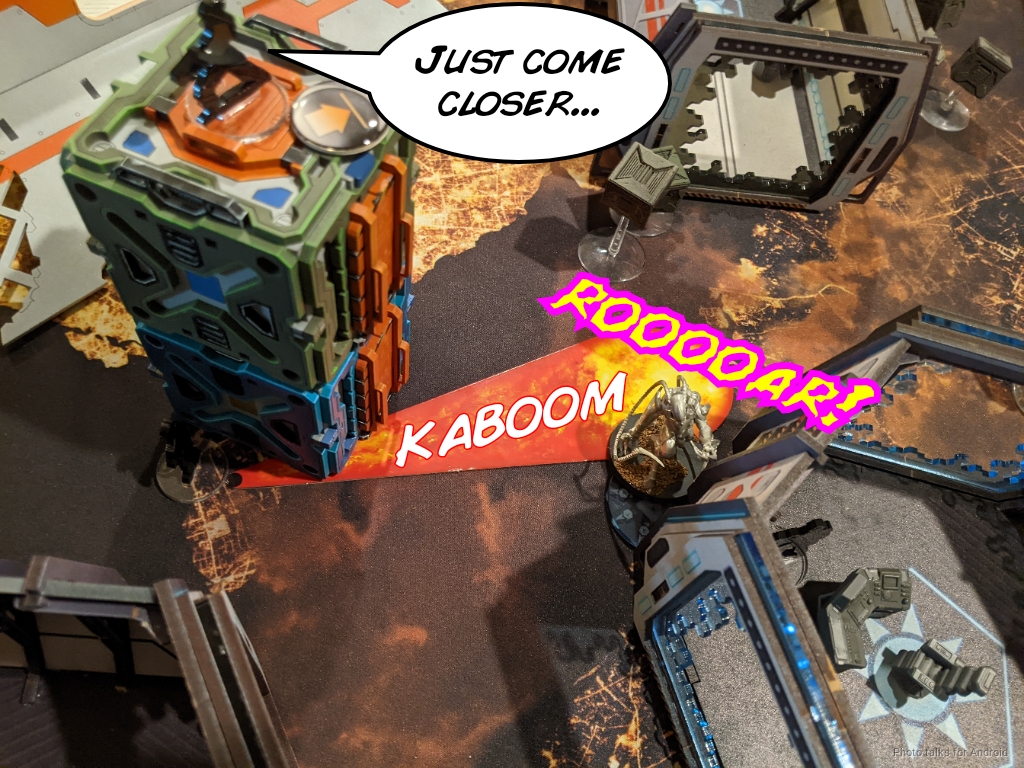
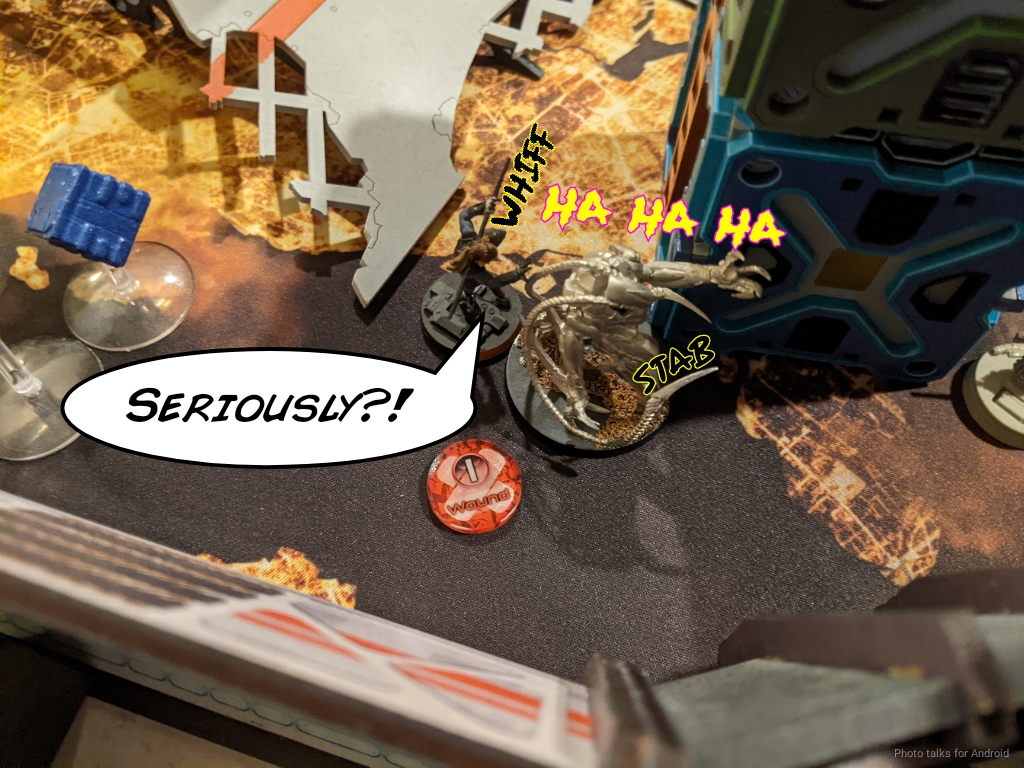
My odds are pretty good here, you'd think. CC 22, MA3 versus CC 19, which puts me on 25 versus 16. In fact, the odds are indeed quite good:
| 64.50 | 25.12 | 10.38 |
Of course, those of you who have watched Late Night Wargames' Immortal Combat series know that there can be some serious upsets in 1 burst versus 1 burst close combats!
In any case, I immediately lose Bran to the Anathematic, not even to a crit, and I'm left with my primary method of clearing the Anathematic and my primary way of getting the beacon just gone.
Well, I've got Fiddler there, so I send her in too, firing her Contender and the Jackbot's Vulkan shotgun. The odds here are pretty even on Fiddler versus the Anathematic, but I do have two fire templates coming in:
| 33.29 | 28.43 | 38.28 |
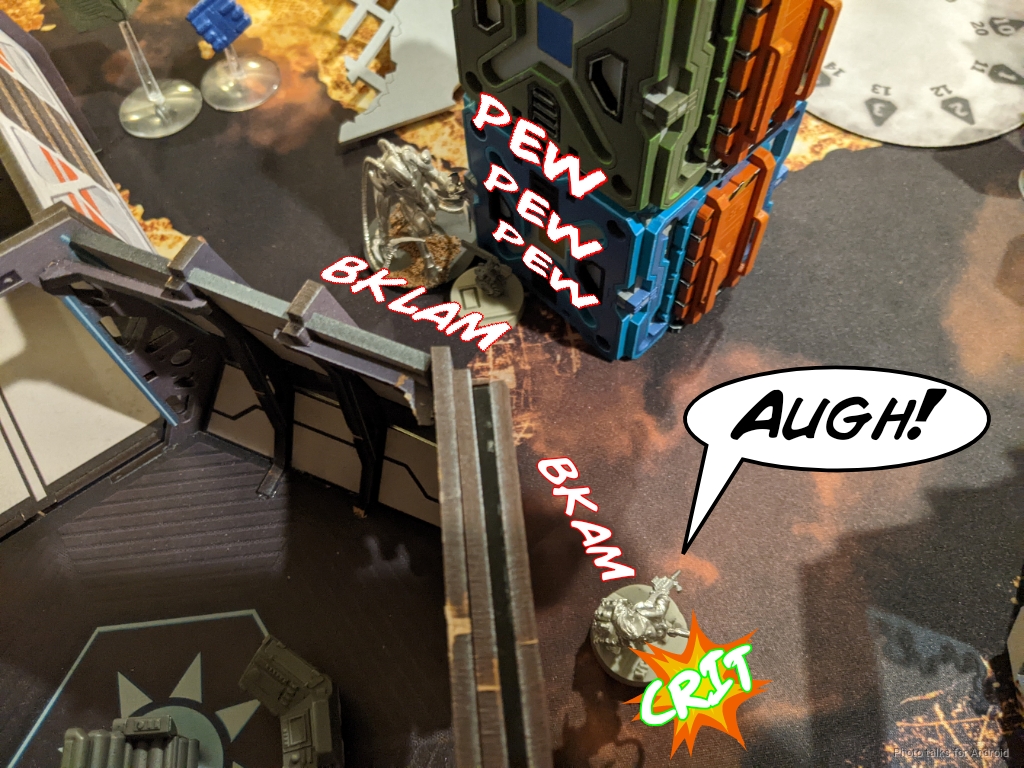
Of course, Adam crits, killing Fiddler! Immunity to crits doesn't save her if I fail all the plasma saves! The Jackbot comes through for me though and burns the Anathematic off the table. I exact revenge by sending the Morlock with combi after Bit, knocking her out and tanking an ADHL shot from Bit.

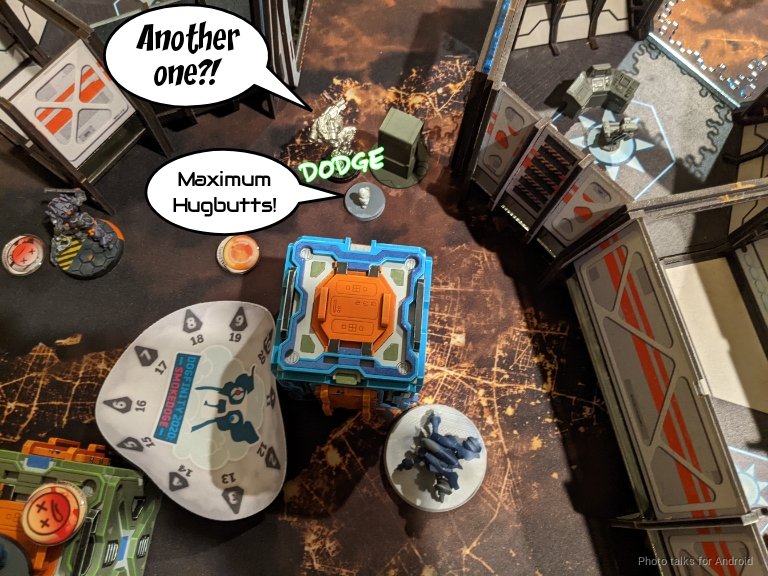
Well, I've got the Anathematic down. Time to take out the Gaki and set up for a turn 2 run. I start moving my Zero around to take out all the Gaki.
I then settle my Zero back into position and pass turn.
Turn 2
Acting Lieutenant, Durgama Defense CoalitionB-Bran is gone. So is Fiddler.
Acting Theater Commander, Durgama Defense CoalitionIs the Anathematic dead?
Acting Lieutenant, Durgama Defense CoalitionY-Yes.
Acting Theater Commander, Durgama Defense CoalitionTheir cubes are backed up. They bought you time, now get to work!
Top of 2 - Combined Army
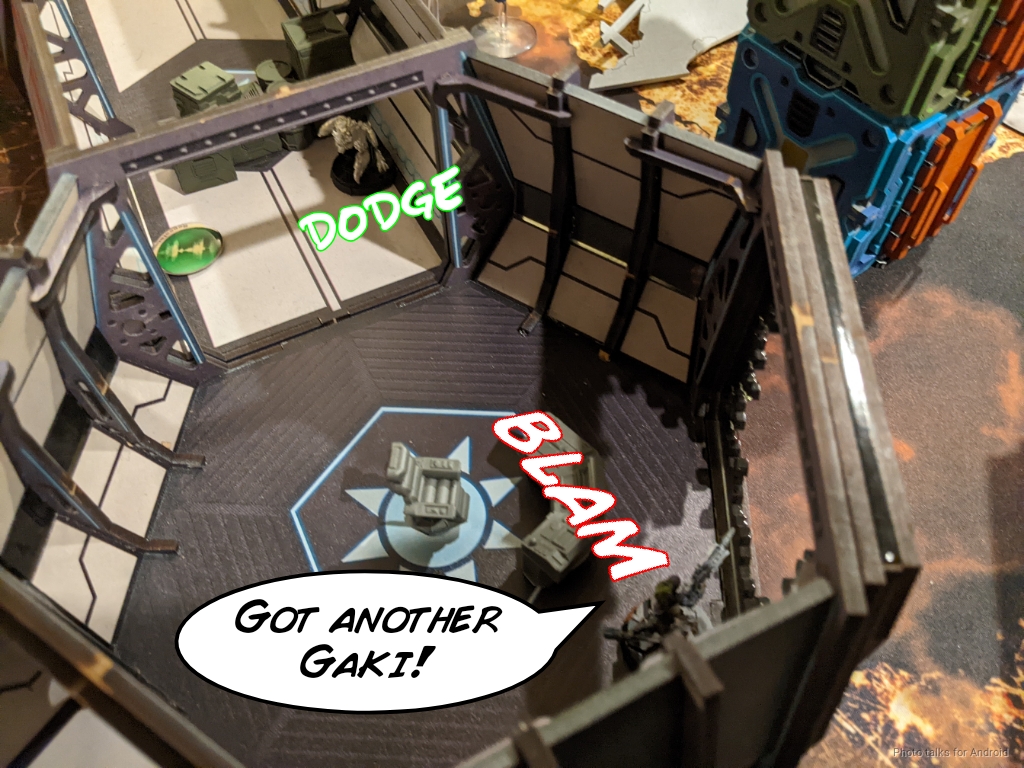
It was Adam's turn to go after warbands. He traded one of his remaining Gaki for my combi Morlock and then moved Dr. Worm up.
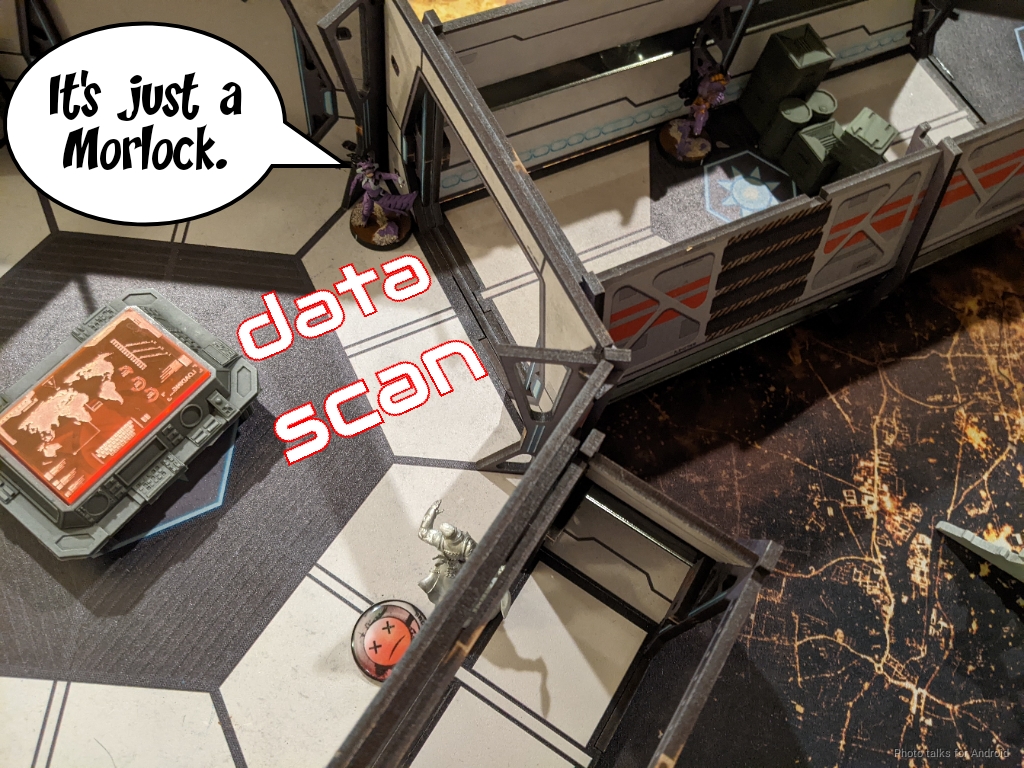
Dr. Worm was able to get Bit back up with two orders, which is sort of a net neutral for me. Bit's not dead anymore, which is bad, but Adam spent two orders not really improving his position, which is good.
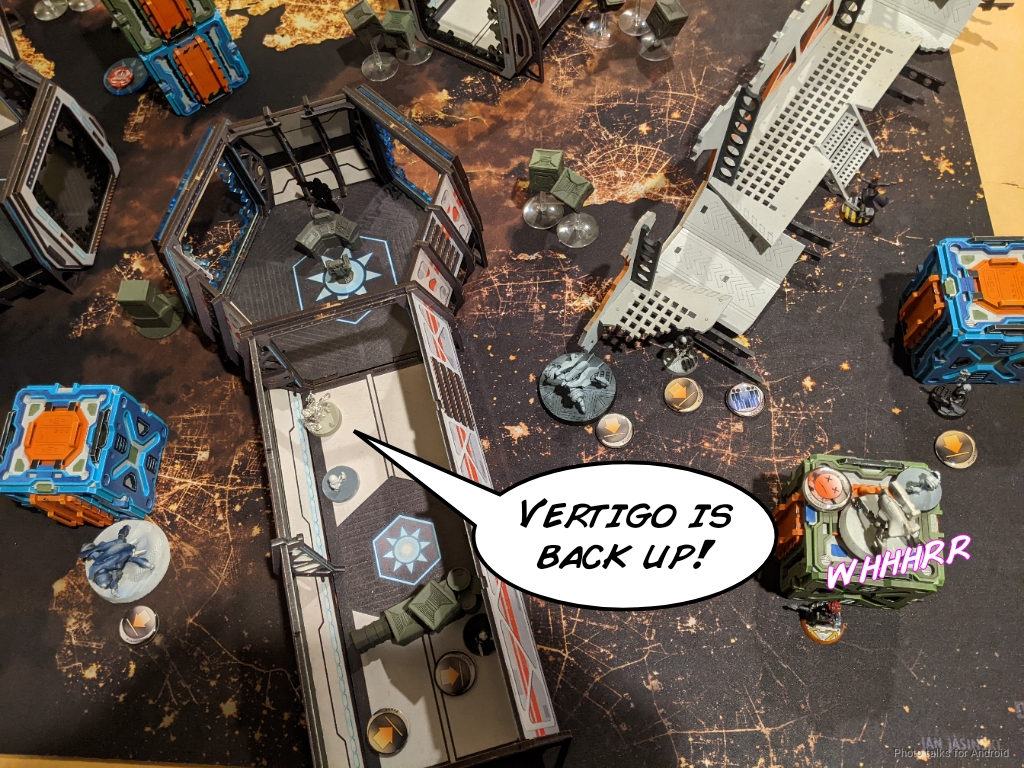
Unfortunately, he did still have enough orders to move Nourkias up to take out Anya, the Morlock that threw smoke for Bran and Fiddler. This had the added benefit of developing Nourkias into the midfield for a potential run on the beacon at the top of turn three.

He decided to undo all the hard work Fiddler had done picking up the Vertigo and took it out with the Noctifer.
Not a great turn for me, but Anya had rolled Regeneration for her MetaChemistry bonus, and I made the PH roll to get her back up!
Bottom of 2 - Bakunin
Depressurization alarms screamed in Anya's helmet as her eyes fluttered open. Her vac suit had been punctured by the rounds from the Combined breaker rifle a moment earlier, and her blood was oozing out of the vac suit in pulsing droplets. If it wasn't for the fact that it was her blood, she would have found all these tiny little blurry red stars twinkling in her vision beautiful. Perhaps they were anyway.
As Anya floated half conscious in the void, a small bit of Praxis black tech nestled in the gentle curve of her thyroid whirred to life and dumped a truly unreasonable amount of combat stimms, coagulating agents, and biotech nanites into the veins leading directly back to her heart. As the synthetic adrenaline hit, her eyes snapped open, her pupiles dilating with the pure intoxication of the cocktail of illicit substances hitting her brain and the rest of her central nervous system.
She pivoted around her center of mass, found a foothold on the side of the Raveneye station, and kicked off towards the Combined filth that had done this to her. As she shot forward, Anya thumbed the activation stud on every smoke grenade she had left on her belt, letting the jets of air propel her faster and faster towards her would be killer.
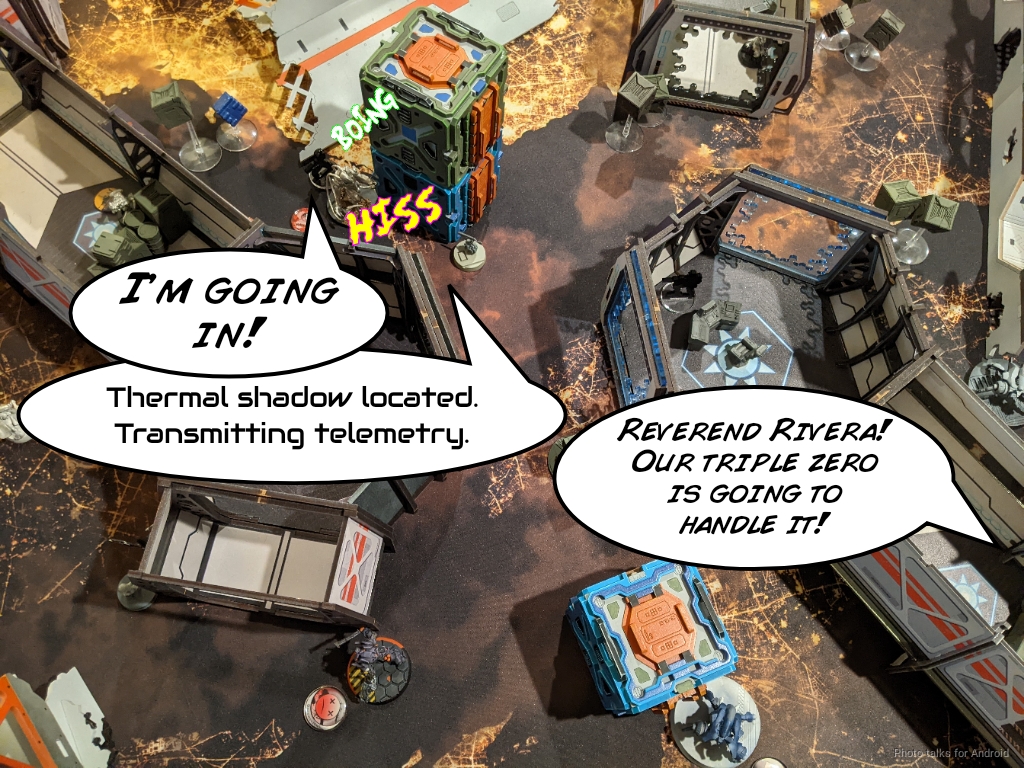
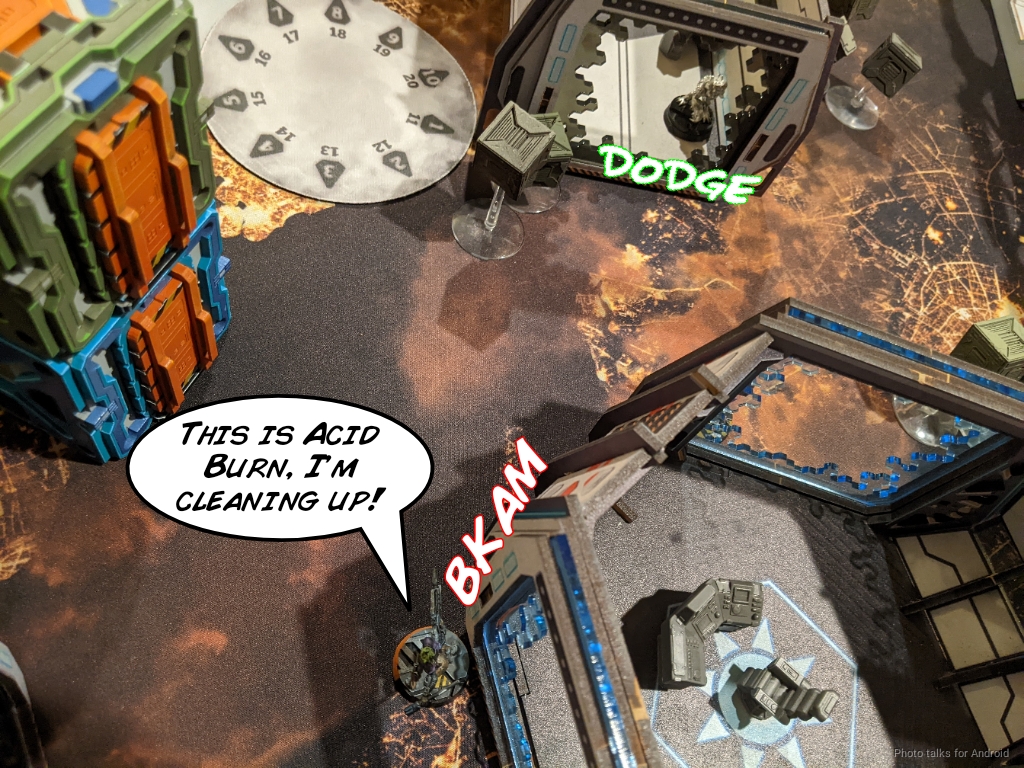
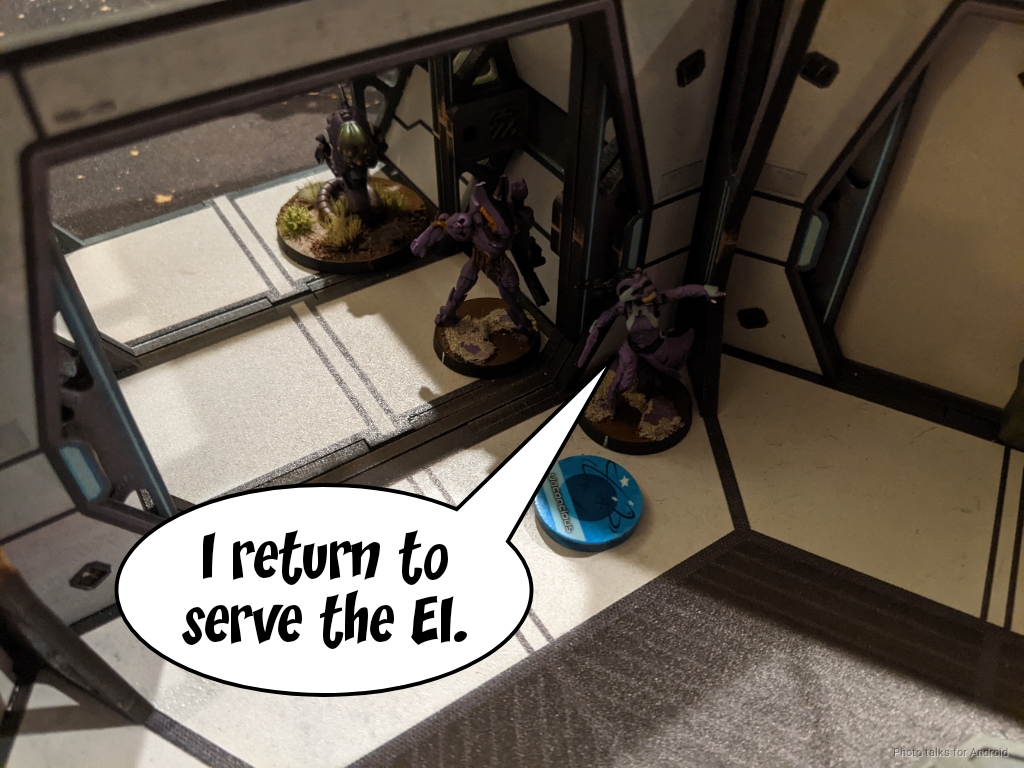
Now was the time to make the play on the beacon. I had some orders and command tokens left to set up smoke for the Zero, so that's what I did. As I got the last bit of smoke I needed down, Nourkias dodged into close combat with Anya the Morlock. No matter, her job was done. Now she could tie him up in close combat!
Acid Burn, my Zero, made her way across the table, snagged the Beacon, and retreated to the midfield, uncomfortably close to Nourkias, because I had run out of orders. Adam's bluff with the Mentor as a Shrouded Minelayer had worked, and I had dodged past the danger zone twice to get to the Beacon and back out, eating precious movement. I settled for placing a mine instead of moving my Zero out of cover. I even made this a coordinated order to reposition my link and then reformed them, just to really get the maximum efficiency out of everything.
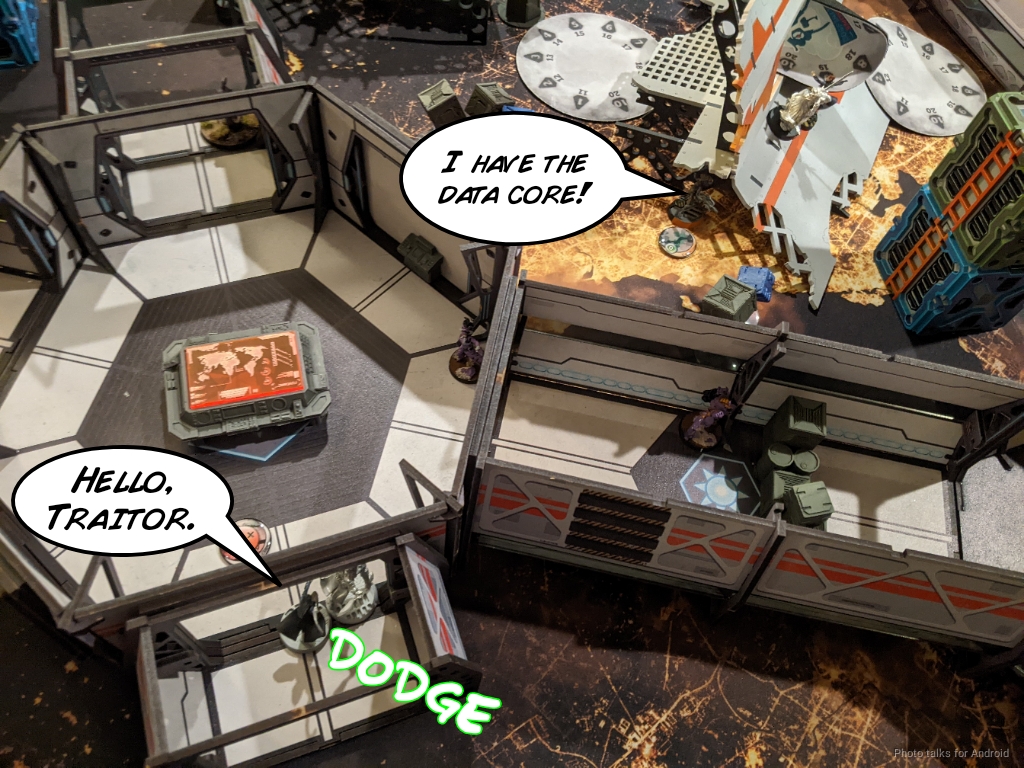
I had one irregular order left on my other Morlock, so she dodged into view of Bit and Dr. Worm in hopes of pinning them there. In retrospect, this was probably a mistake, but it was too late now. Still, having the Beacon now gets me that all important 2 points!
Turn 3
Top of 3 - Combined Army
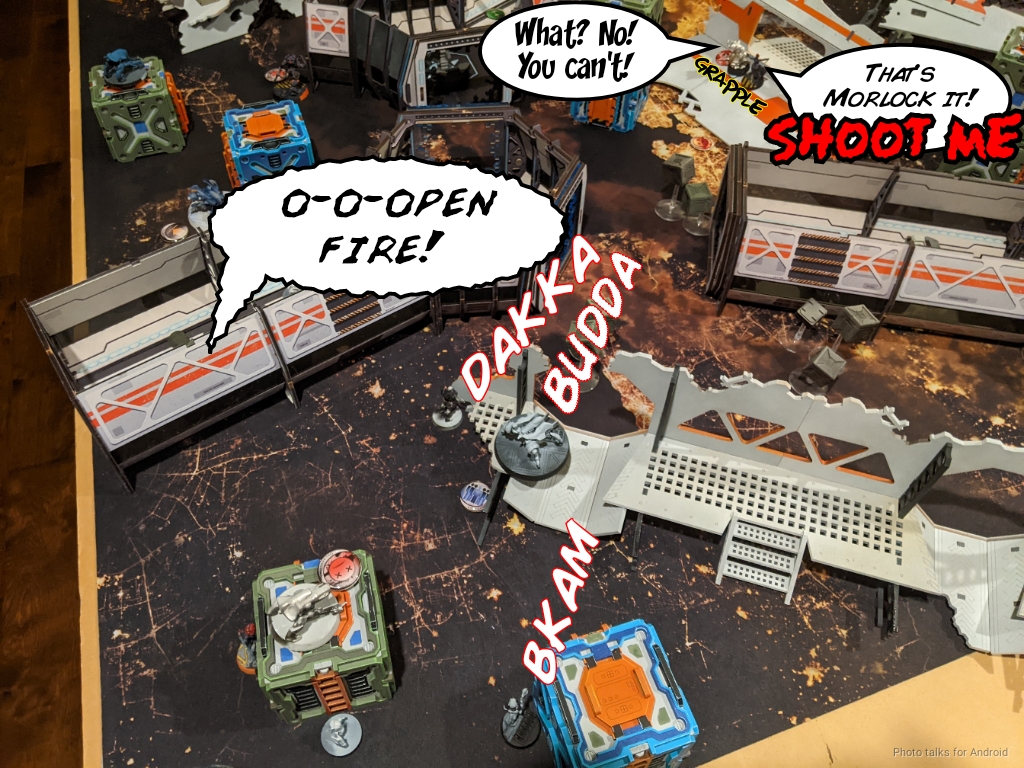
Adam decided to CC my Morlock with Nourkias, in full view of my Moderator link and Vostok. His plan was to just eat her to get more wounds, which would make his run on the beacon easy. I elected to shoot Nourkias with everything I had, figuring I could at least try to keep his wound count down. Amazingly, both Nourkias and Anya crit, making the CC a wash, and the Mk12 and combi fire coming in from the link obliterated Anya and put a wound on Nourkias, meaning Adam's plan had failed. Success!
Anya couldn't see the enemy Umbra, rather she saw the hole in the starfield it left before her eyes. There was no way she could defeat this thing alone... but she wasn't alone. A tearing pain erupted in her abdomen as alien metal parted the aramid fibers protecting her. This was it. The nanomachines weren't going to fix this one. She could no longer feel her legs, which meant her spine was severed. She still couldn't see the Umbra in front of her. So many stars... why were they all red?
"Anya!" came the choked cry from her comlog, her geist realizing the inevitable.
She blinked, the sound refocusing her. Her arms. Her arms still worked. She could move them. If she had gotten stabbed in the stomach, then... there... it was a wrist. An alien wrist, but a wrist nonetheless. Her fingers closed around it like bands of iron, one hand, then two. The Umbra struggled to pull away, the motion sending them into a gentle spin.
"Shoot me." she croaked into the comlog.
"What?" came the reply from Olivia, already rattled by the events of the last 60 seconds.
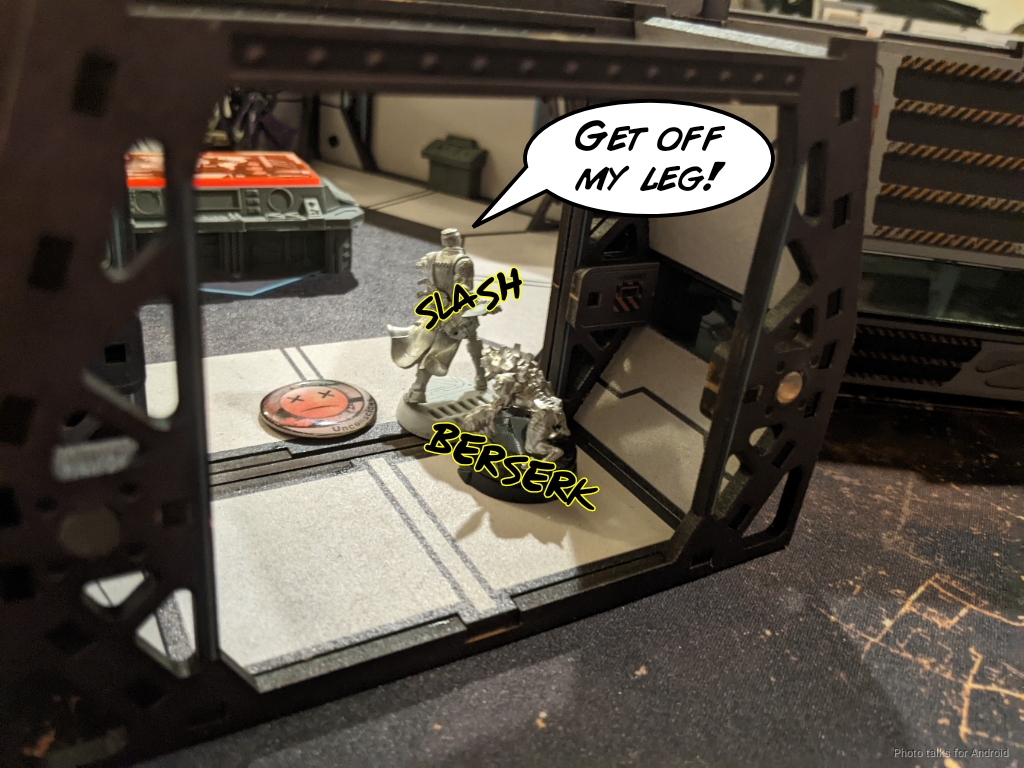
Anya summoned everything she had left, the last dregs of synthetic adrenaline clearing her head and somehow pulling air into her lungs. "That's Mor-lock it! SHOOT ME!
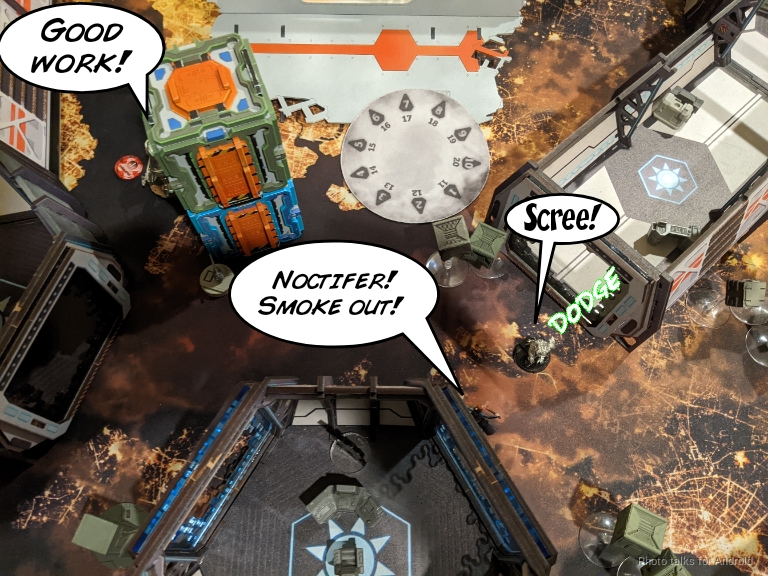
With Nourkias wounded, it wasn't safe for Adam to use him to get the beacon, so he brought in his last surprise, a Rasyat. I dodged with everyone that could and got a Spotlight to land.
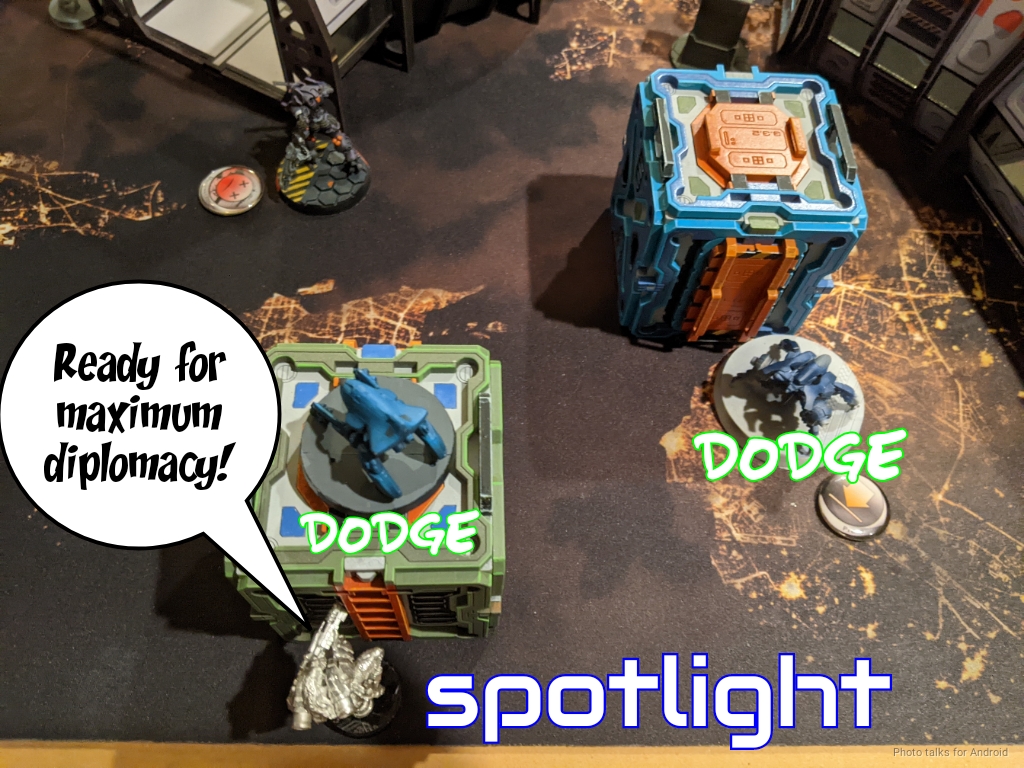
The dodge allowed the Transductor to spin around in time to oppose the Rasyat's CC attack with a flash pulse, but there wasn't any real hope of winning that one. Still, the Lunokhod finally got to turn around and drop a flamethrower template on the Rasyat as it was leaving.
Sadly, the Morat survived and threw some smoke to make its way to the beacon. It had to dodge a Koala on the way in, which let my Lunokhod dodge into view of the Beacon after having turned around and moved to catch the Rasyat.
It wasn't enough movement though, and the Rasyat managed to tank the other Koala and grab the beacon, absconding into the corridor where Bit & Kiss were.
Adam's last order was to jump Nourkias into close combat with my Zero, dying to the mine and forcing me to drop the Beacon.
Bottom of 3 - Bakunin
All I have to do now is either pick up the Beacon or kill the Rasyat. I decide killing the Rasyat is easier, so I start doing that. The only way to do that is to get past the Noctifer, who is still alive, somehow. I spend entirely too many orders knocking it down, using the Vostok's Mimetism like a shield to chip away with 4 dice on bad odds versus 1 die on bad odds. At one point Adam even does a wound to the Vostok, which was very very upsetting.
In any case, I make it across the gap, climb up the interior wall of the corridor to see the Rasyat, and gun it down thanks to the extra +3BS from the Spotlight earlier.

With neither of us having Beacons at the end of the game and me having it at the bottom of 2, with Adam's classified it's a
3-2 Jurisdictional Command of Bakunin Victory!
Acting Lieutenant, Durgama Defense CoalitionReverend Rivera, I'm reporting area secure. More importantly, the fire control computers and their data cores are in Nomad hands. Unfortunately, we were unable to capture the traitor Bit.
Acting Theater Commander, Durgama Defense CoalitionGood work, Olivia. Stand by, as soon as our Daktari frees up I'll send him over.
Acting Lieutenant, Durgama Defense CoalitionModerator Singh is already stabilizing the wounded, but we'd appreciate the help.
Acting Theater Commander, Durgama Defense CoalitionSend over your comlog records, we'll review them together later. Good work. Stay vigilant. Rivera out.
Post Game Analysis
Whew! That was a long one! Thankfully there's not much to say in the analysis. Capture and Protect is a game that famously ends in lots of ties. I think Adam's choice to prioritize getting Bit & Kiss up to get Data Scan to try and tiebreak was really good in that respect.
Both of us did a good job of defending our beacons, but I had just enough orders for my Morlock to get there and get the last smoke I needed down. Going second is pretty powerful in this mission, because you can have the beacon and your opponent has no real recourse to deny you those points if you can make it past their defense net. The game would have ended 3-2 if I had just left my Zero in base to base with the beacon at the bottom of 2 and instead focused on killing Bit & Kiss or something.
That says something about the mission design, but this probably isn't the time or place to unpack all of that. In any case, I think we both did a good job of pushing at the right times and prioritizing the right things. No major mistakes on either side, just some minor things like exactly what to do with the Rasyat at the end.
That was an incredibly brain draining game--Adam and I usually finish our games in 90 minutes but this one almost took 4 hours because we really pulled out all the tricks. I'm really happy to have had a chance to play a game like this during the campaign, I hope I get to get some more before it's over. We'll see if life cooperates. I wish you all the best, dear reader. Thank you for taking the time to read this!
A last reminder about the Durgama Defense Coalition patch giveaway! Click the image below to learn more about how to get some patches!
Battle Report Author


Army Lists Used In This Battle
Recommend Commander For Commendation
Share this battle with friends
WiseKensaiWins

Still best reports for infinity on the web
I love the style! Well done, commander!
Go go bromads!
Nice battle report. How did you get the army lists to embed like that into the main body of the article?
Great report, that reads well through the pictures alone. But … it has one flaw: I saw unpainted minis
Just like a Nomad to hack the code of this site to make their battle reports extra.
another great report!.
Boom badaboom! Excellent!
Go Nomad, show those aliens hoe to run a station!
High quality reporting! Thanks for being that beacon of community building!
This is just an awesome report – Well Done.
Congratulations on your victory against the Combined Army!
Awesome report!
It’s nice to see all bromads fighting together 🙂
Brilliant report as always!
Fight the good fight Bromad!
Excellent report. Was fun to read and of course a well deserved victory, commander!
Your reports are always a joy, but this somehow feels a bit more polished. It may very well just be the excitement of the campaign. Fantastic work, commander.
A great report.