Fought At Raveneye Bow Section: Sensoring Module
640 days 11 minutes ago
Operation Tangled Net
300 POINTSFor some reason, my opponent and I treated the Avatar's MULTI HMG as a burst 5 weapon, rather than burst 4. Under normal circumstances, I wouldn't publish a battle report with such a glaring issue, but due to the Tohaa war effort, and the fact that I managed to eke out a tie against such overwhelming odds, I think it's warranted.
I do not recommend others attempt to engage the prime aspect under such circumstances; giving the Avatar a free invisible Haris is incredibly oppressive. I sincerely hope CB doesn't get any ideas from this report. You have my deepest apologies if they see this as an opportunity to tinker.
With all that said, please enjoy.
Our orders are clear - to advance on the Sensoring Module in the Bow Section of the RavenEye. Combined Army units are clearly on site, and should be approached with extreme caution. We're not here to wipe them out - more than likely, we'll be outgunned - so the objective is to activate the Communication Antennas under cover of Eclipse smoke, and secure the PanOceanian tech coffin if at all possible. Expect heavy resistance.
Mission: Acquisition
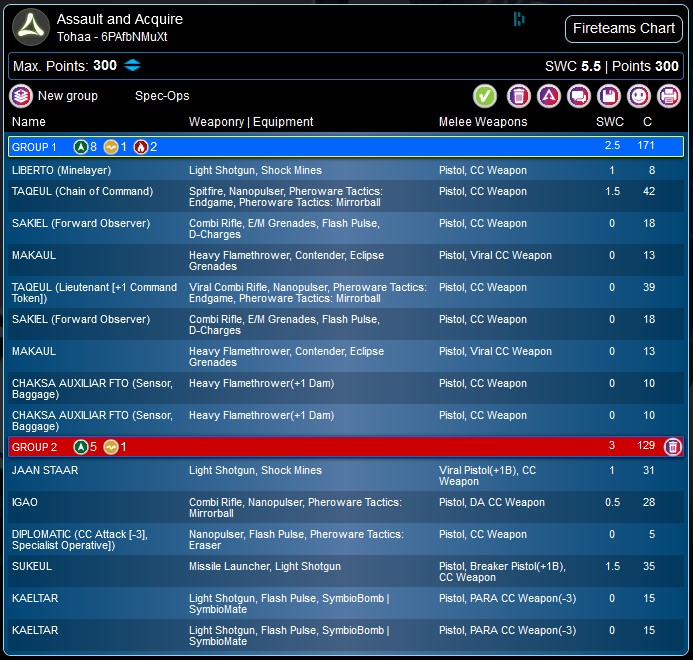
Forces: Vanilla Combined Army (Jummz) versus Tohaa (Hey It's Bren) - 300 points
Deploy First: Combined Army
First Turn: Combined Army


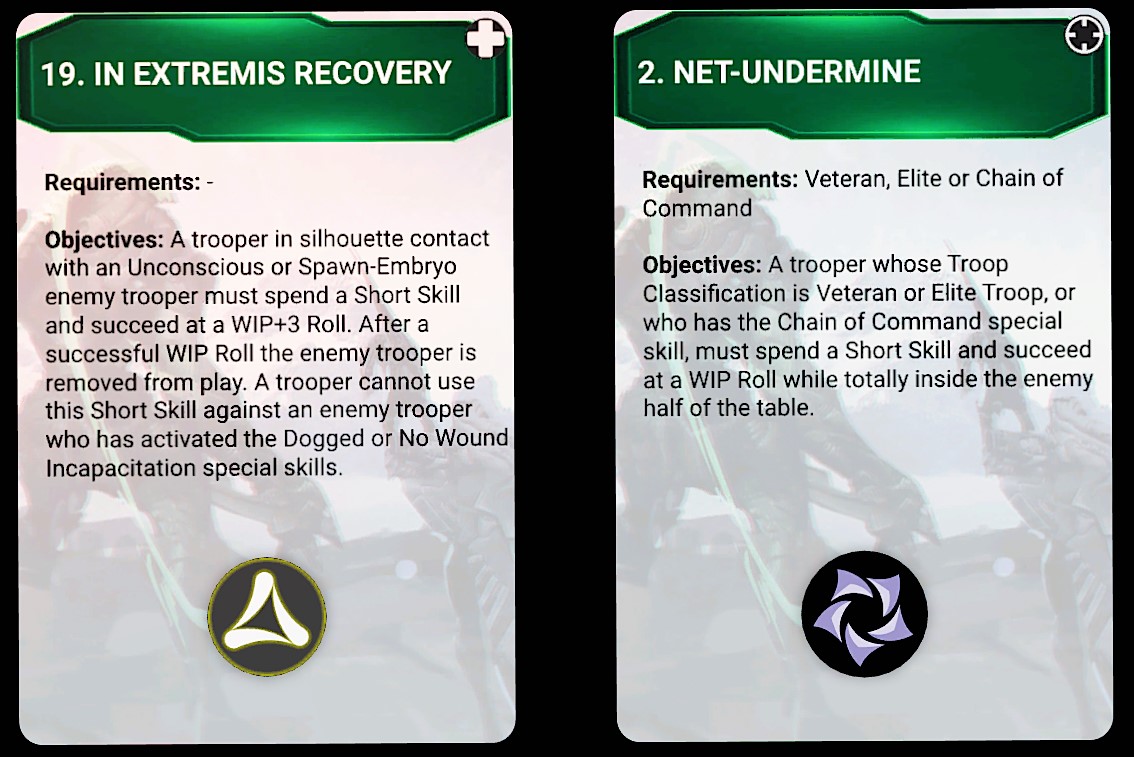
I pulled In Extremis Recovery, which, given the presence of Jaan, a Liberto, and an Igao all spending quality time in (or beyond) the midfield seemed like an obvious choice.
Jummz chose Net-Undermine, but wasn't able to complete it due to a lack of Veteran, Elite, or Chain of Command units in his list.
With the luxury of having Strategos L2, Jummz also decided to flip a command token to hold an additional unit back, which I felt was quite rude. I knew I was facing down the Avatar from the WIP 17 Lieutenant Roll that I'd lost, but was a little nervous at the lack of points that had ended up on the table.
Jummz placed a Dartok on his left flank, keeping it prone and concealed behind a column. A little further up went his first Taigha, this one carrying a DA CC Weapon, and a second Taigha in group two went nearby, staring down the only long fire lane on the table.
Both Imetrons were placed in difficult to reach spots in the midfield, with one failing its roll, and landing in Jummz' back-right corner. A pair of R-drones went down next, with one watching the long ground-level fire lane and the second placed on a roof in the back of the zone, ready to be incredibly annoying for the rest of the match.
A Med-Tech Obsidon Mechanoid and paired slave drone went down next, with Dr. Worm prone behind a car, facing the back line to discourage any Gao-Tarsos from coming on there, and flanked with a Nexus Engineer. Finally, Kerr-Nau made an appearance, going prone on the steps of Jummz' right flank, ready to make a play for the Antenna.

After some quick mental math, and some minor to moderate panic, I figured there was about 100 points on the table - the Taigha's are 5 or 6, both flash bots come in at 7 points each, the Imetrons are another 4 points... Deciding to hedge my bets in case Jummz had decided to bring along a Speculo (or two) I held my Liberto back, hoping that I'd be able to body block at least one Infiltrator if they made an appearance.
I placed my Sukeul Haris in the only spot that gave him a long line on the ground level of the table. The angles were fairly sharp up top, and I wasn't convinced the Missile Launcher would be able to see much if I placed it high up. To deter a Taigha, I put a Kaeltar watching a narrow band along the same line, making a note that the Avatar - due to its height - would encounter the Sukeul first, and hopefully in a poor range-band for its HMG. I was a little worried about being so far forward with the Sukeul, but the map wasn't giving me a lot of options in that regard - a trade off for having more access to the consoles and tech coffin was having to deploy a little closer than was ideal. I was also feeling a fair amount of pressure from the additional 4" for deployment zones, which would allow the Avatar to quickly gain ground and dominate the center of the map. To be extra safe, and not totally sure if combat jump units would make an appearance, I gave the Sukeul a bomb and a mate.
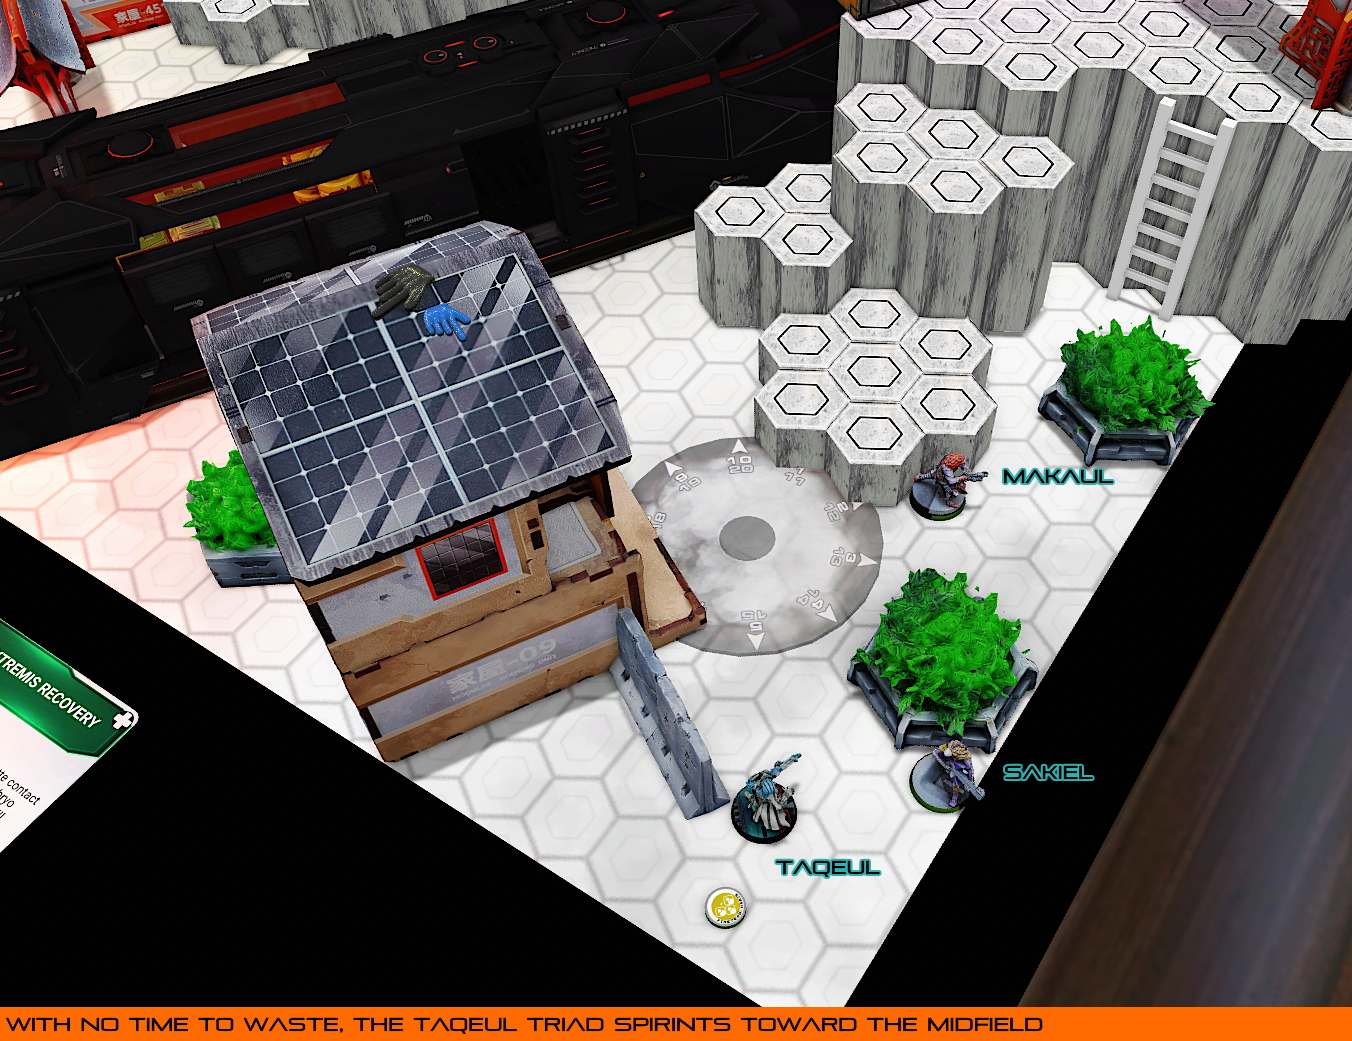
I hid my Spitfire Taqeul Haris in a central pocket. They could advance up the middle, and make use of the closer range-band later in the game, and I decided to protect my Chain of Command active gun with a Symbiomate. Without wanting to reveal Jaan for the last bomb, I gave it to the Sakiel in the back, hopefully to discourage Combat Jump troops landing on my back line.
On my right flank, I put my third triad, who would be able to make their way up the board, toward the antenna. I put my Diplomat nearby, who I thought would be able to be annoying with Erasers, and potentially score a point with her Irregular order by flipping the console. I put an Igao down nearby, hoping to make use of its Mirrorball to blind aggressive units before trapping them in melee, and hopefully disposing of them without too much fuss.
Wanting to support my Missile Launcher, and not have it locked down with a first-turn Taigha rush, I put both of my Chaksa watching opposite sides of the roadway, ready to burn the vicious alien monsters alive, should they be foolish enough to advance.
Finally, Jaan found himself hunkered down just on the edge of Jummz' DZ. Without knowing where the Avatar was going to land, I wanted to lock off a flank and potentially guide the oversized menace toward my Igao. The larger-than-normal deployment zones hurt a bit, stealing 4" of movement from my Impersonator, but at least they would do the same to opposing parachutists or Speculos, should they be included in the Combined list.
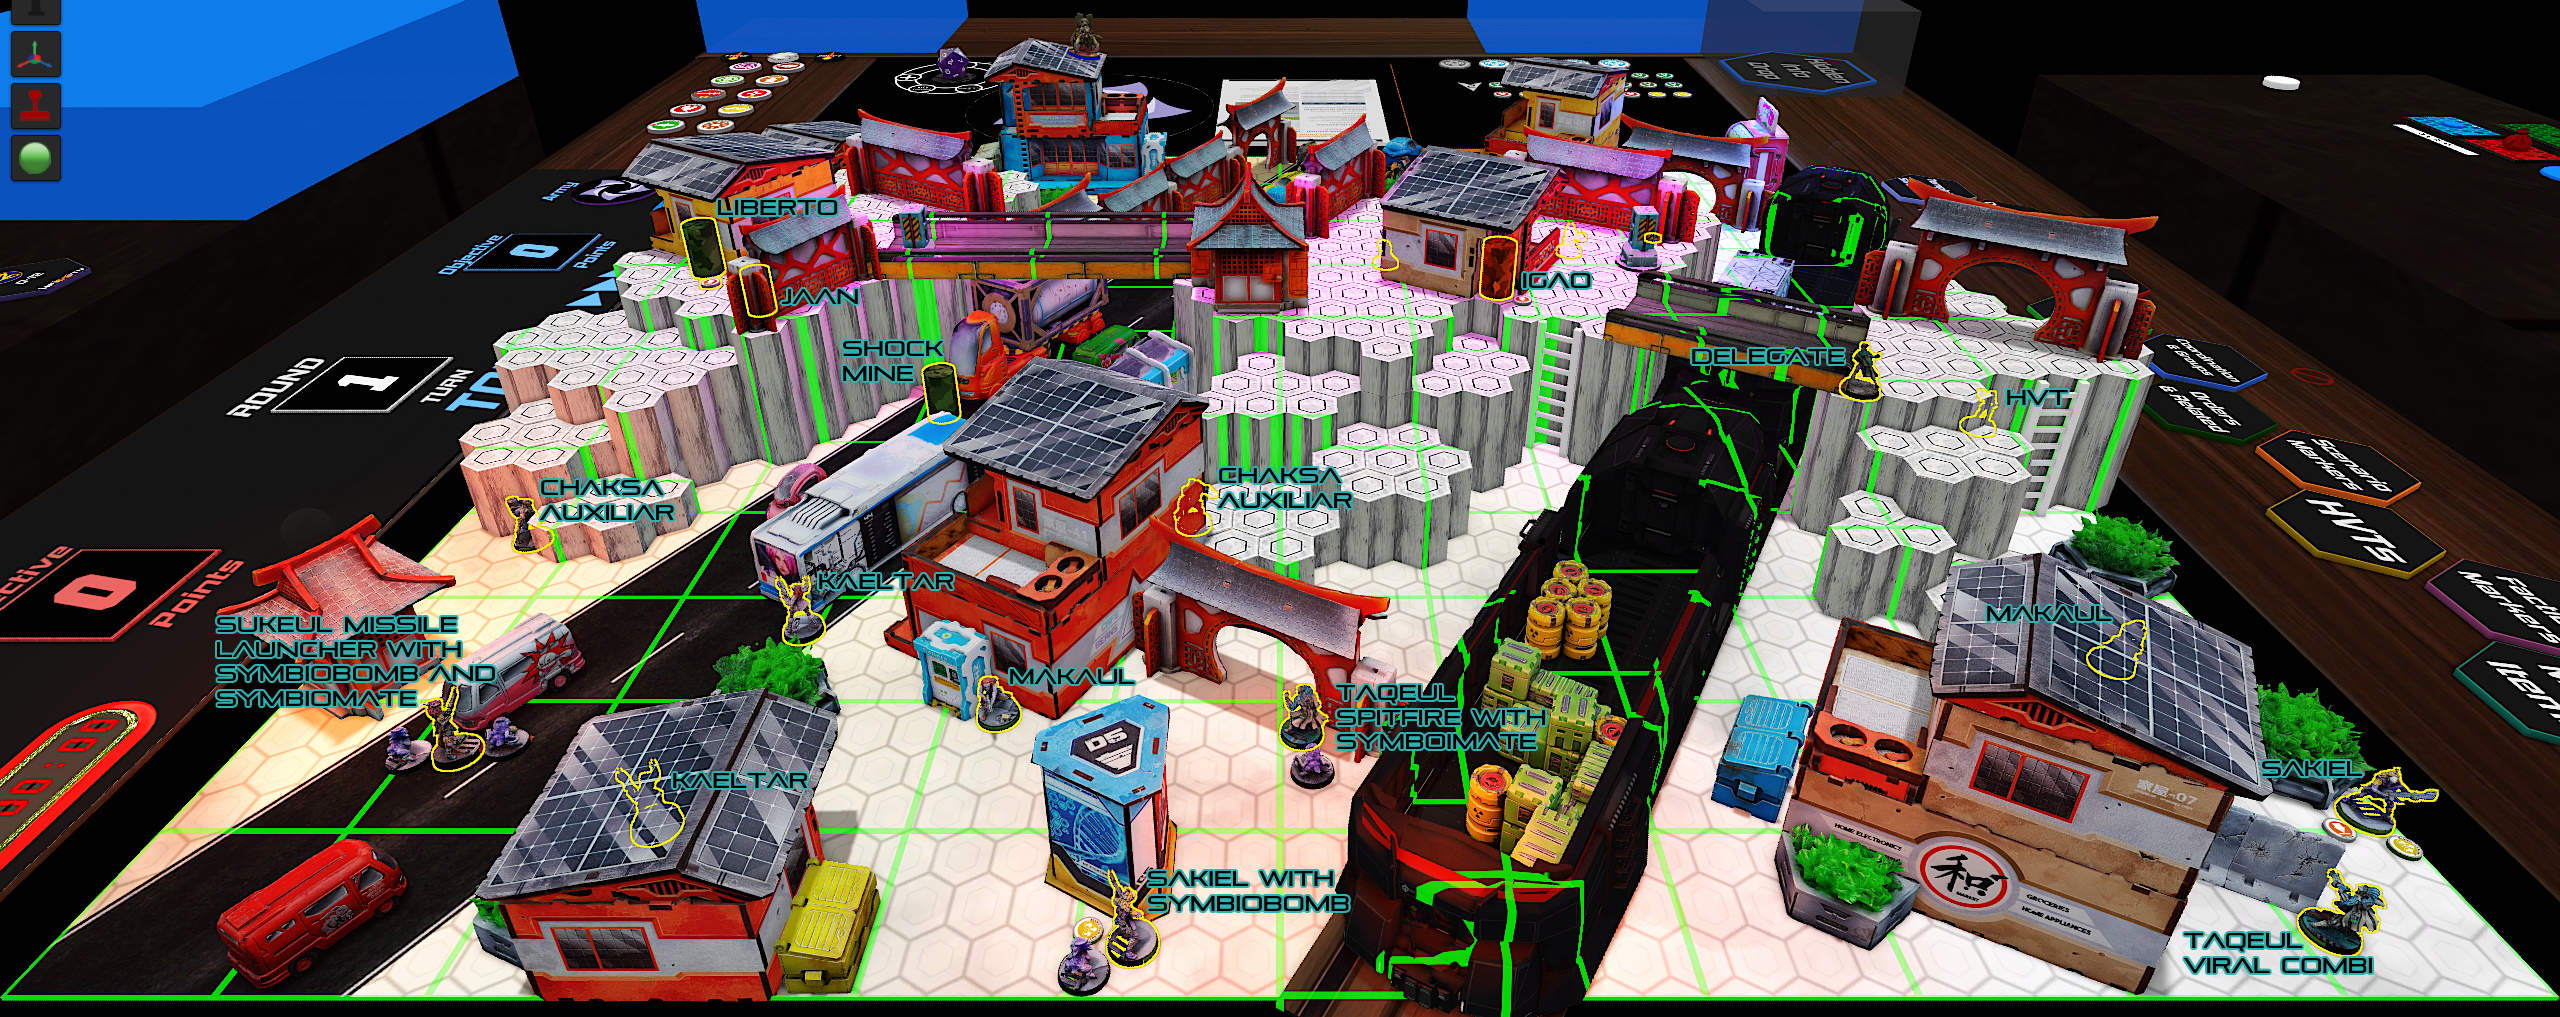
Jummz brought out the Avatar (no surprise) and placed it centrally, to either oppose and remove my Sukeul, or to make its way over the top of the hex-stairs and into the middle of the table (and toward my Igao). Viktor Messer went down on Jummz' left flank, and Bit and Kiss! were placed on the opposite side of the table, near Kerr-Nau with the aim of controlling both Antennas.
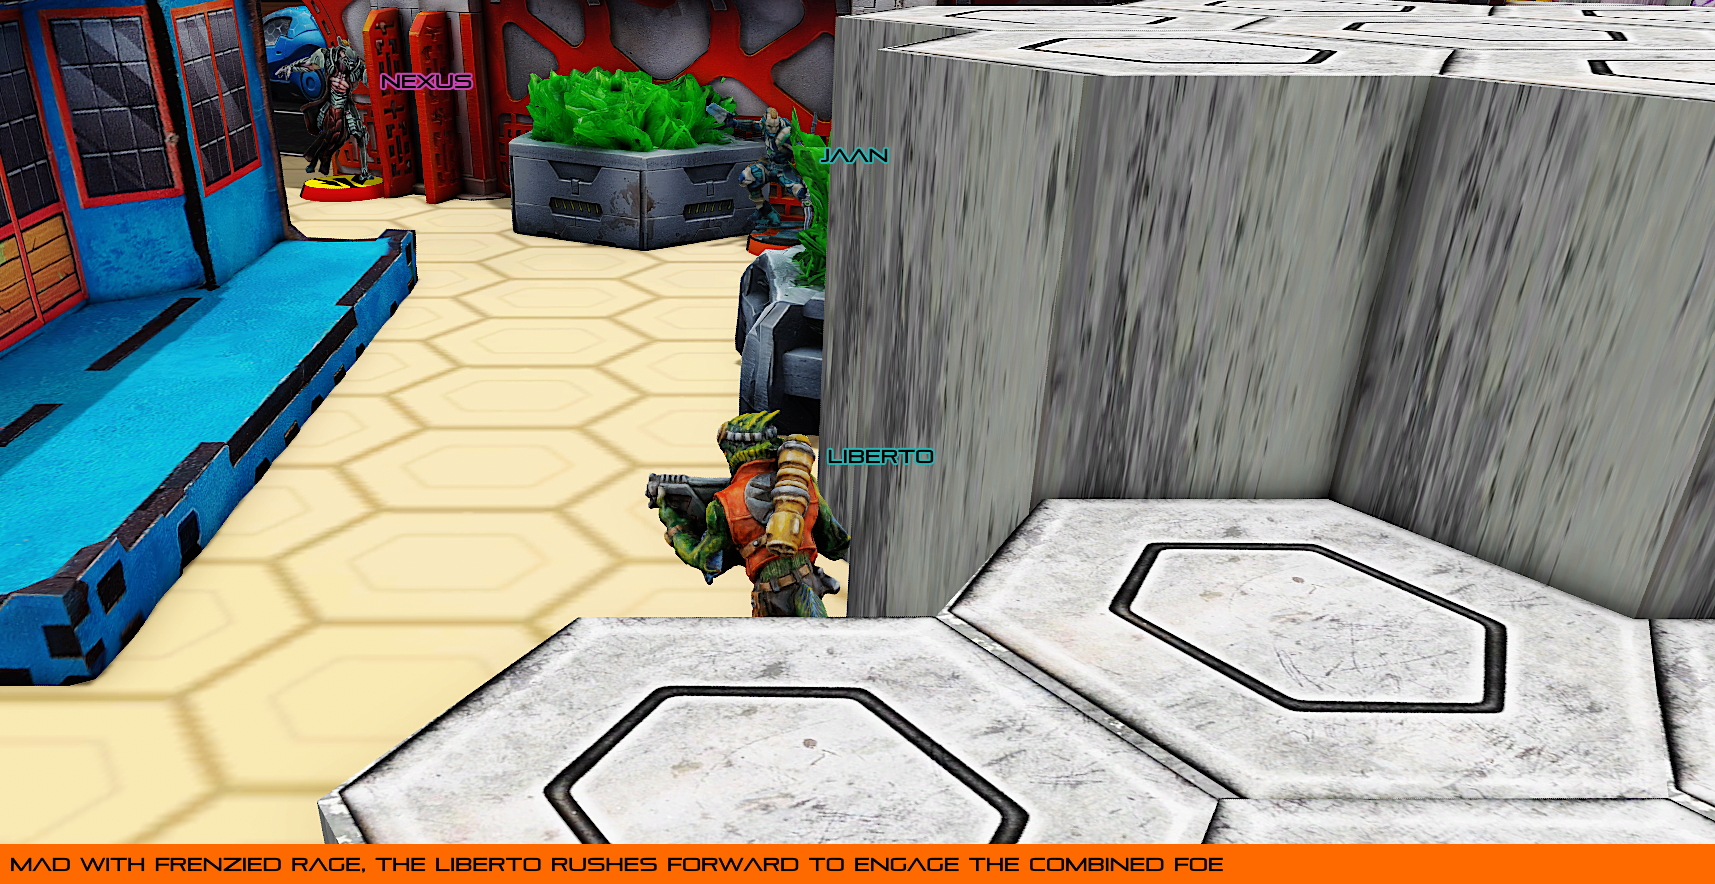
Still a little nervous about the inclusion of combat jump units or hidden deployment with only 13 Combined units on the board, I put my Liberto up high to support Jaan, and put its mine down on the ground level to further harden the road. Hopefully the preponderance of templates on my left flank could do some work and thin down the opposing order pool once my turn came around, but I had to stay alive until then.
It's as bad as we'd thought - the Avatar is here in the Sensoring Module. Worse yet, the thing is carrying the biggest gun I've ever seen. Is this some sort of new EI-based technology? I hope this isn't a sign of things to come.
Keep your head's down out there. We have work to do, and we can't do it if we're dead.
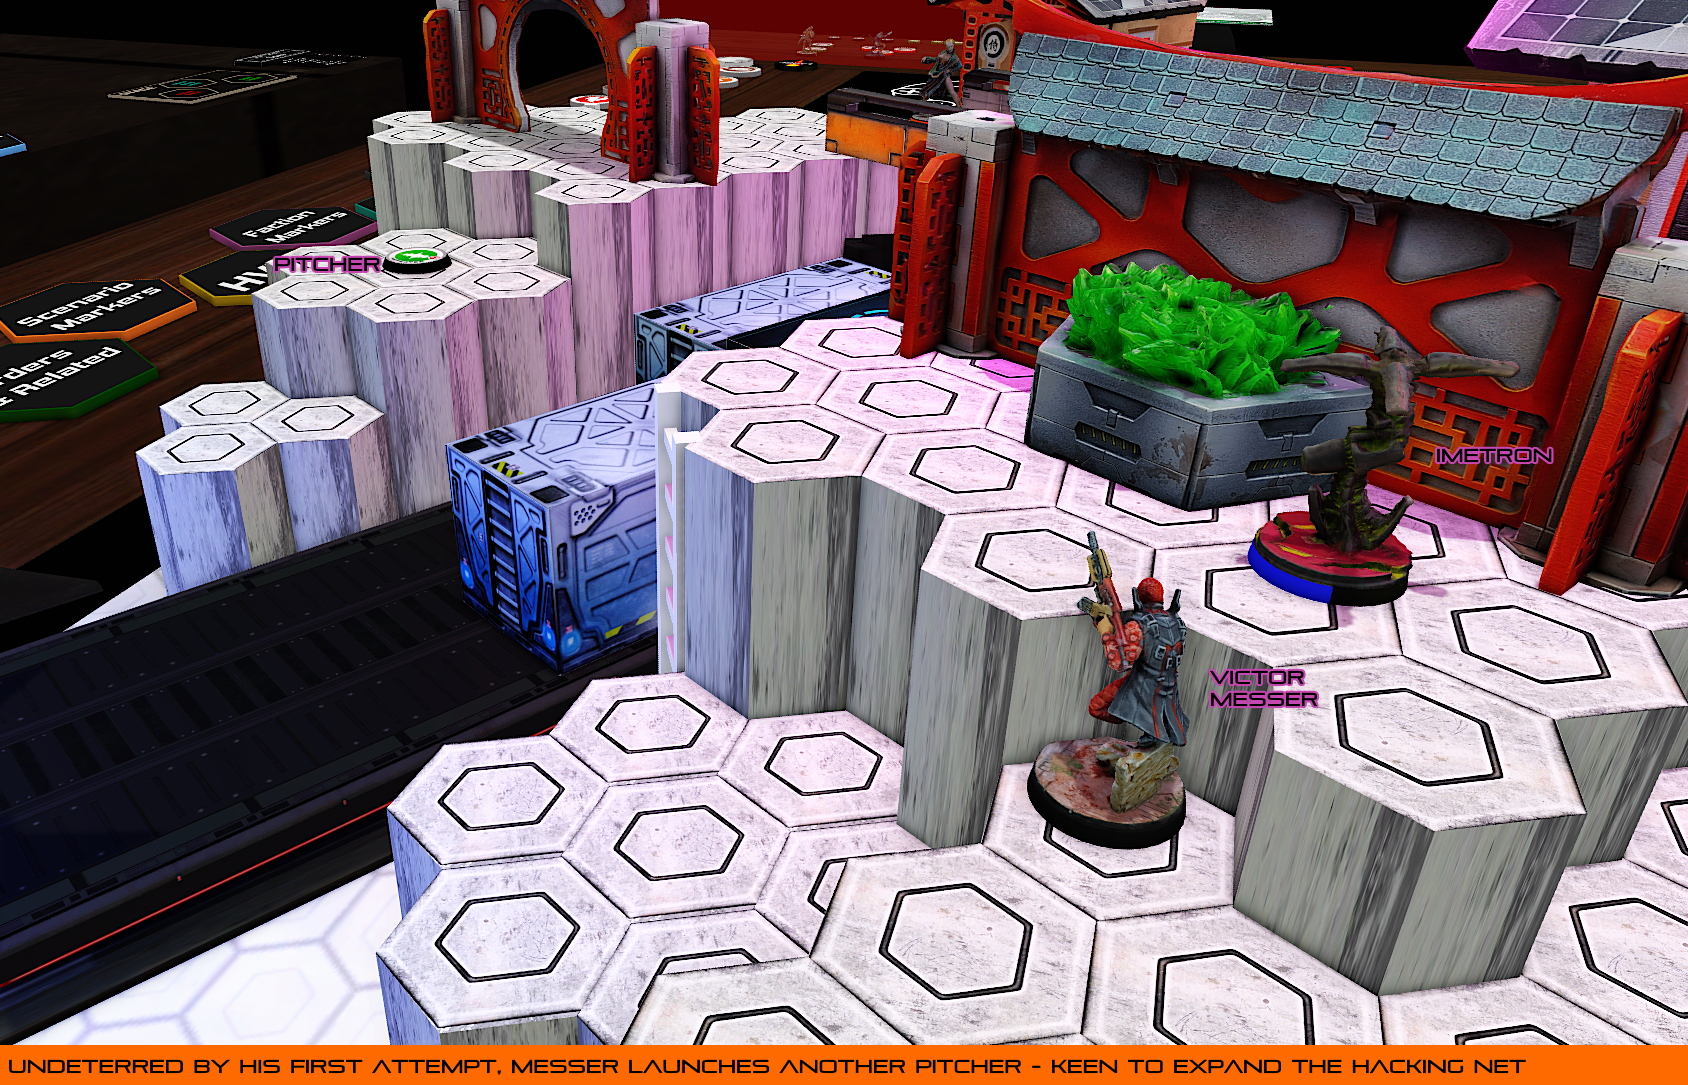
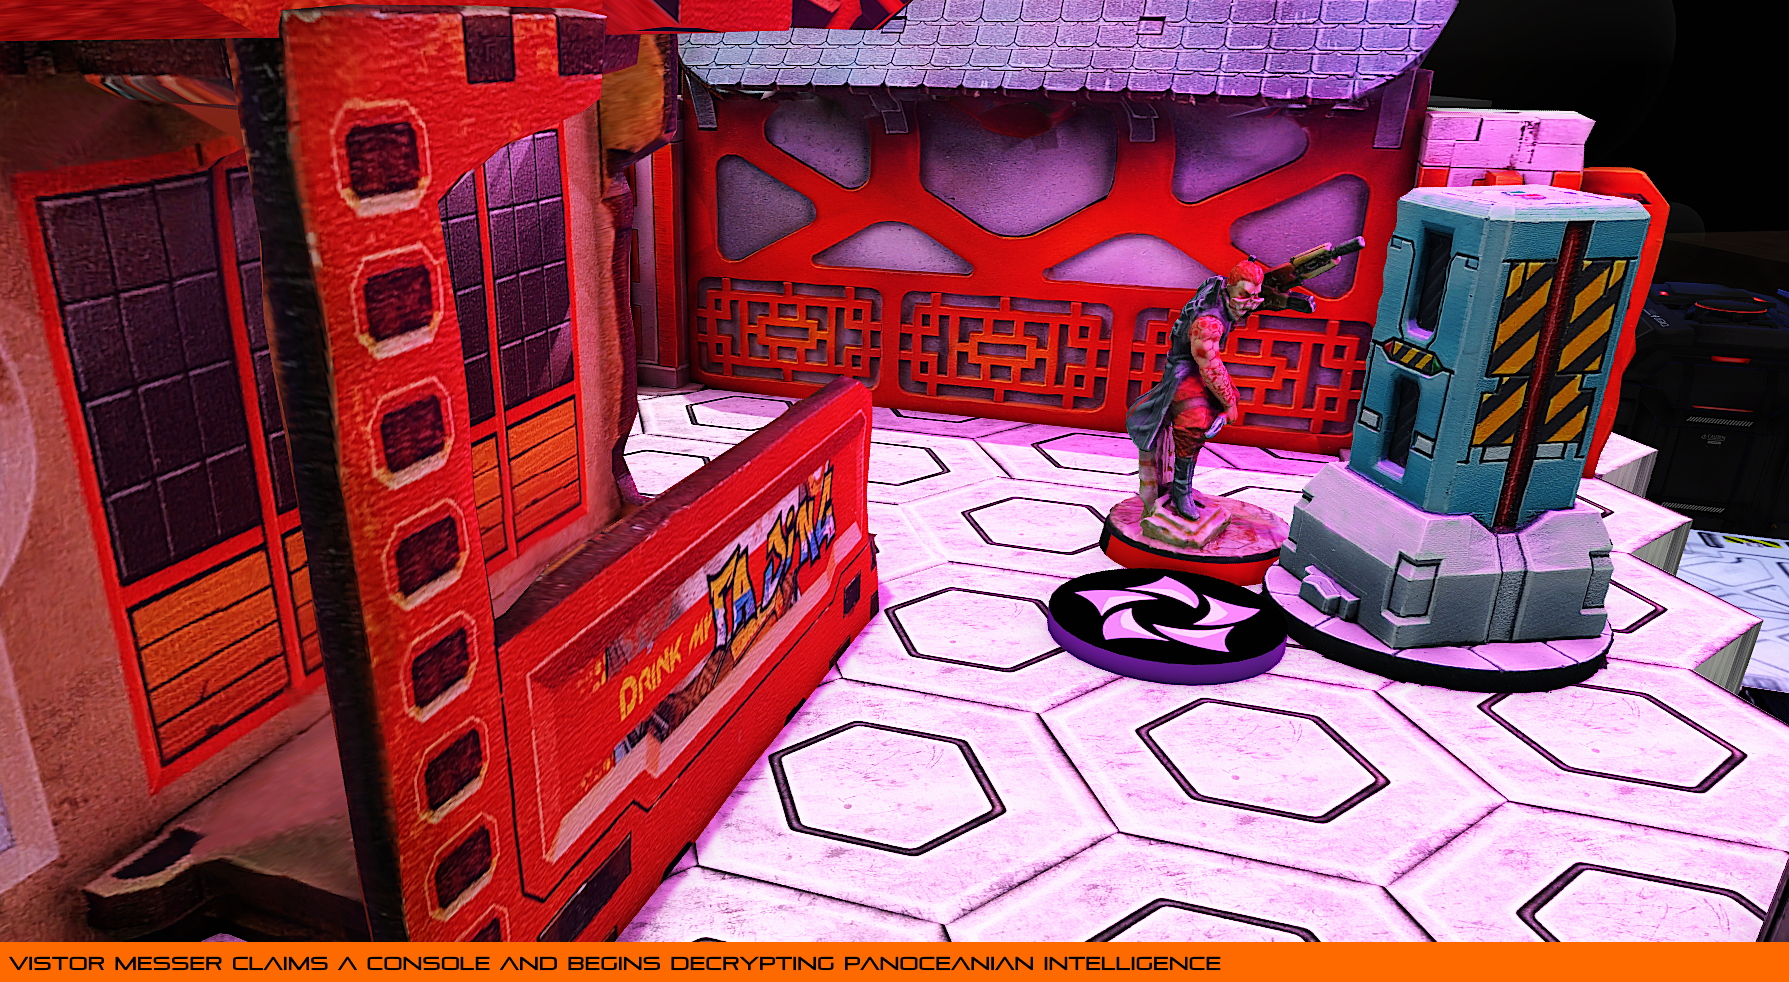
The initial order saw Victor Messer move slightly forward and attempt to place a pitcher behind a wall near one of the Communication Antenna's. The first attempt at this failed, but another order was flipped to ensure that a pitcher went down exactly where the hacker wanted one.
With the group two orders spent, the Avatar advanced up the table to see the waiting Sukeul. The engagement was in poor range for the MULTI HMG and the Sukeul managed to land a hit, but the Avatar shrugged off the explosive shot from the Missile Launcher.
A second exchange, still in bad HMG range, saw the Sukeul crit! Unfortunately, the Avatar was completely unscathed from the additional hit - seven saves and no wounds, not that I was counting.
Pressing forward and out of cover to get into closer range, the Avatar finally managed to land two hits on the Sukeul who was thankfully protected by his Symbiomate - the small creature bravely sacrificing its life to protect its host. The Sukeul chose to remain standing, facing down the full force of the Combined Army's might.
Spending another order on a fourth volley, the Avatar finally managed to put a wound on the Sukeul. With the removal of its Mimetism, the Missile Launcher chose to drop prone to deny the enemy a target. With a follow-up order, the Avatar rounded on an exposed Kaeltar that I'd placed to deter the Taigha's. After a failed Dodge, and several failed Armor saves, the Kaeltar was killed outright. My Sukeul Triad had been de-fanged, but doing so had taken quite a few orders. Hopefully, the trade would be worth it.
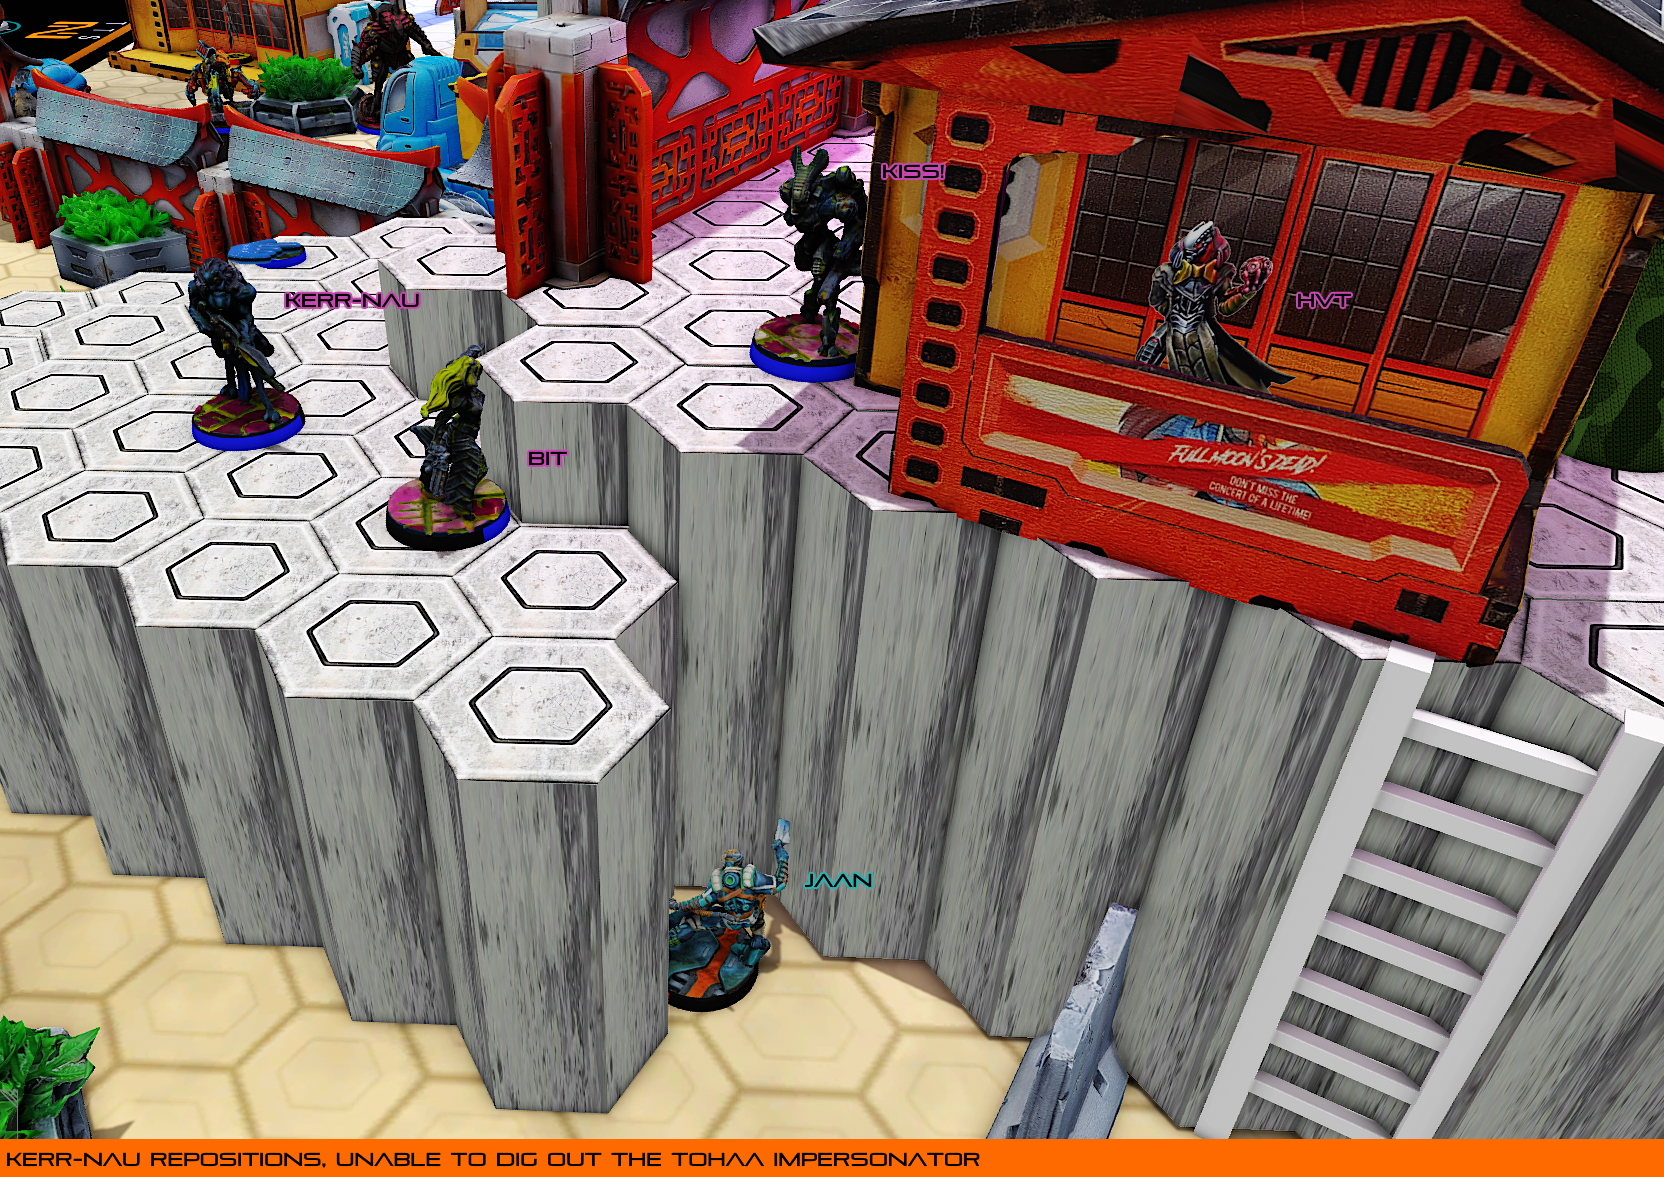
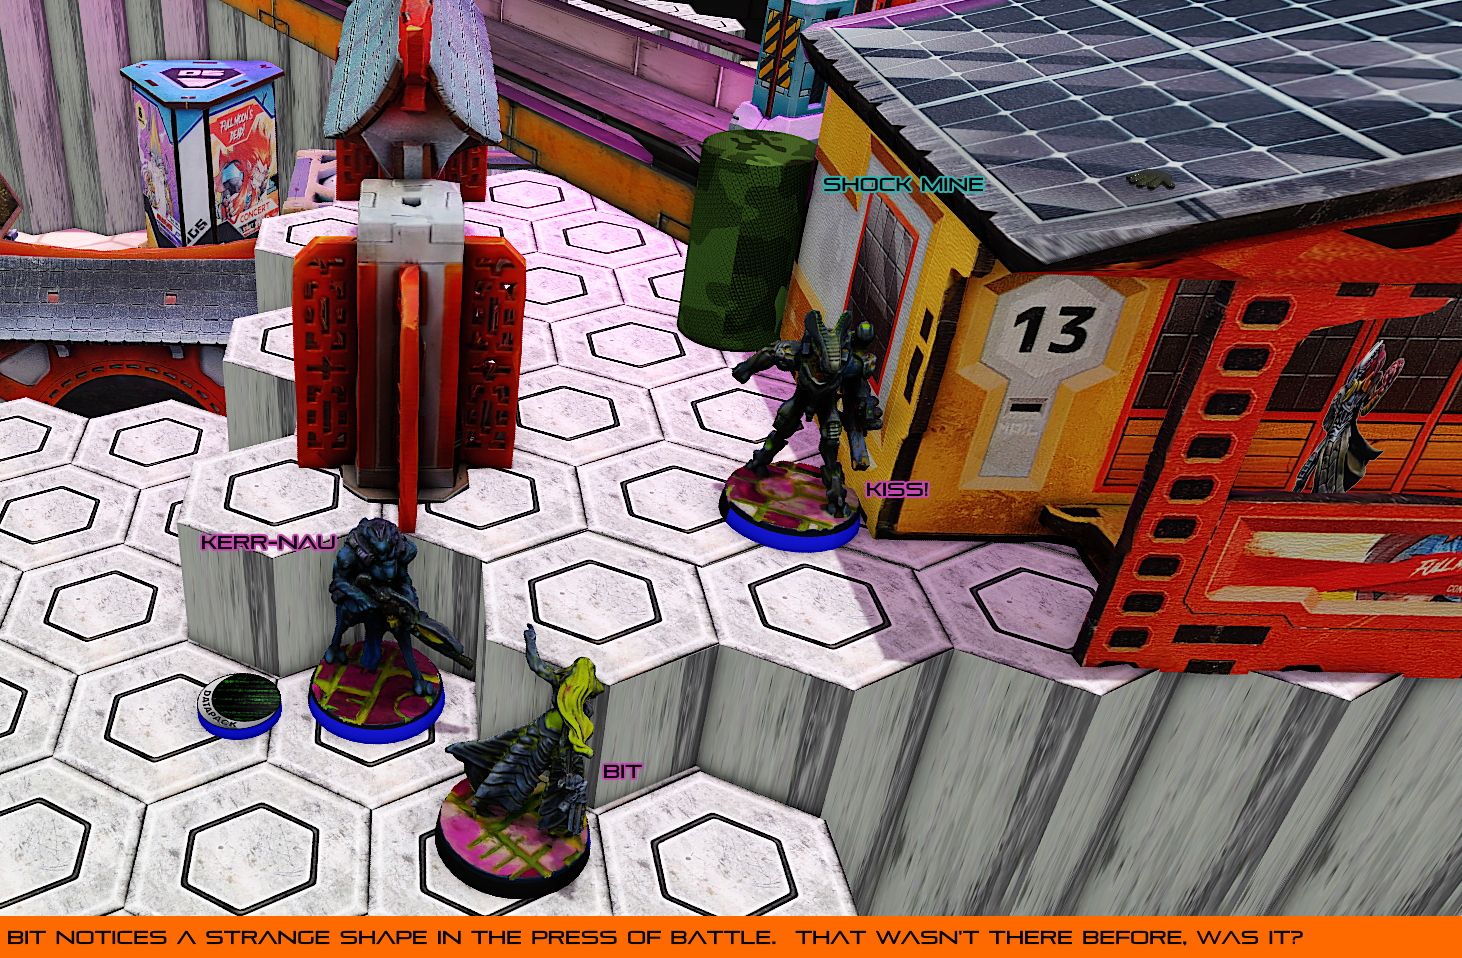
Wanting to limit the threat to his exposed flank, Jummz advanced Bit and Kiss! up the field to discover Jaan, who was hiding in a difficult to dig out spot just outside of the Combined DZ. After a successful discover, he wanted to bring Kerr-Nau's Plasma Rifle to bear. The Nexus Operative moved up the board, but Jaan's keen ears picked out the noise of the hacker's march and he placed a mine in preparation for a shootout.
Kerr-Nau looked over the edge of the hex-stairs, coming eye-to-eye with the Kiiutan Imposter. He pumped three quick shots into Jaan before quickly retreating away from the incoming shotgun blasts and the explosion of Jaan's shock mine. As the smoke cleared, only the mine was gone - both troopers had survived the encounter with hardly a scratch on them.
With his order pool depleted, Jummz passed the turn to me.
Having only suffered a single casualty, I started my first turn with a near full order pool. Looking at the table, Kerr-Nau and Bit were poorly positioned, and I could push my Liberto up to hopefully remove them without too much fuss, relieving my left flank of some of the scoring pressure that Jummz had on the board.
Losing the Mimetism on the Sukeul hurt a bit, and I didn't want to throw the unit away, so I elected not to spend orders on a coin flip between the Missile Launcher and the Avatar. This would prove to be an error on my part - the Avatar had moved back into Jummz' deployment zone, so the range would have been in my favor, and in doing so, he had turned to face the oversized menace toward Jaan's location, leaving my Sukeul in its back arc! Unfortunately, I was too preoccupied with other plans to notice.
I crept my Liberto up, hugging the side of a small house it had deployed against. The fish-man put down a mine just within view of Bit, revealing himself in the process, but doing so safely out of view.
Unable to re-camo, the Liberto ran out from behind the house. Shocked, Bit, Kiss! and Kerr-Nau all tried to Dodge out of the way. Both hackers were caught in the Mine's blast, and died to a combination of shrapnel and shotgun fire, leaving Kiss! undamaged but disconnected.

I spent the rest of group 1's orders moving the Liberto further up into Jummz' empty DZ, hoping to force him to spend orders dig out the pest and divert him away from my two remaining Triads. On the way, I spent a short order claiming In Extremeis Recovery, having the Liberto remove Kerr-Nau from the table, and netting me an objective point.
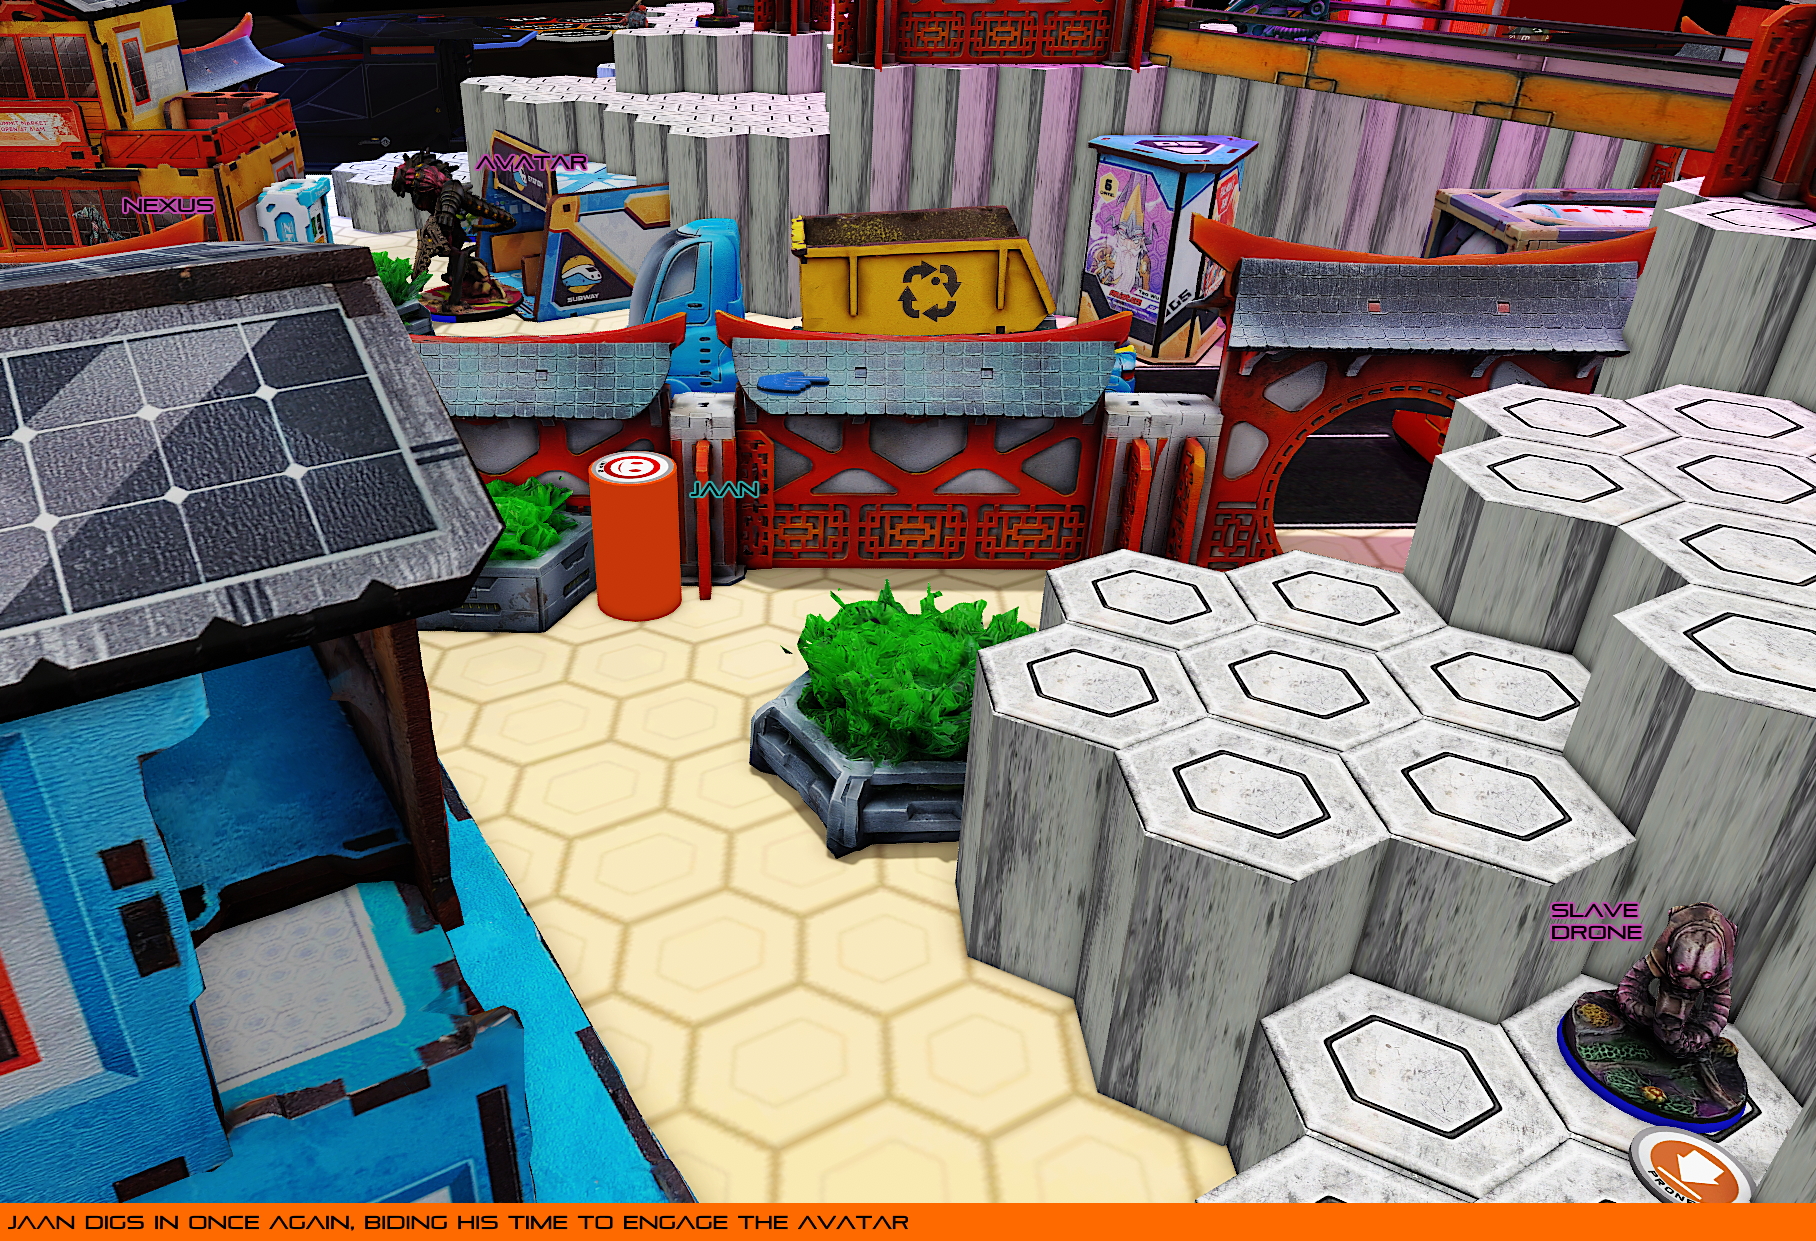
To support the murderous fish-man, Jaan also advanced, killing an R-Drone on his way and re-Impersonating in another awkward spot. I was close enough that I might be able to engaged with the Avatar in a follow-up turn, or force him to move to the middle of the table and into range of my waiting Igao. I passed the turn back to Jummz, up 1:0.
We've taken some losses, but we're pushing the Combined units back! Their advance on the western Antenna has been halted, but we've still got that hulking nightmare in the middle of the station. Jaan and a Liberto are dug in on their flank - hopefully those two can keep the enemy distracted long enough that we can get what we came here for, and get out.
Feeling the pressure from the Liberto and Jaan, Jummz spent orders in group two to move his Nexus up and discover my Impersonator. The Liberto - Frenzied from removing Bit and Kerr-Nau - passed all of its Dodges to run down the hex-stairs and support Jaan.
Spending a Command Token to convert an Irregular from one of his Taigha's, Jummz had the Nexus fire on Jaan, who I'd clumsily set the facing on a poor angle that left the enemy Engineer in his back arc. The Impersonator failed a Dodge and took a wound from the Nexus, but the murderous Liberto dropped the enemy unit with a well-placed shotgun blast.
Having lost his Nexus, Jummz pushes back into his right flank with Dr. Worm in an attempt to recover his deployment zone. After a brief exchange of fire, the Med Tech decides that caution is the better part of valor, and bravely retreats back to the car it started prone next to at the beginning of the game. Recalling its medical training, the doctor fired a MediKit at the unconscious Nexus but the poor Engineer was too badly wounded to be resuscitated and died in the attempt. Dejectedly, Dr. Worm admitted that perhaps his father had always been right, and that he should have gone into the Combined Army Diplomatic Division after all.
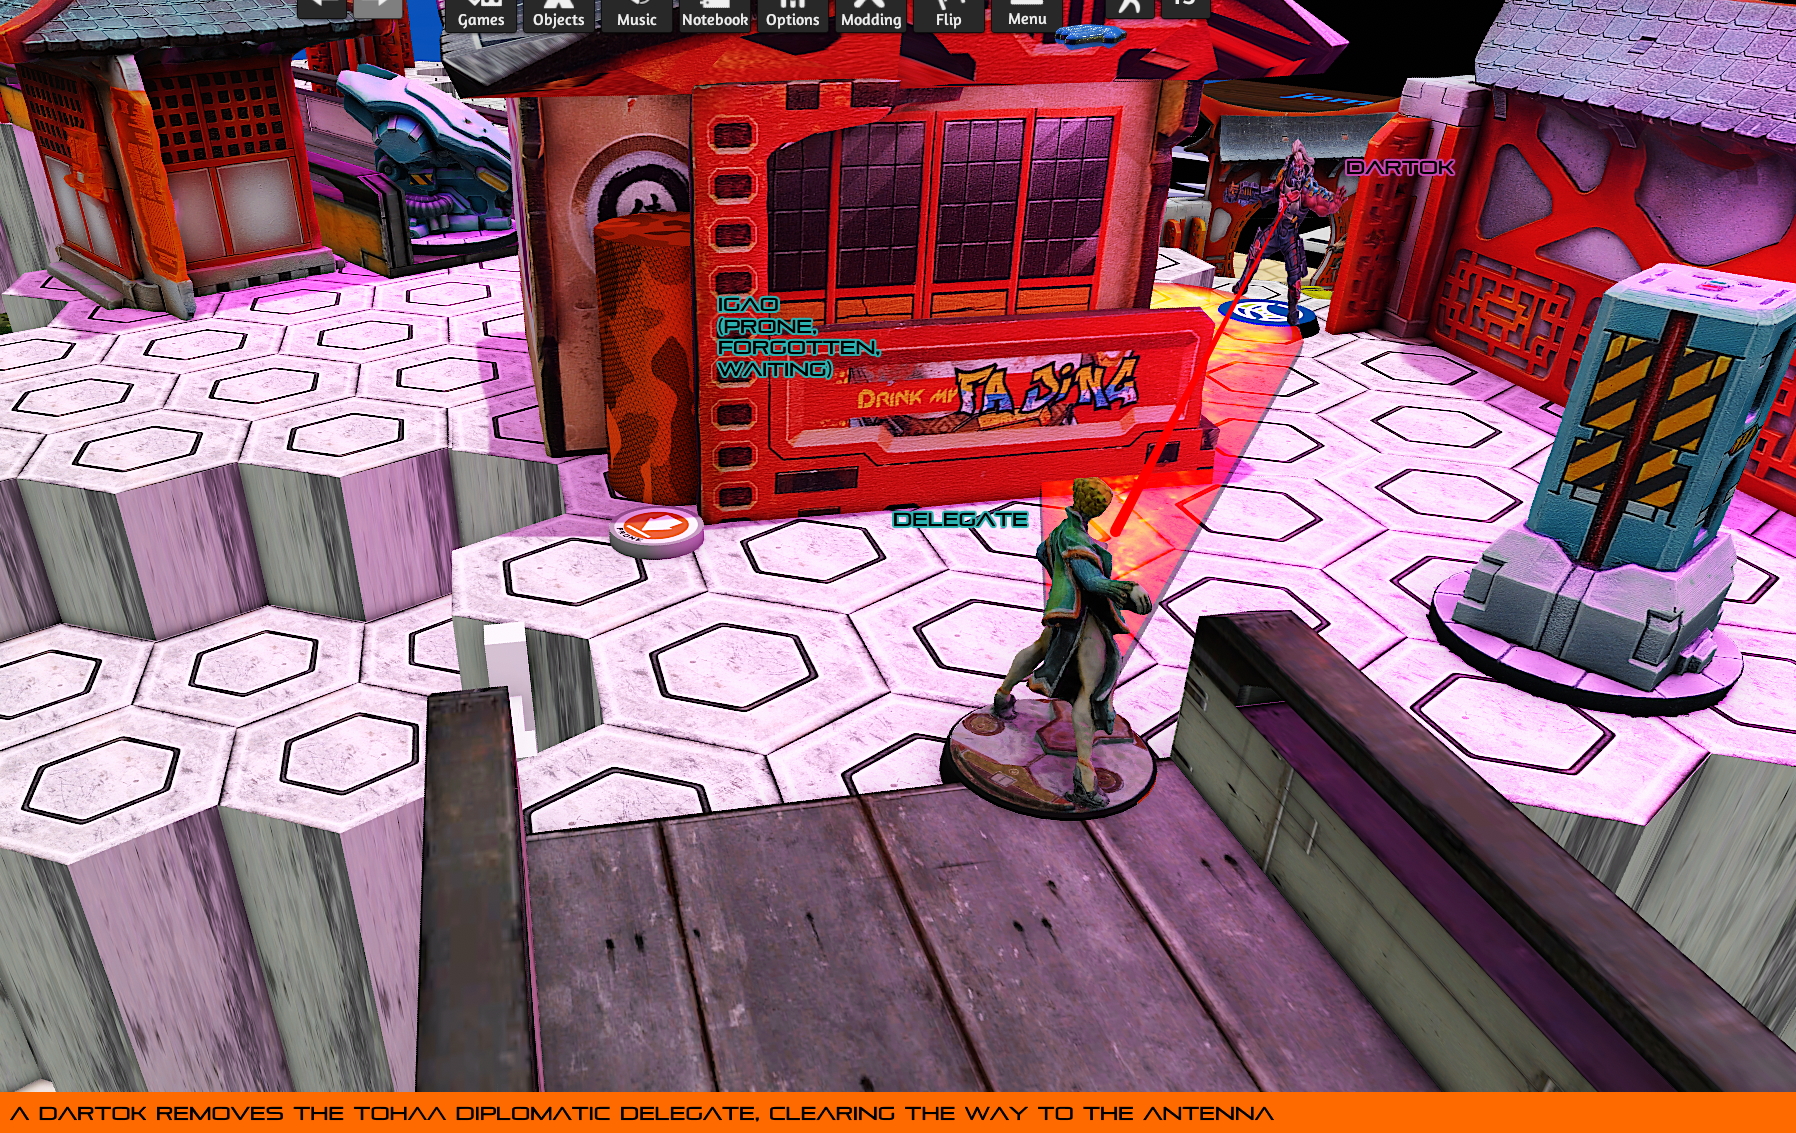
Having resigned the loss of the Western Antenna, Jummz spent an order in group 1 to advance with his Dartok hacker who climbed the hex-stairs and engaged with a Diplomatic Delegate. The Delegate tried to use its Nanopulser on the hacker, but the Dartok's BTS held strong. The Delegate wasn't so lucky, and died to a hail of SMG fire.
Moving to support his Dartok, and keen to remove a high-burst Tohaa gun, the Avatar made its way into the middle of the table to get a line on my Taqeul Spitfire. In doing so, it revealed itself to a nearby Chaksa Auxiliar, who was able to catch both the Avatar and the Dartok in a gout of flame! The Avatar made its save without issue, but the Dartok wasn't so lucky and fell unconscious from the template. The Taqeul failed its dodge, taking a few shots from the Avatar's MULTI HMG, but was saved by its Symbiomate and fell back into cover.
Feeling exposed, the Avatar re-positioned further back, prompting another blast from the Chaksa. The Avatar returned fire, killing the Auxiliar and making yet another Armor save - nine so far!
We're under heavy fire, and are experiencing heavy casualties! The Avatar has advanced on our position and is holding firm in the center of the engagement zone. We have no choice but to deal with it now!
Having whittled down my order pool somewhat and now firmly controlling the midfield, Jummz was well placed to grab points in his third turn. If could remove the Avatar, though, there wasn't much else on the table that I saw as a threat to my final turn. He was close enough to the Igao that with a few orders, I could probably engage the Avatar and potentially remove it which would deliver me a hard-fought win. Time to spend some orders.
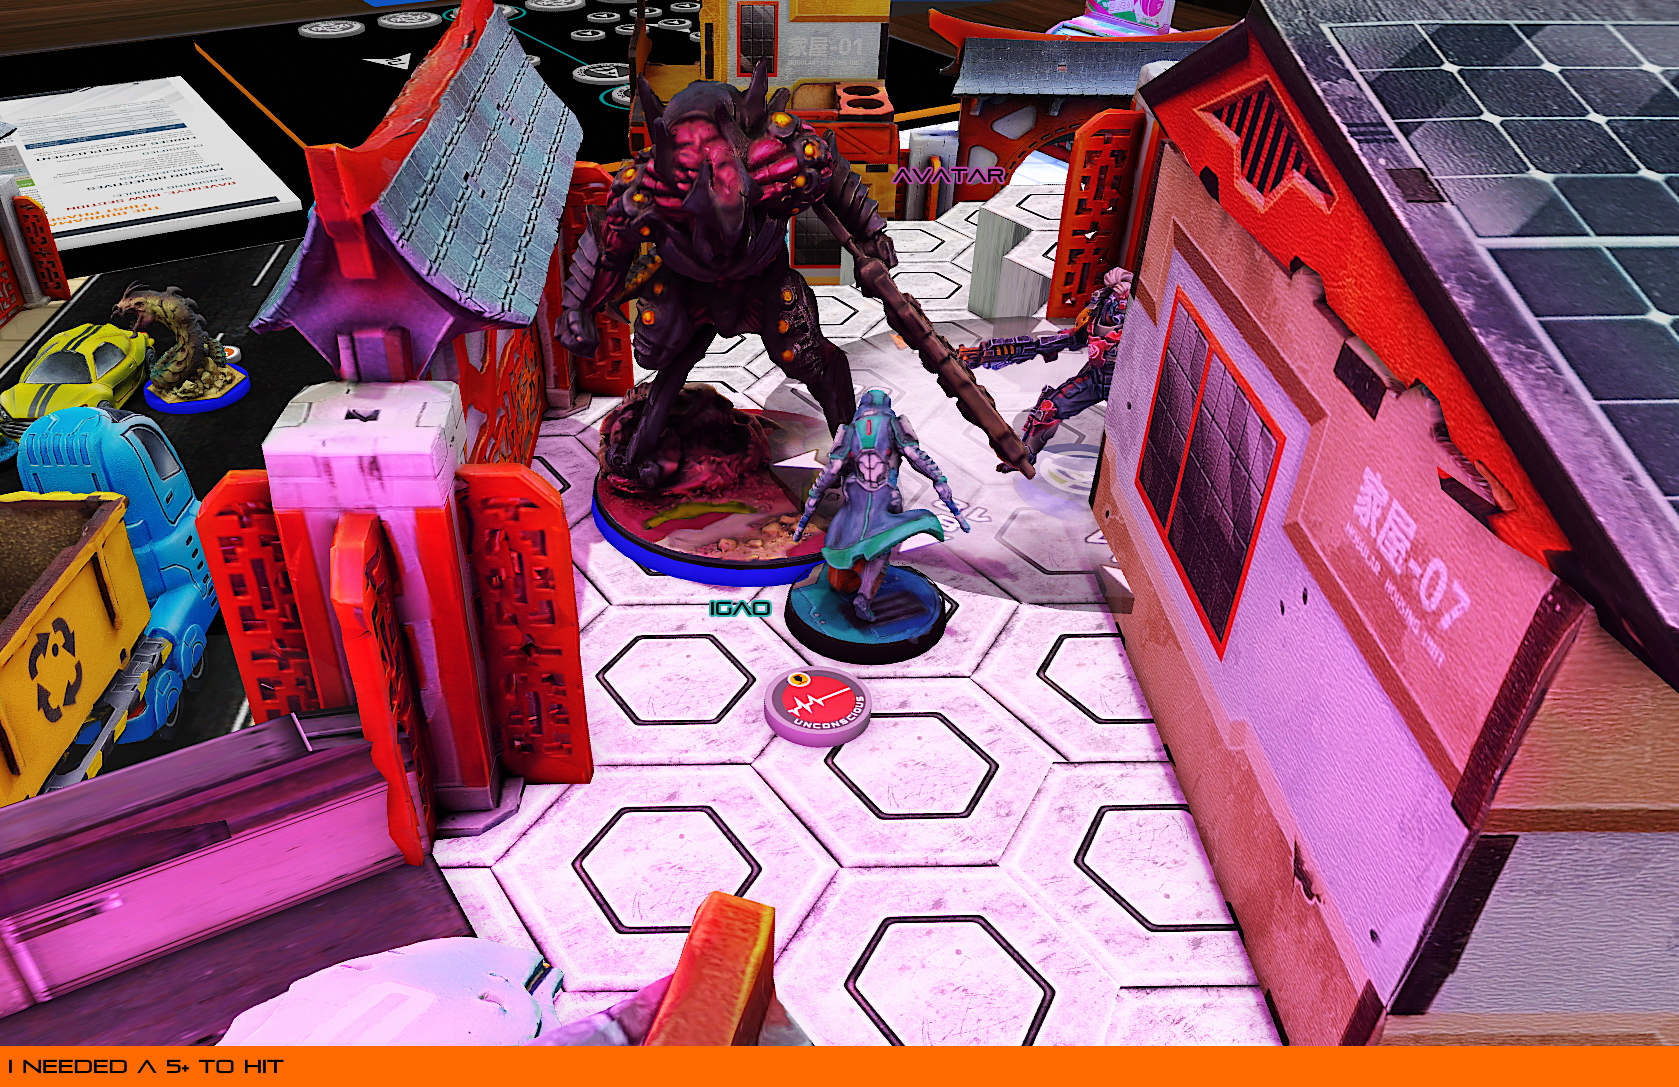
The Igao revealed, moving out and putting down a Mirrorball cloud on the Avatar, blinding it to further movement and blocking its Sepsitor. Victor Messer and a pair of Taigha's were nearby, so I re-evaluated my initial plan of just locking the Avatar up in melee and decided to try and outright remove the unit. Having slept on this, I think this was a mistake despite the chances of the rolls going in my favor. Jummz would have been going into his third turn with his main attack piece trapped in melee, and would have had to choose between spending orders to dig it out of trouble, or leaving it engaged and trying to grab points with his remaining pool of specialists.
Nevertheless, the Igao retreated to re-camo and jumped into melee with the Avatar, putting the inital roll on a -9 (Surprise Attack, Martial Arts L3, and the Igao's native CC -3 modifier). The Avatar fought back, but was hit by the Igao's DA CC Weapon and finally took a wound, but saved against the second hit.
Spending another order on the Igao, this time with the Avatar on a -6, I rolled a one and had to save against the Avatar's Phys 17 DA hit, which I regret to tell you, I most certainly did not. Later, I took a look at what the odds were of this happening. Assuming my die math was correct, the Igao had a ~53% chance of inflicting a single wound. The Avatar? A 3.48% chance of the same.
I am still salty about this.
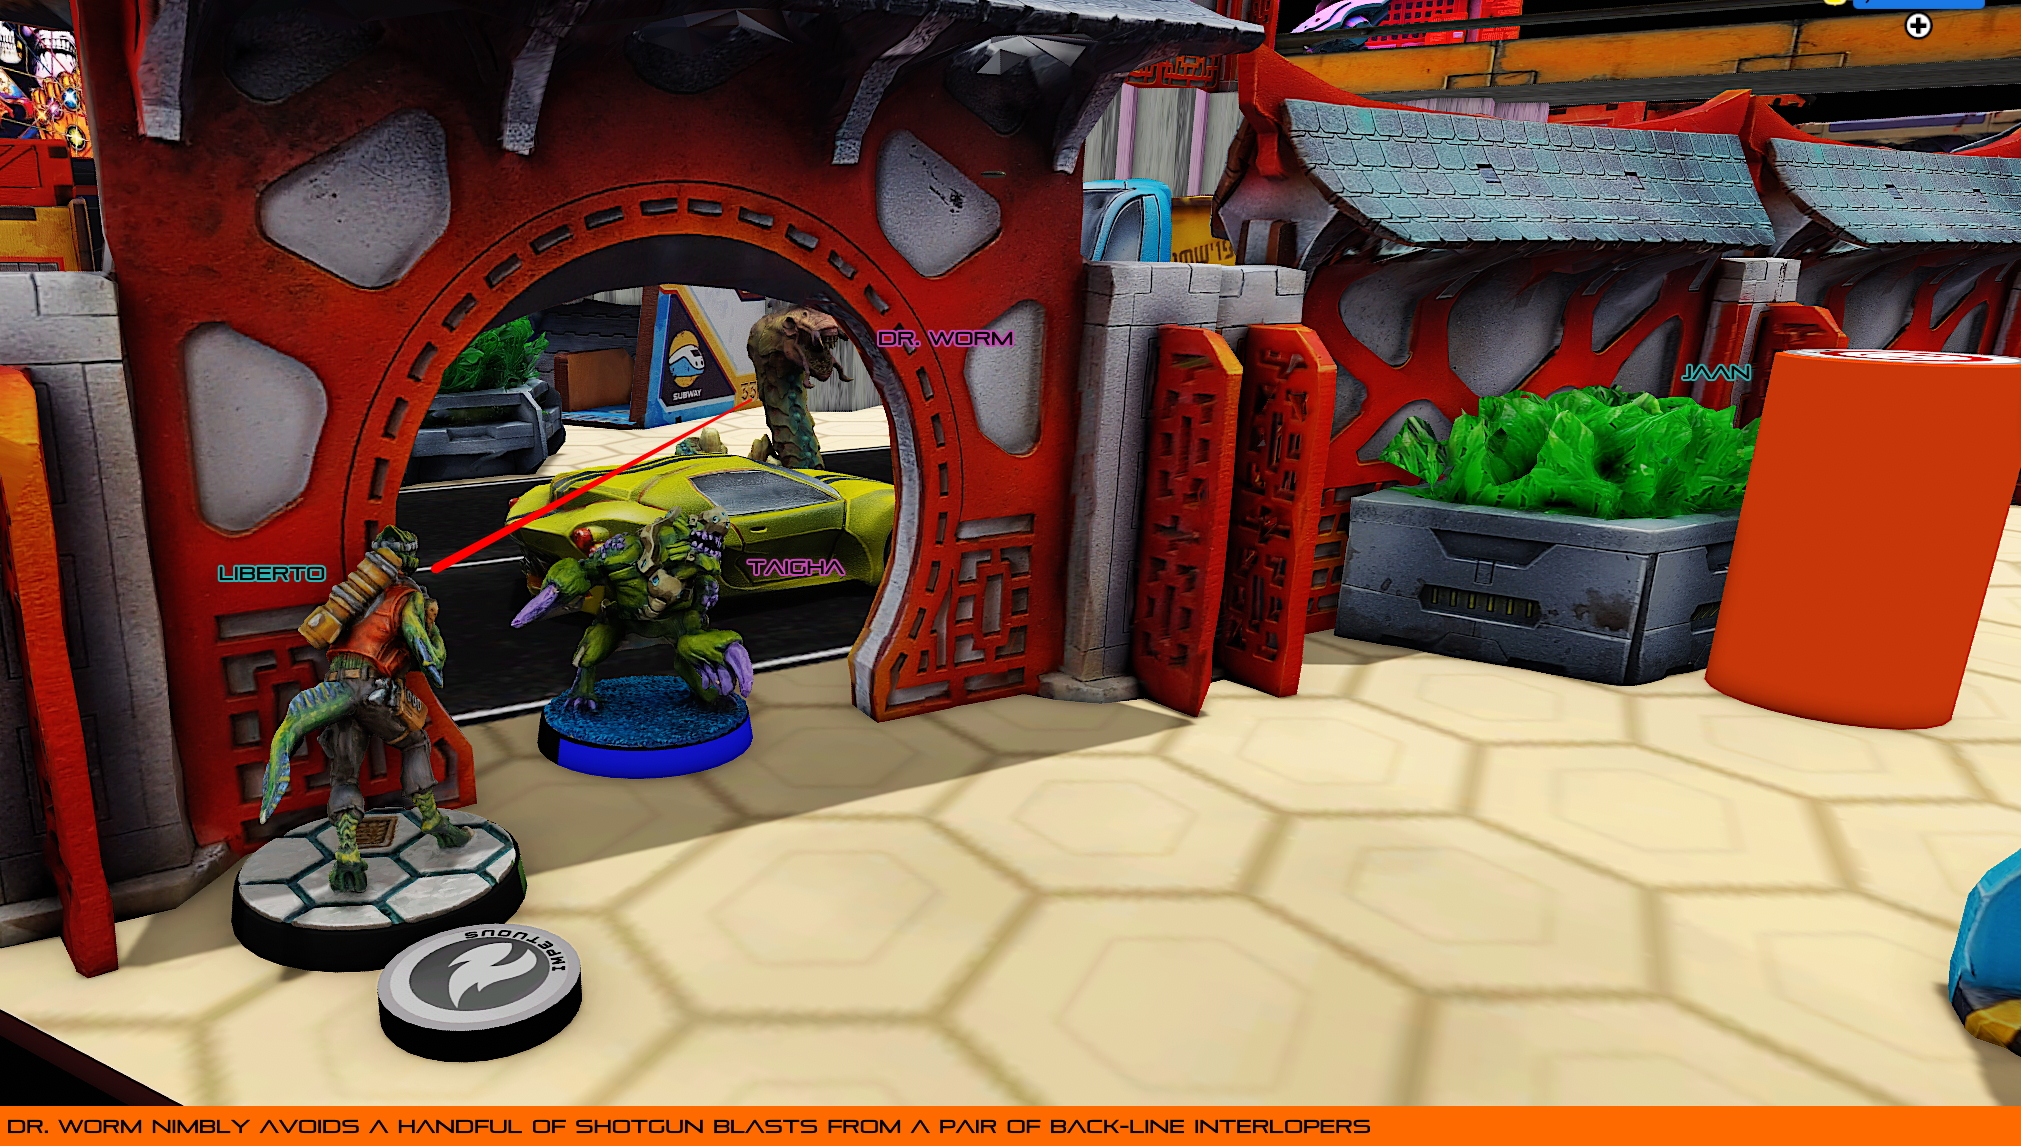
With the Avatar free to cause chaos in the midfield, I needed to remove orders. Moving Jaan up, I drew a line on an out-of-cover R-Drone and Dr. Worm. Both units Dodged, with the R-Drone failing to avoid the template and going unconscious. A nearby Taigha dodged toward Jaan, who fell back and spent an order to re-Impersonate.
The Liberto moved up the field, positioning near the back of Jummz' deployment zone to try and catch the Med Tech who managed another dodge, going prone behind a car. The Taigha advanced closer to the Liberto with it's own Dodge, putting itself between the fish-man and Dr. Worm.
With the final orders in group one remaining, I moved my Taqeul Spitfire Triad across my deployment zone pointing, them toward the Western Antenna and trying to keep them in cover but separate in the event that the Avatar decided to come down from the middle of the table and try to Sepsitor them.
Having only removed two orders, and needing to have done quite a bit more to impact the third round, I passed the turn to Jummz, desperately hoping that my 1:0 lead would be enough to keep the game in my hands.
The Igao is down, I repeat, the Igao is down! The Avatar is looking straight at us! If we're going to secure an Antenna, it has to be now! Push!
Firmly in control of an uncontested midfield, but out of Command Tokens, Jummz' used the Avatar's Strategos to move Victor Messer into group one, and slingshot the hacker up the hex-stairs and toward the Eastern Antenna. Spending another order, the hacker easily connected the Antenna for the Combined Army, potentially scoring 3 points for Jummz.
The Taigha that was protecting Dr. Worm spent an order killing the Liberto in CC, dying in turn to Jaan's shotgun blast.
Looking to secure the console and deny the advance of my Taqeul Spitfire's Triad, the Avatar re-positioned, moving across the midfield. Initially, I'd thought it was going to stop at the Tech Coffin, which would all but guarantee a Combined Army win, but Jummz kept moving to shore up the Western flank, and was able to draw a long line that could potentially catch my other Taqeul Triad if they weren't careful with movement.
On the way, the Avatar casually sprayed down Jaan, who had revealed to try and support the Liberto in dealing with the Taigha, killing the Impersonator and removing another order from my pool.
Without a lot of options left on the field, and lacking a large number of orders to get things done, I had to focus on the Antenna that Victor Messer was holding. I spent an order with the Makaul in my Taqeul Viral Combi Triad throwing Eclipse smoke to block an attack from the Avatar. After the game, checking line of sight, this was - critically - a wasted order. Normally, Jummz and I play that we can't shoot through doorways, only into and out of, but in the heat of the moment, it looked as though the Avatar would have had a line on the Triad as they moved out of my deployment zone.
The Makaul succeeded on one of its two throws and the Triad ran forward, making a b-line for a nearby ladder to try and gain control of the contested Antenna.
The Triad clambered up the ladder with the Makaul in the lead who threw another Eclipse smoke at top to contest a shot from Messer's MULTI Rifle. Thankfully, the Eclipse went down and kept the Makaul safe, as well as the rest of the Triad behind it. Charging across the bridge toward the Antenna, Messer was able to land a Spotlight on the Makaul who was still in the lead as it was obscured by Eclipse.
The Makaul ran full tilt out of the smoke and into the Combined Army hacker, engaging Messer in melee. Messer elected to Dodge and managed to reposition, evading the Makaul's Viral CC Weapon, staying in contact with the Antenna, and engaging the Sakiel Forward Observer who had managed to move into silhouette contact with it. Now engaged, the Sakiel wasn't able to reconnect the Antenna for Tohaa! The only chance now was to go for a tie by controlling the Antenna and killing Victor.
With burst 3 in CC, the Makaul swung again and rolled two hits and a crit, forcing seven saves from Messer, who failed most of them and died, knowing he had stalled the Tohaa advance enough to draw the match, with a final score of 2:2!

There were some really tough rolls for me in this one! The Avatar passing ten out of eleven saves, the Igao dying, and the Makaul missing Victor Messer at the end were really difficult to manage. Worse, having to spend one of my extremely limited orders on an unnecessarily Eclipse throw in my third turn was quite painful - that order could have been spent on a last-ditch effort from the Sakiel to connect the Antenna and end with a 4:2 win!
That said, I definitely misplayed a number of things. Not seeing the Sukeul's Missile shot in my first turn, despite being down to burst 1, could have been a huge swing. Furthermore, as I was moving Jaan up, there was an opportunity to shoot Jummz' Imetron, which would have removed two orders from his pool through the course of the game. Jaan also had no real need to reveal against the Taigha in the second turn - this would have saved me an order that may have been enough to flip the Antenna for the win.
All in all, this felt like a really tight game after the first turn, with my second and third turns being very tense. Definitely a fun one, despite some absolutely heartbreaking rolls!
We weren't able to complete the mission, but we also managed to hold out against the full force of the Combined Army. With the RavenEye being an unfolding battleground, Tohaa command fully expects to encounter additional Combined units and resistance. Despite our performance today, it's not a total wash. While Victor Messer was able to decrypt some of the PanOceanian intelligence, the data wasn't sent out thanks to the response of our Taquel's op's team. The data is currently in the hands of our bioengineers, and will be turned over once the situation on Concilium Prima stabilizes.
If it stabilizes...


Well done Brohaa! Keep the spirits up! Next time win – it was a tough game but you held courageously!
Cool report!
I like your list >:D
Great job, nice batrep!
Wooof B5 Avatar! Playing hard mode!
great report