Fought At Raveneye Bow Section: Comms Room
639 days 21 hours 26 minutes ago
Mo'rats mo'problems
300 POINTS>> “Everything was destroyed?” Black Hand Analyst Dieter Nakamura was incredulous.
>> “Wiped out.” There was no way to put any lipstick on it. The misadventure into the Cameliard Reliquary had been a complete and utter rout.
>> “Perhaps you’ll be more successful in a low gravity environment…” Nakamura mused as he transferred the next set of mission instructions. “There’s an asset of ours in the field, Dr. Archimedes Barbossa. An eccentric type, has ties to Equinox. Deeply interested in artificial intelligence. We lost contact with him after a raid by Military Orders at a facility in the Human Edge.”
>> Boris reviewed the briefing details. Looks like they’d be deploying to the Bow Section. “How’d he end up on Raveneye?”
>> “He’s a scamp,” Nakamura says with a twist of a grin. “Regardless, it’s not how he got here that interests us. It’s why. He’s been tinkering with something along the Morat beachhead on the station. I want you to take a team and recover it. Eliminate any copies the enemy might still possess. And destroy their servers for good measure, so they can’t recreate it.”
>> “What can we expect for resistance?”
>> “Only their best,” Nakamura concedes, “Make sure you get in and out before either PanOceania or O-12 can respond to the Morat incursion. And, Borya, this time try not to get everyone killed.”
>> Boris nodded grimly. He’d try. But he couldn’t guarantee. As he left the briefing room he queued up another team.
>> “Interventor Kaczka, prepare your team to infiltrate the Comms Room.”
Mission: Mindwipe
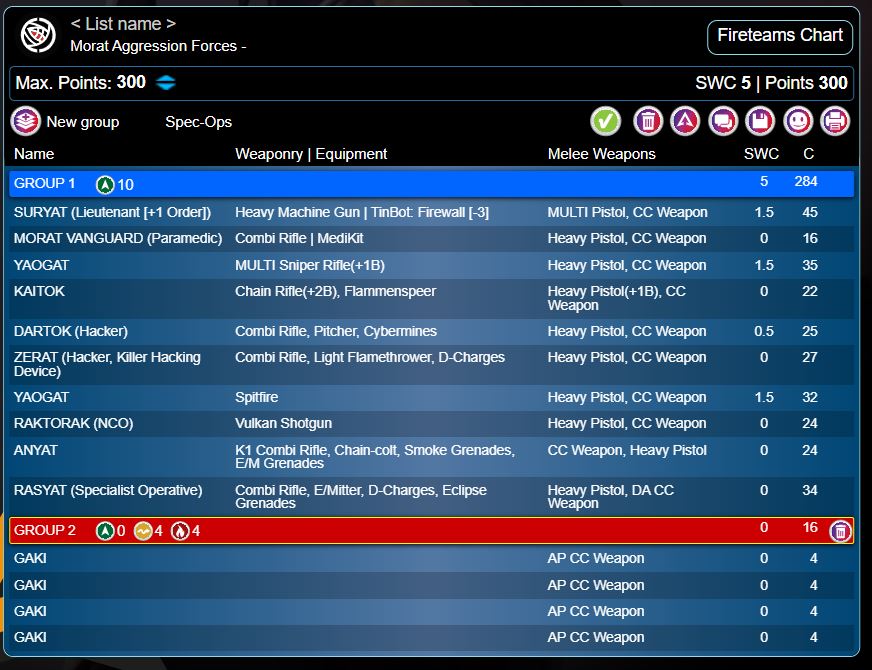
Forces Jurisdictional Command of Tunguska versus Morat Aggression Force (300)
Deploy First: Tunguska
First Turn: Tunguska
My opponent here is redbranch who has some beautifully painted Morats, a mix of the old sculpts and the new action pack. From his display stand I scope most of his models, especially the Raicho, the Rasyat, and the Gakis. I don't know a ton about Morats but I know the little explosive bastards are probably the highest impact devastation for cost. The Rasyat also got Van Zanted which is going to inform how I deploy, since my backline is soft with the Securitate core.
I win the roll and having just suffered a pretty devastating alpha strike in the previous game decide to go first, so I will be deploying first. We cut classifieds and I get experimental drugs which feels achievable. unlike looting and sabotaging, I feel like I have a solid plan here. First turn is to use the Grenzer to remove threats and especially the explosive gakis. Then push up with the haris, activate the console to score a point, and make moves towards the server. The Hollow Man hacker will be my uberhacker, so if I need to push him out of the link to get forward or use his special program, I feel like it's a solid option. Moving 6-2 with super jump gives the hollow men lots of options to get where they need to go, and two wounds/second level unconcious with Perseus having ODD and NWI makes them feel durable to push up into the opponent DZ. Only weakness is their low phys and lack of CC options, making those gakis a real problem. But as long as I can catch the hungries from a distance, I think things stand in my favor.
I put together redbranch's list from memory and I think I got it about 90%. At least the points work out. Suryat Lt. + NCO on the Raktorak means some pretty serious order efficiency, and if the gakis get to use their impetuous that's up to 20 orders on the list. Now, no one ever really gets to use a full list worth of orders. If you go first, you're almost certainly docked two orders. If you go second, something dies and isn't there for the order count phase. The Rasyat starts off board and won't generate an order till it's deployed. And the irregular/impetuous orders can only really be spent on the units that need a positional advantage to make use of them. So, it's not really 20 orders, but it can be a heck of a lot to get work done, especially with a haris and core bringing extra efficiency to expenditure.
Remember how I said I took some of Lobo's advice? This is where I do and don't take it. I do put that Grenzer up first turn to deal with whatever gets thrown at me. Having him overwatching one of the consoles means I can deploy the haris on the other side to activate the remaining one, meaning whatever redbranch wants to use will have to face BS 14/17 MSV1 ignoring cover on burst 2. Even if he dies, he will pull off orders going down that will make it harder to do just about anything else. I don't quite realize how many orders are on the other side at this point, but it's more than enough. Backing up this overwatch is my killer hacker Heckler in camo close to the server, allowing me to trinity a hacker if they try to activate it.
Where I don't take advice, or really the lesson, is deployement and facing. My interventor is on a roof, only partially obscured by a flower box. Meaning the Yaogat MSR that will counter deploy will get a free shot on him when the Grenzer activates. I also do weird facing with Fiddler, the Warcor, and Motorized Bounty Hunter in case he walks a Rasyat on. While this time I do actually need something facing the back line, I underestimate the threat coming from the front and leave some pieces exposed that I shouldn't have.
As I mentioned, he counter deploys with his Yaogat MSR and a Vanguard Paramedic that I can see off the bat, as well as a few gakis. The rest of his core team (Suryat, Kaitok hacker, and Dartok double chain rifle) are in full cover. His haris lead by the Suryat spitfire backed up by the Raktorak vulkan shotgun and Anyat deploy on my right side at the edge of their deployment zone, ready to push up on his active turn but otherwise obscured from view. The Zerat KHD infiltrates to a safe place.
Hollow Man hacker is my Uberhacker. Zerat KHD is the opposing Uberhacker. The MBH rolls up an HMG, which I gladly hold on to.
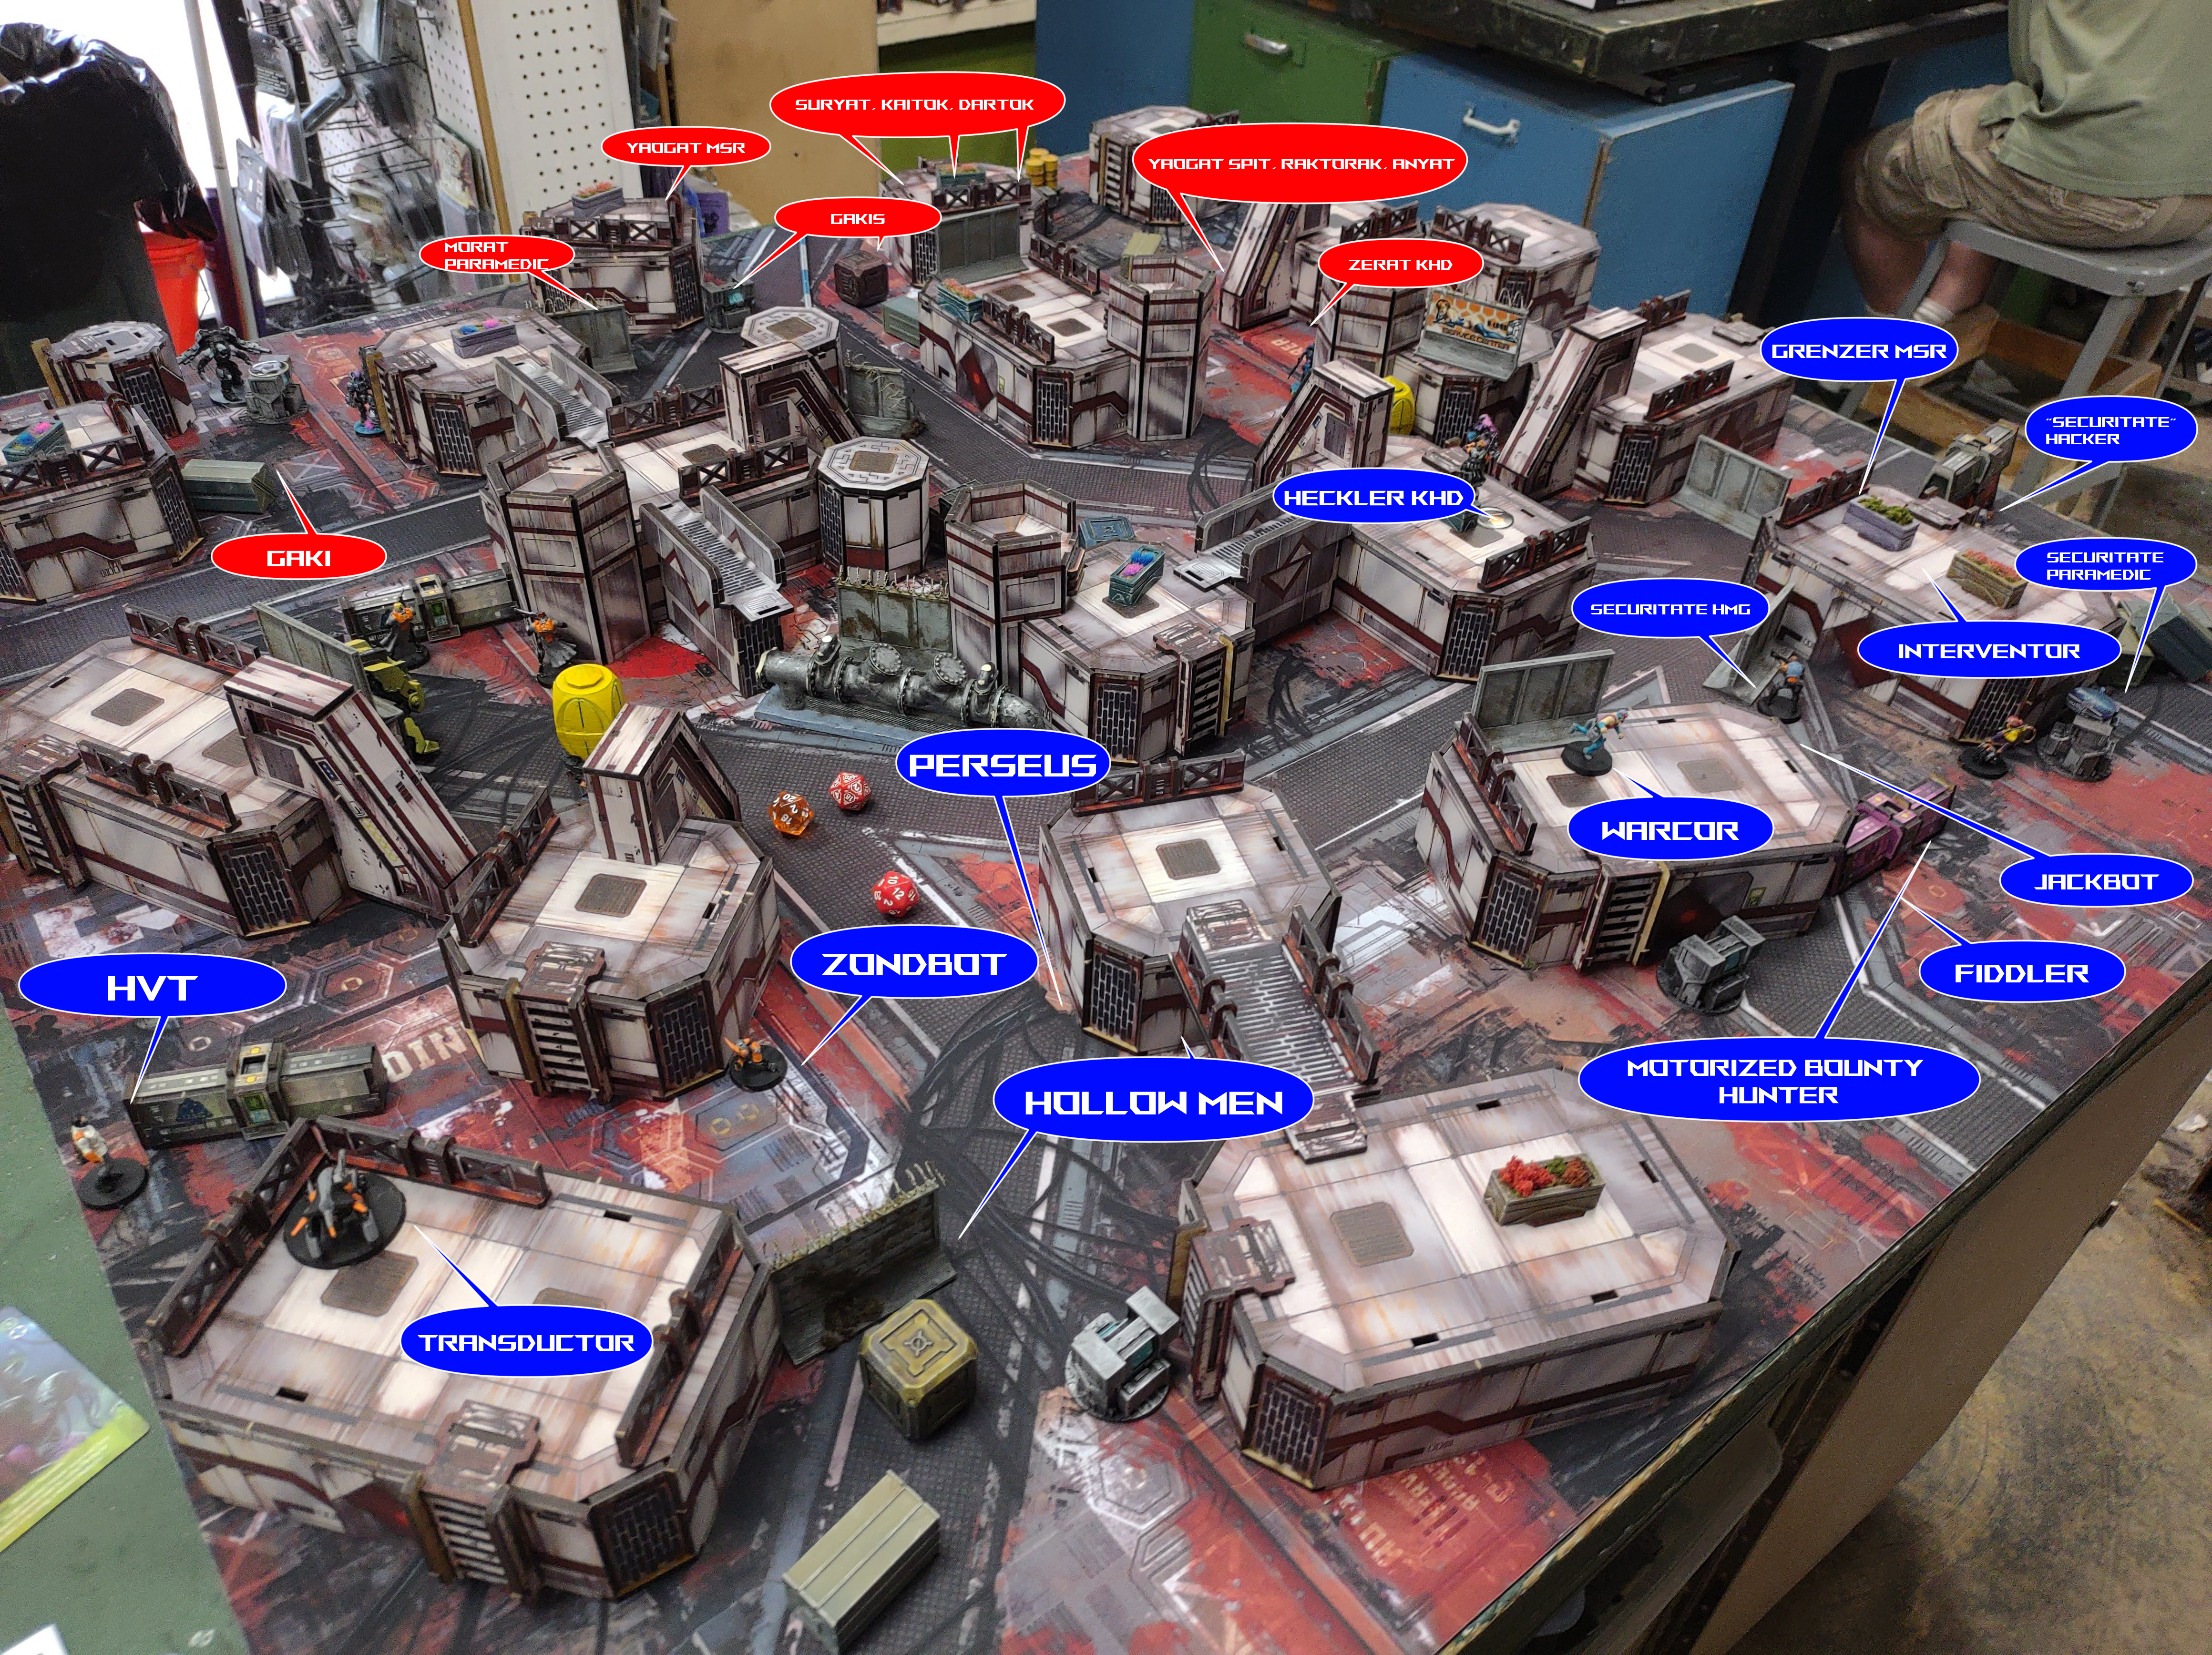
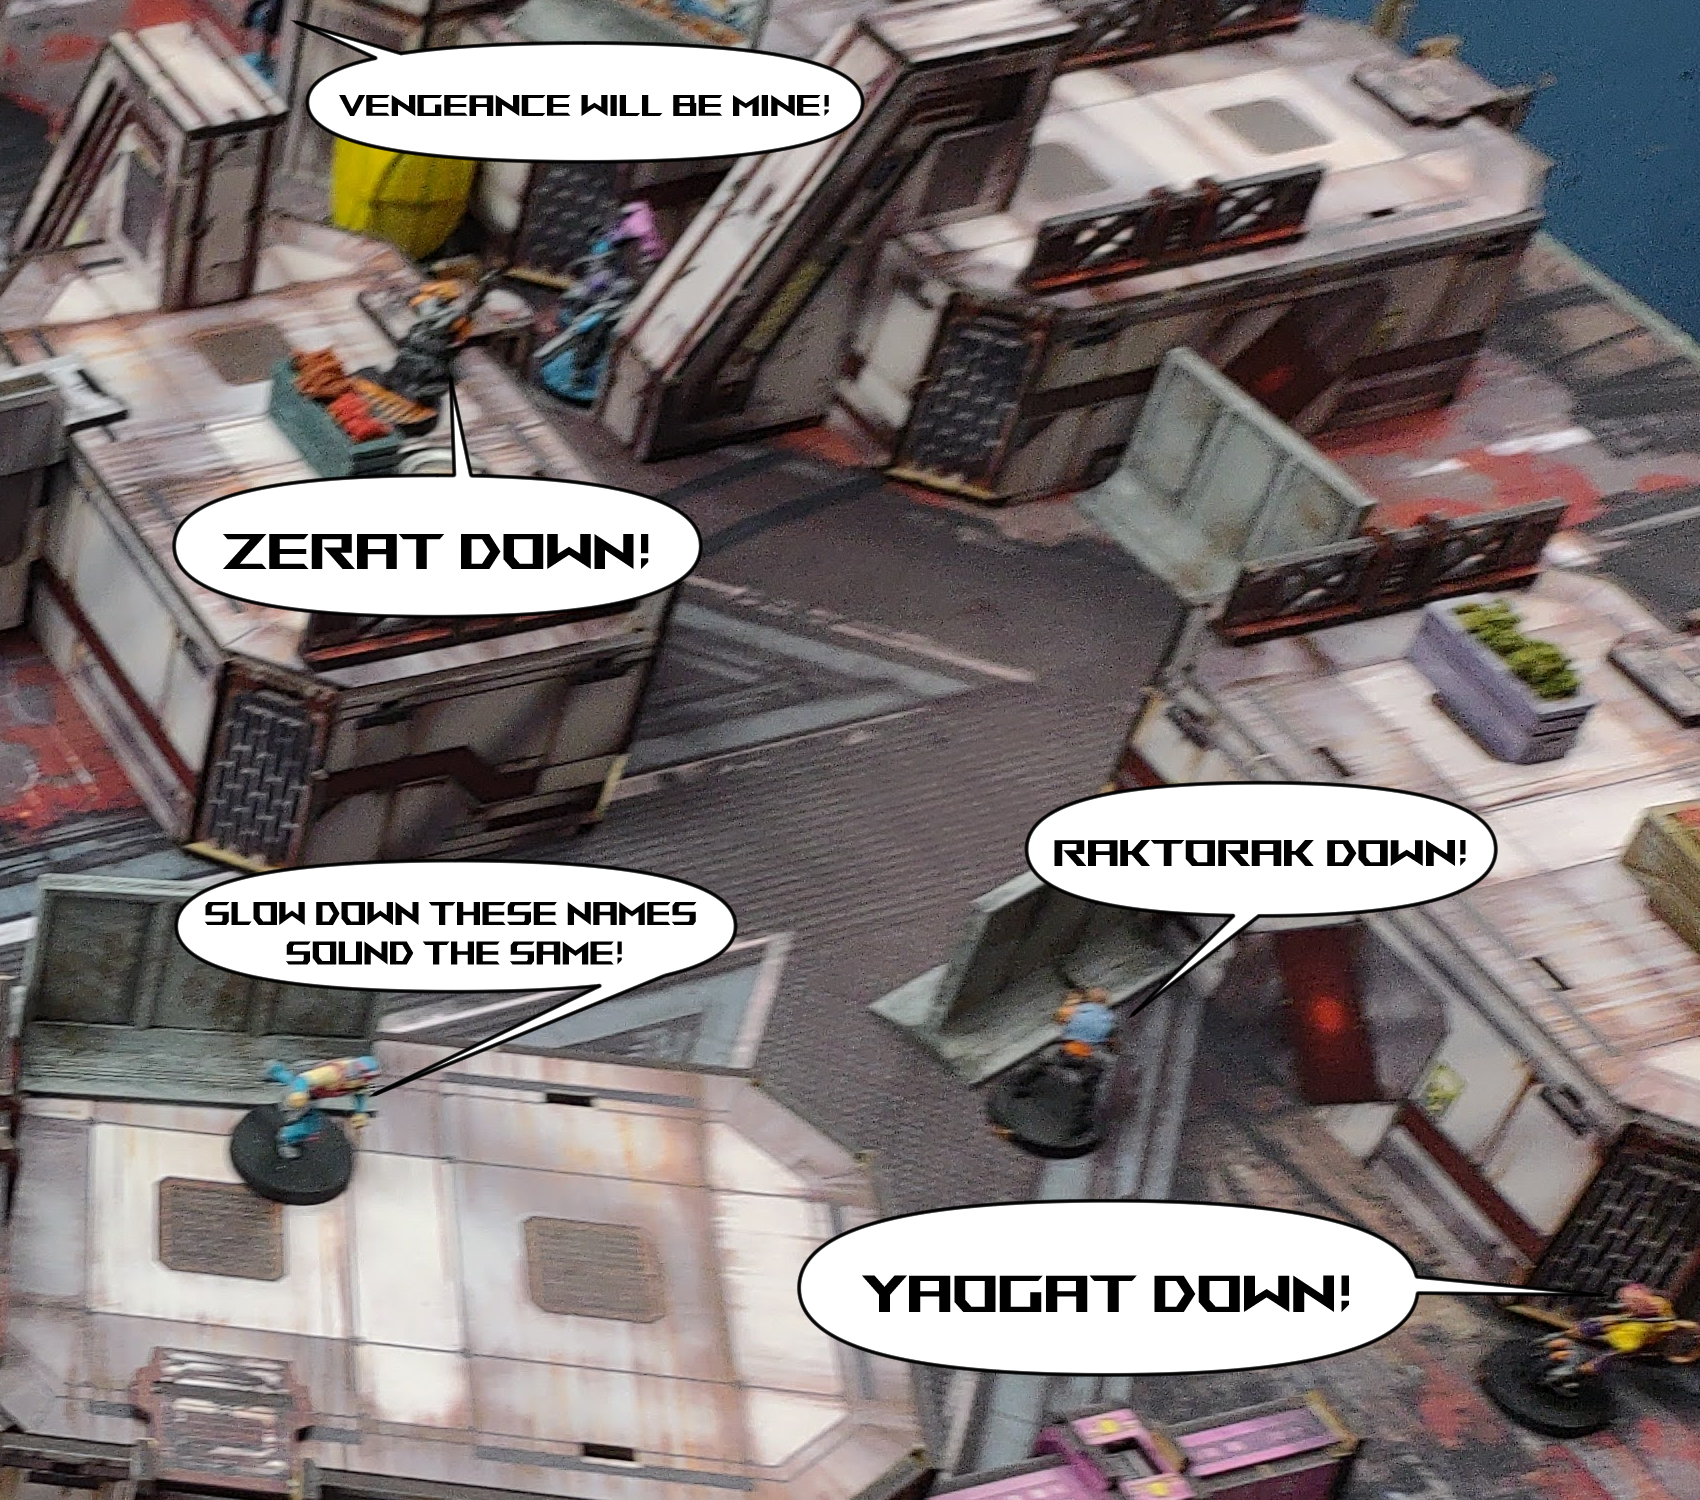
I believe redbranch docks my order pool with a command token. So I activate the Grenzer first to take down that Yaogat and redbranch informs me that he has line of sight to the Interventor. So, first order of first turn, I'm sure I'm going into LoL for Turn 2. I probably should have opted to activate the MBH first and tried to clear the Yaogat with the HMG at B4, but I had committed to the Grenzer first and decided to just pull the trigger. The Yaogat splits the burst at DA, hits the Interventor who fails both rolls and goes straight to dead. The Grenzer wins his face to face and pastes the Yaogat in revenge. He then moves to the side and clears the Morat Paramedic on B3 and if recall is also able to clear a gaki. He then stays up to weather the inevitable counter strike.
On my left hand side, I start pushing up with the Hollow Man haris. The uberhacking Hollow Man does uber things and activates the console for the first point. This will not be a shut out. Nice. I roll a 20 on the Mindwipe table and pick the server farthest from the rest of his army and closest to my haris for the enemy AI. Double nice. The team then pushes forward with the Hollow Man spitfire clearing another gaki.
Lastly, I move a few things around. Fiddler moves up with her back to the enemy DZ to get cover against the Rasyat. Big mistake. Her jackbot moves up to cover the console from the corner. Probably also a mistake. Would have been better to run it at the haris, I think, maybe used climbing plus to get a weird angle or just drop two templates and hoped for the best with continuous damage. But ending up where it did was not so much a mistake as a wasted opportunity to get value from it. But all in all, I scored the first point, I'm positioned to pounce on server. And though it will be loss of lieutenant, I have the command tokens to take it down.
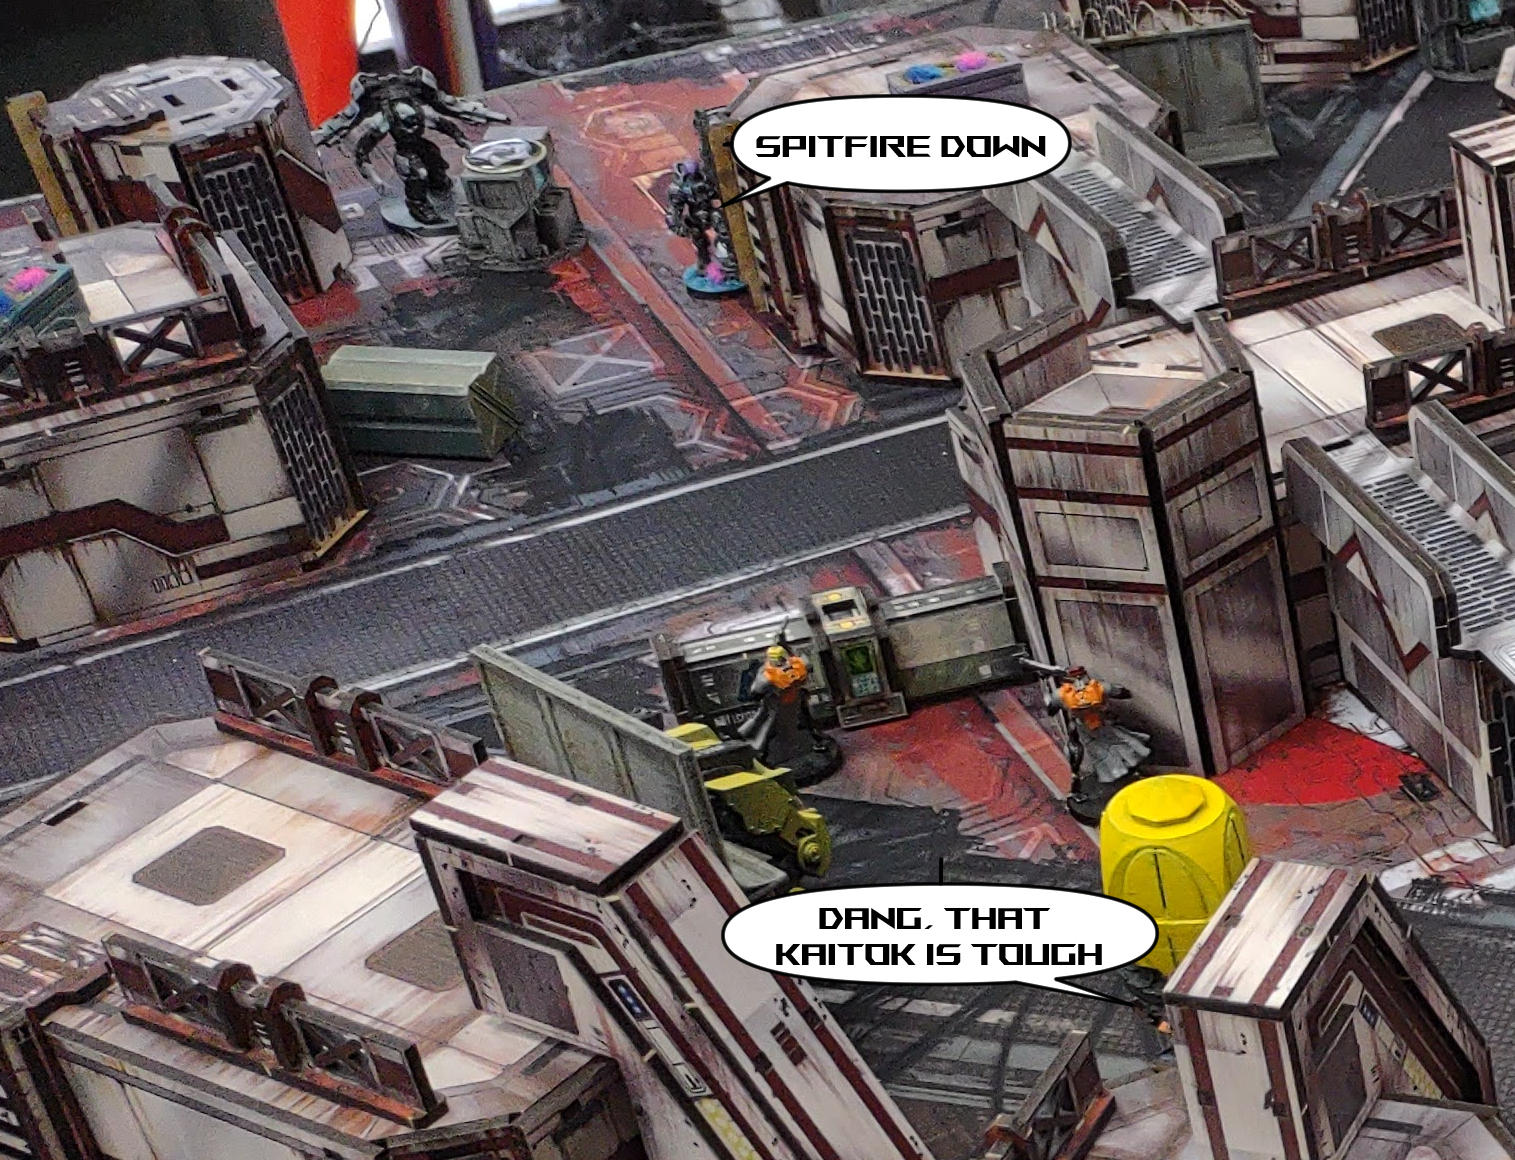
A third gaki moves up to clear my jackbot. They live. They laugh. They love as it berserks in to my template and they both explode in a glorious mess of alien viscera and advanced circuitry. With the jackbot cleared, the Yaogat spitfire haris moves up and pastes the Grenzer. Then, using the Raktorak's NCO, it moves up to get LoF on Fiddler and with another order on the Yaogat, she goes down to a single wound (I forgot NWI, but that's probably for the best). Then the Zerat moves up to activate the console, which reveals the server opposite the haris as my AI. Close but also my most heavily guarded portion of the board. He then takes on the MBH and I probably threw it away shooting on one burst instead of dodging. Now within striking distance of my server and with my ARO pieces cleared, he opts to move the rest of his core team towards their server to prevent my Hollow Men from completing the objective.
lol LoL again. well, at least I had some recent pracice with this. First thing I do is slice the pie with the Securitate HMG and kill the Raktorak who can't respond with its shotgun from that distance. This pulls off the burst bonus on the Yaogat. Next, my paramedic heals Fiddler. Actually stands her back up with facing towards the spitfire. I also score experimental drugs. I decide to move her into real cover with a converted irregular from group 2 and on the way out hit the Yaogat with the contender. The single burst ARO means my shot gets through and knocks him unconscious. I then move my Heckler up with his irregular and trinity the Zerat, who goes down.
On the left hand side, I try to get the Hollow Men moving but end up losing a wound to the Suryat on the spitfire with the now broken team. The hacker moves up prone so that it can make a turn 3 rush at the server when I have regular orders to fuel it. Perseus tries to breaker combi down the Dartok but fails.
All in all, not the worst LoL turn that could be had. Pretty effective, all things considered. And while I was decently set up for turn three, I can't help but feel that had I actually preserved my lieutenant, I could have won or forced a tie in the game here.
Anyat decides to get revenge by killing the Heckler and moving into suppression just outside my deployment zone, hoping to set up a spot for the Rasyat to walk on. Most orders are spent trying and succeeding to take down my Hollow Man spitfire. Out of the link it loses the burst bonus and because of religious I can't get it to fail guts and go prone. The link moves to get multiple lines of sight on the sprint by my Uberhacking Hollowman. Perseus still can't land a wound on the Dartok but gets smoke down to keep from dying so he's otherwise protected for valuable duty in turn 3. While my position isn't seriously wounded by the loss of the Heckler, lack of command tokens and loss of the Hollowman spitfire means my tools for a run on the server or significantly reduced.
My remaining orders are split weirdly and I don't have enough command tokens to do what I need to do to consolidate the groups. Using a Brevet Lieutenant order, my "Securitate hacker" peeks out to see Anyat, who at first decides to suppress but then dodges when a wild Sforza appears. Sforza then peeks out again and drops back from cover but otherwise obscured from her lines of fire. When she dodges again he heavy pistols her to death.
With the rest of group one orders, it's just a mad dash to the server. Perseus tries to lay down smoke and the Suryat dodges expecting to be shot. When the smoke fails at good range and Perseus tries again, he just dies. The Hollow Man hacker just yolos forward six inches, and dodges the incoming shots. The Dartok tries to lay an Oblivion but the Hollow Man tanks the save. With the last order for group 1, he super jumps to the building on top of the server and takes all the shots to use the special hacking program to wipe the server, only to fail his WIP roll and die in a hail of bullets.
Group two orders are used to move Fiddler into place and put drop bears around the server. We all know what's coming.
It's Rasyat time. It drops just out of sight and attempts to take on Sforza, forgetting he has a nanopulser and has to dodge away from him. He then tries to come around the other side, laying smoke as Sforza tries to dodge into CC to prevent him from getting to the server. However Sforza fails and the smoke succeeds, allowing the Rasyat to stealth within range of the server. He jumps in with his D Charges, taking hits from the drop bears and dying. But with his dying breath he plants the D Charges. I roll my saves and fail two, meaning the server is destroyed. With his last orders, he moves his Suryat up to secure HVT instead of his classified, leading to a 2-9 Morats victory.
Well, first off I've never had so much fun in defeat. Though the score line is lopsided it doesn't show how close the game was. Each turn three came down to final dice and one missed dodge, successful WIP check, or tanked save would have made a significant difference in outcome. Had I made at least one more armor save on the server, it would have been a 5-2 victory for Tunguska. The way it ended felt a lot like the Uruk-hai at Helm's Deep running in with the torch. Sure, it was gonna die, but what a way to go out, taking the enemy with you. Very cinematic.
But dice are dice. Everytime redbranch dodged, it seemed he failed and I killed a piece. Every time he needed a ten, he crit. I must have been on the wrong end of four or five crit rolls. But them's the breaks. There were times when my luck was good and times where it was bad.
That's not to say it was all bad luck that broke my game. Again, I really misplayed my deployment. The Grenzer did what it was supposed to do if only for a turn. But having my back to the enemy DZ and being prone on roofs is not all that safe. I'm pretty sure that if I still had an Lt. in turn 2, I could have destroyed the enemy AI and maybe a second server. Of course, redbranch also would have made vastly different positions and maybe denied me on his half of the board, but if we're playing the game in his half that's still really good for me.
I wish I had also been more conservative with my bounty hunter HMG. An HMG on an 8-6 platform could have been devastating late game and just because she was only 8 pts was no reason to throw her away at the Yaogat spitfire. I also could have spent my command tokens differently in LoL. It was pretty productive, but I felt the burn of not having them in turn 3 to coordinate or do anything different. All in all though, great fun was had. Mindwipe is a really fun mission. Can't wait to play it again.
>> "Alright, pull back. We have responders from PanOceania incoming and we don't want to be here when they come in." Boris called over the comms.
>> "Sir, we have the server in sight. We could shift our forces in and try to secure the copy of the AI project Barbossa was working on."
>> "It's too late. We're out of time. At least we know that the new serum works. We'll feed that data back to command. We lost the day here, but what we learned might save lives." It was a good face to put on another sour defeat. Barbossa's project was out there in the wild, and another team might be able to recover it. However, the doctor was now in Morat hands. If he was lucky, he would be learing to say "Sumi Na Rat, WaKa Ni Wori BiTeK. WaKaU Komorat," to extend the rest of his pitiful existence. More likely, however, he was in for a painful debrief by Evolved Intelligence pneumarchs looking for ways to break Arachne, or maybe even enhance their own enigmatic goals. Nakamra would be pissed. Not only was his pet project lost, but it was going to be a hell of a lot harder to try and get it back.
Battle Report Author

Army Lists Used In This Battle
Recommend Commander For Commendation
Share this battle with friends
redbranchWins
